
Nuke – Advanced VFX… Unit
This page contains all the Nuke workshop materials and tasks from the Advanced and Experimental VFX Animation and Techniques unit.
1. Green Screen Workshops
4th May
My notes from the theoretical part of the lesson.
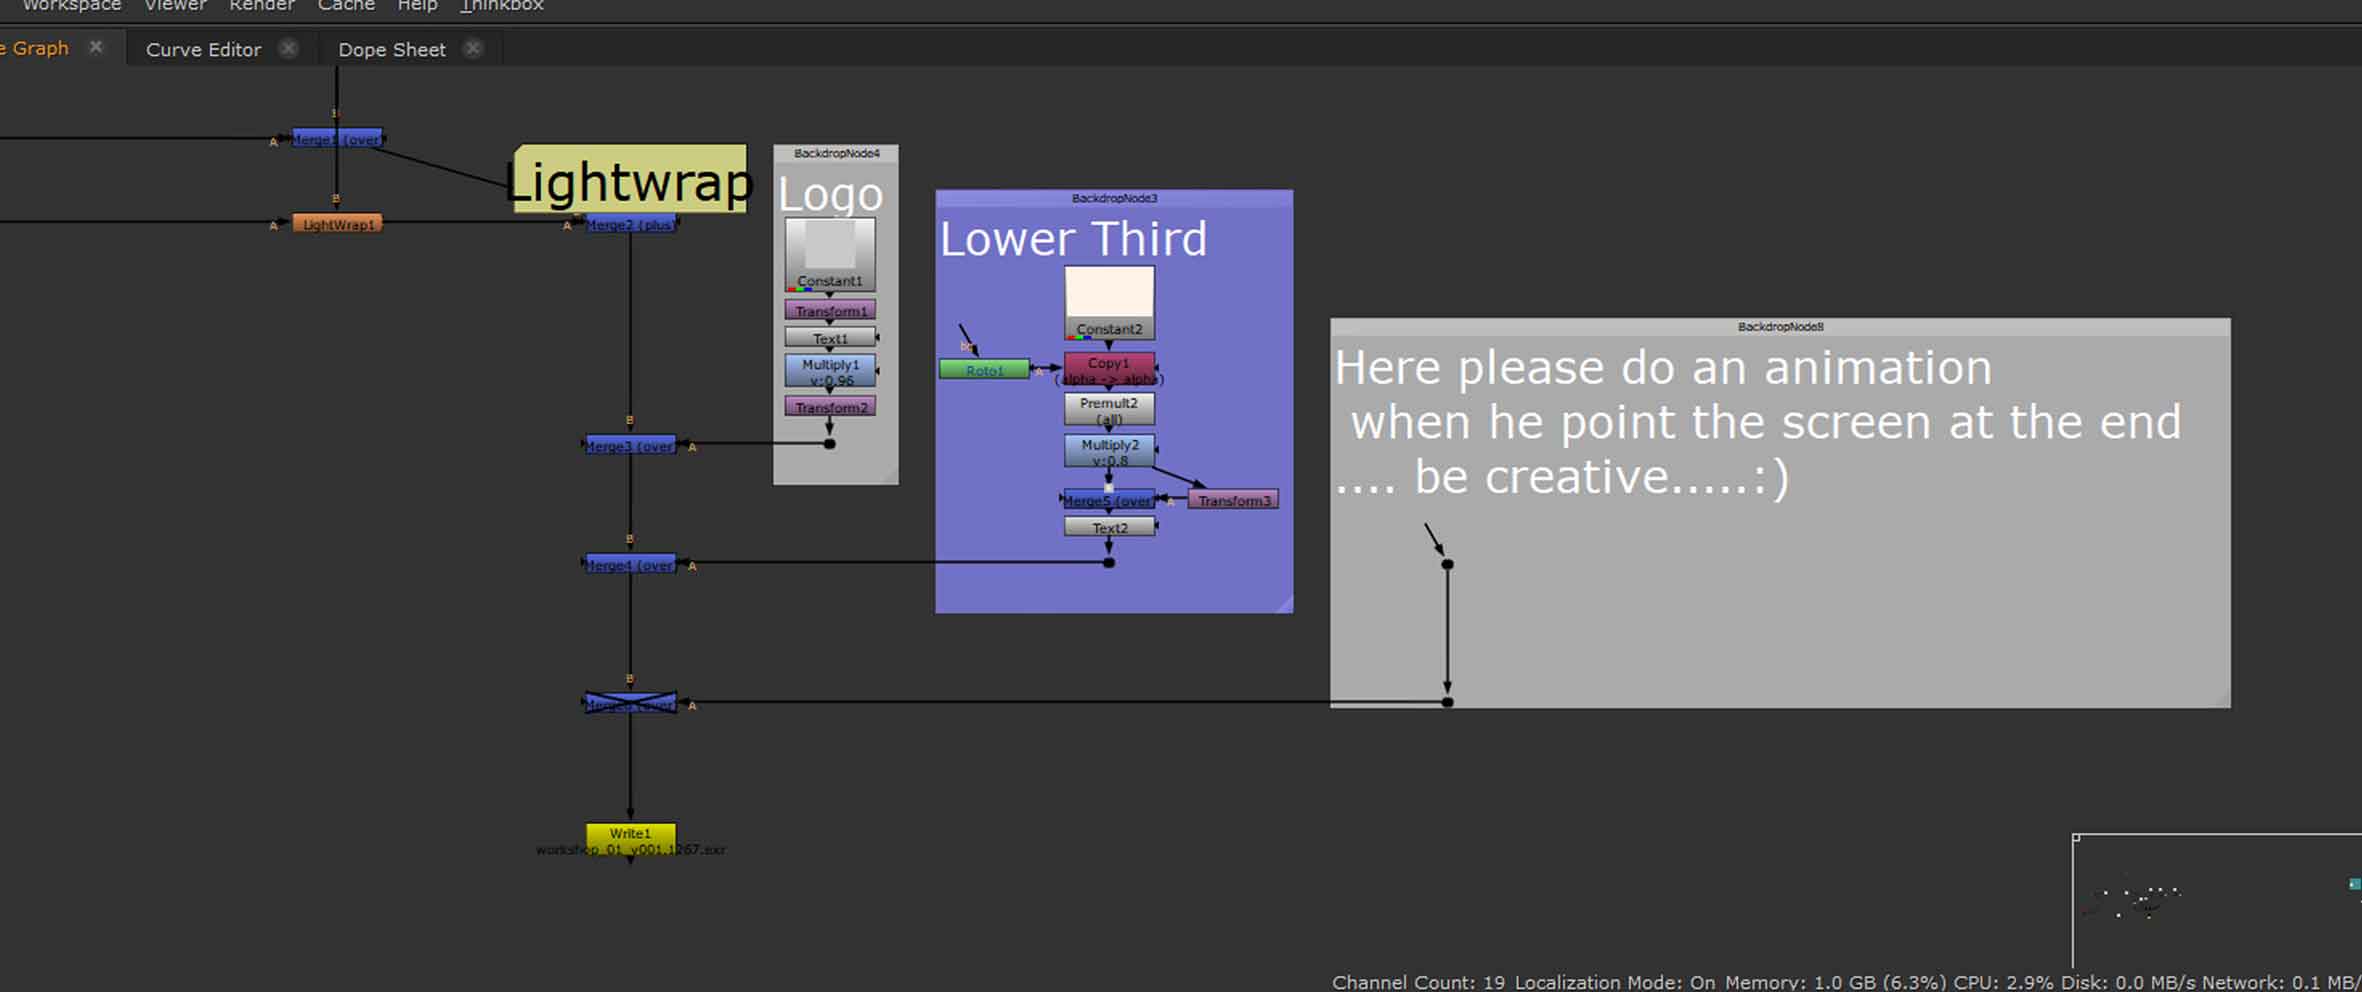
The task
The task was to remove the green screen and place the actor in a different environment as well as add some creative animation to make the video look purposeful (like the actor is pointing to something).
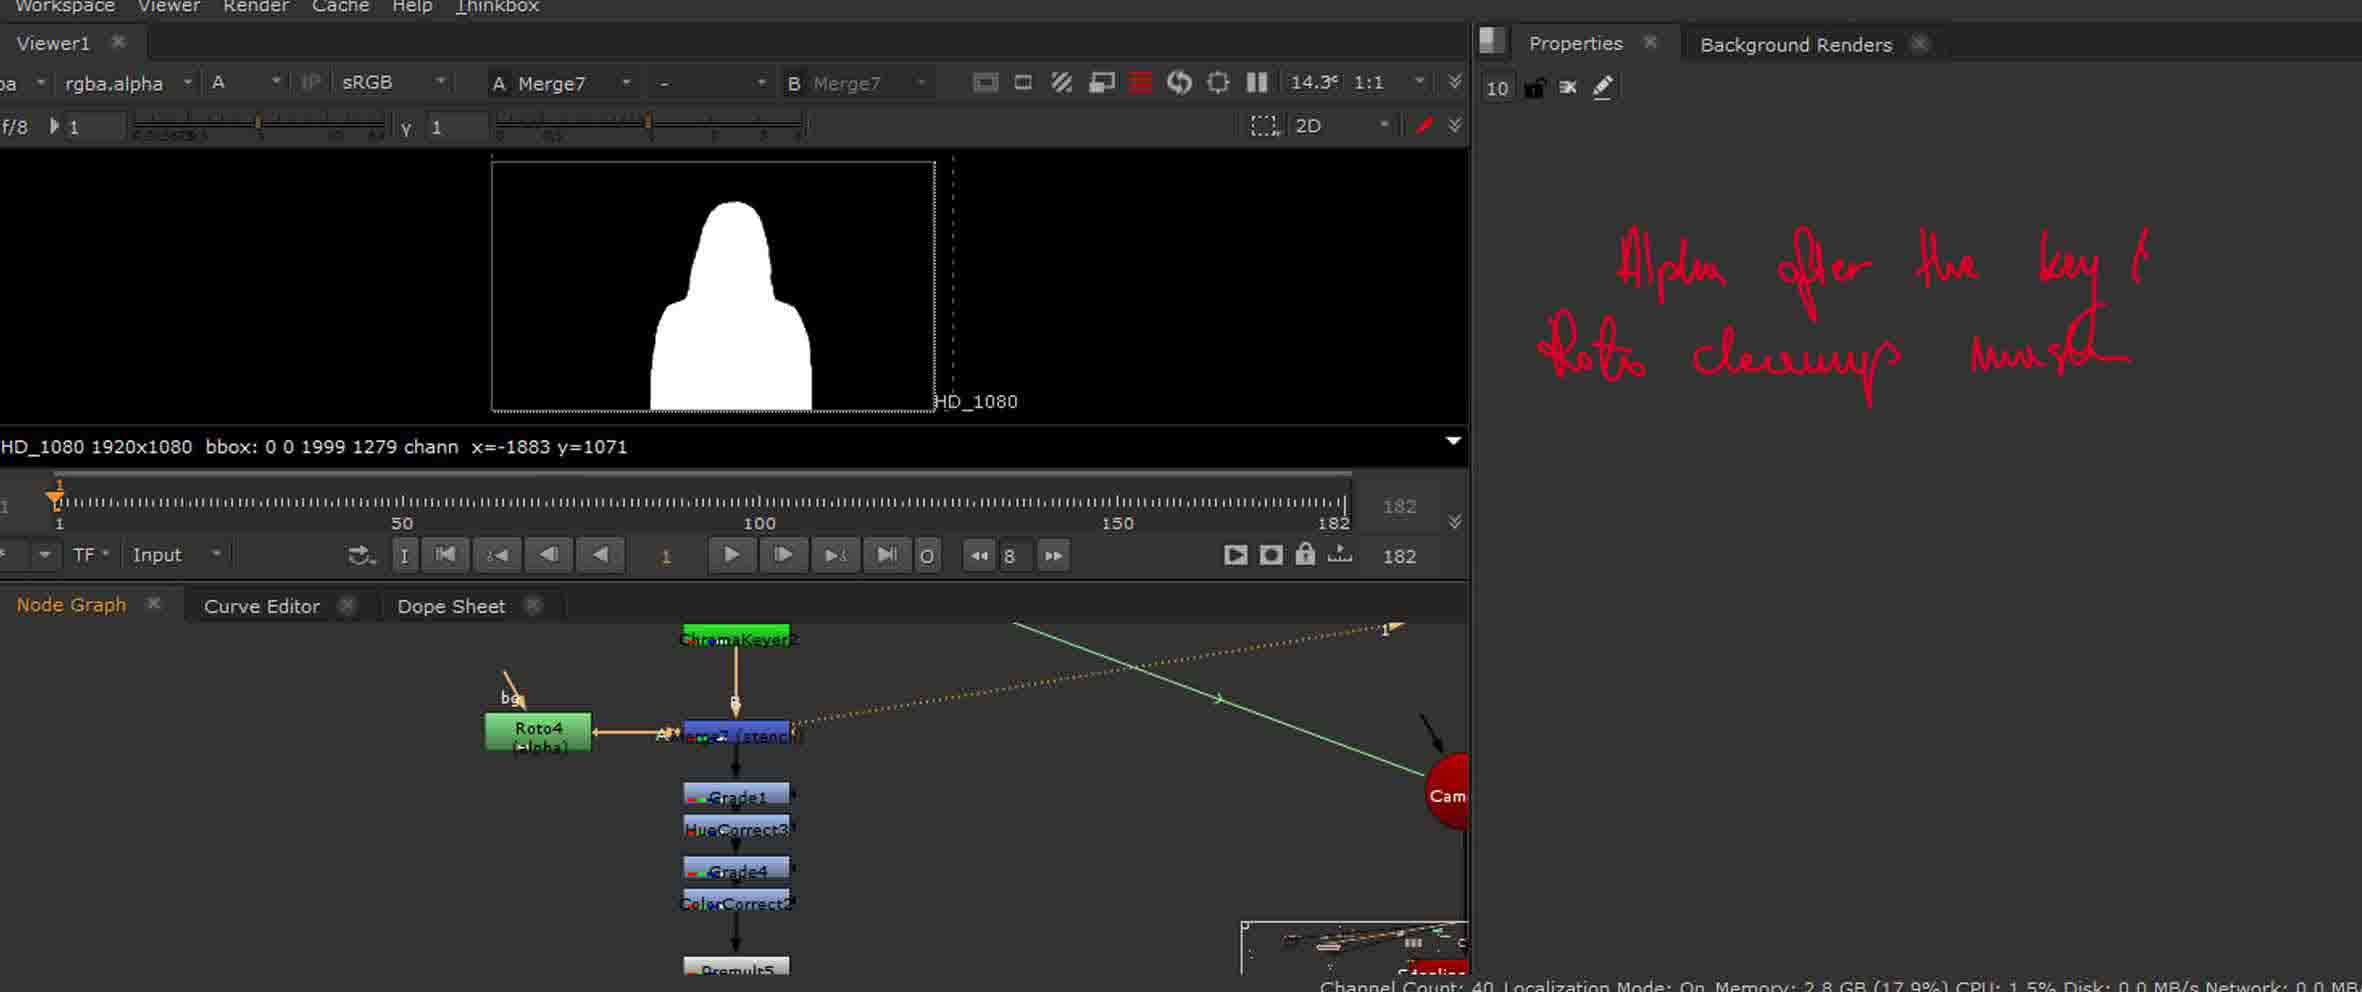
I have started the task with the removal of the green screen and making sure the alpha is nice, clean and ready to be worked with in the future. At this stage I didn’t yet decide which footage I will be working with (or both) so this step was done on both (giving me some extra practice).
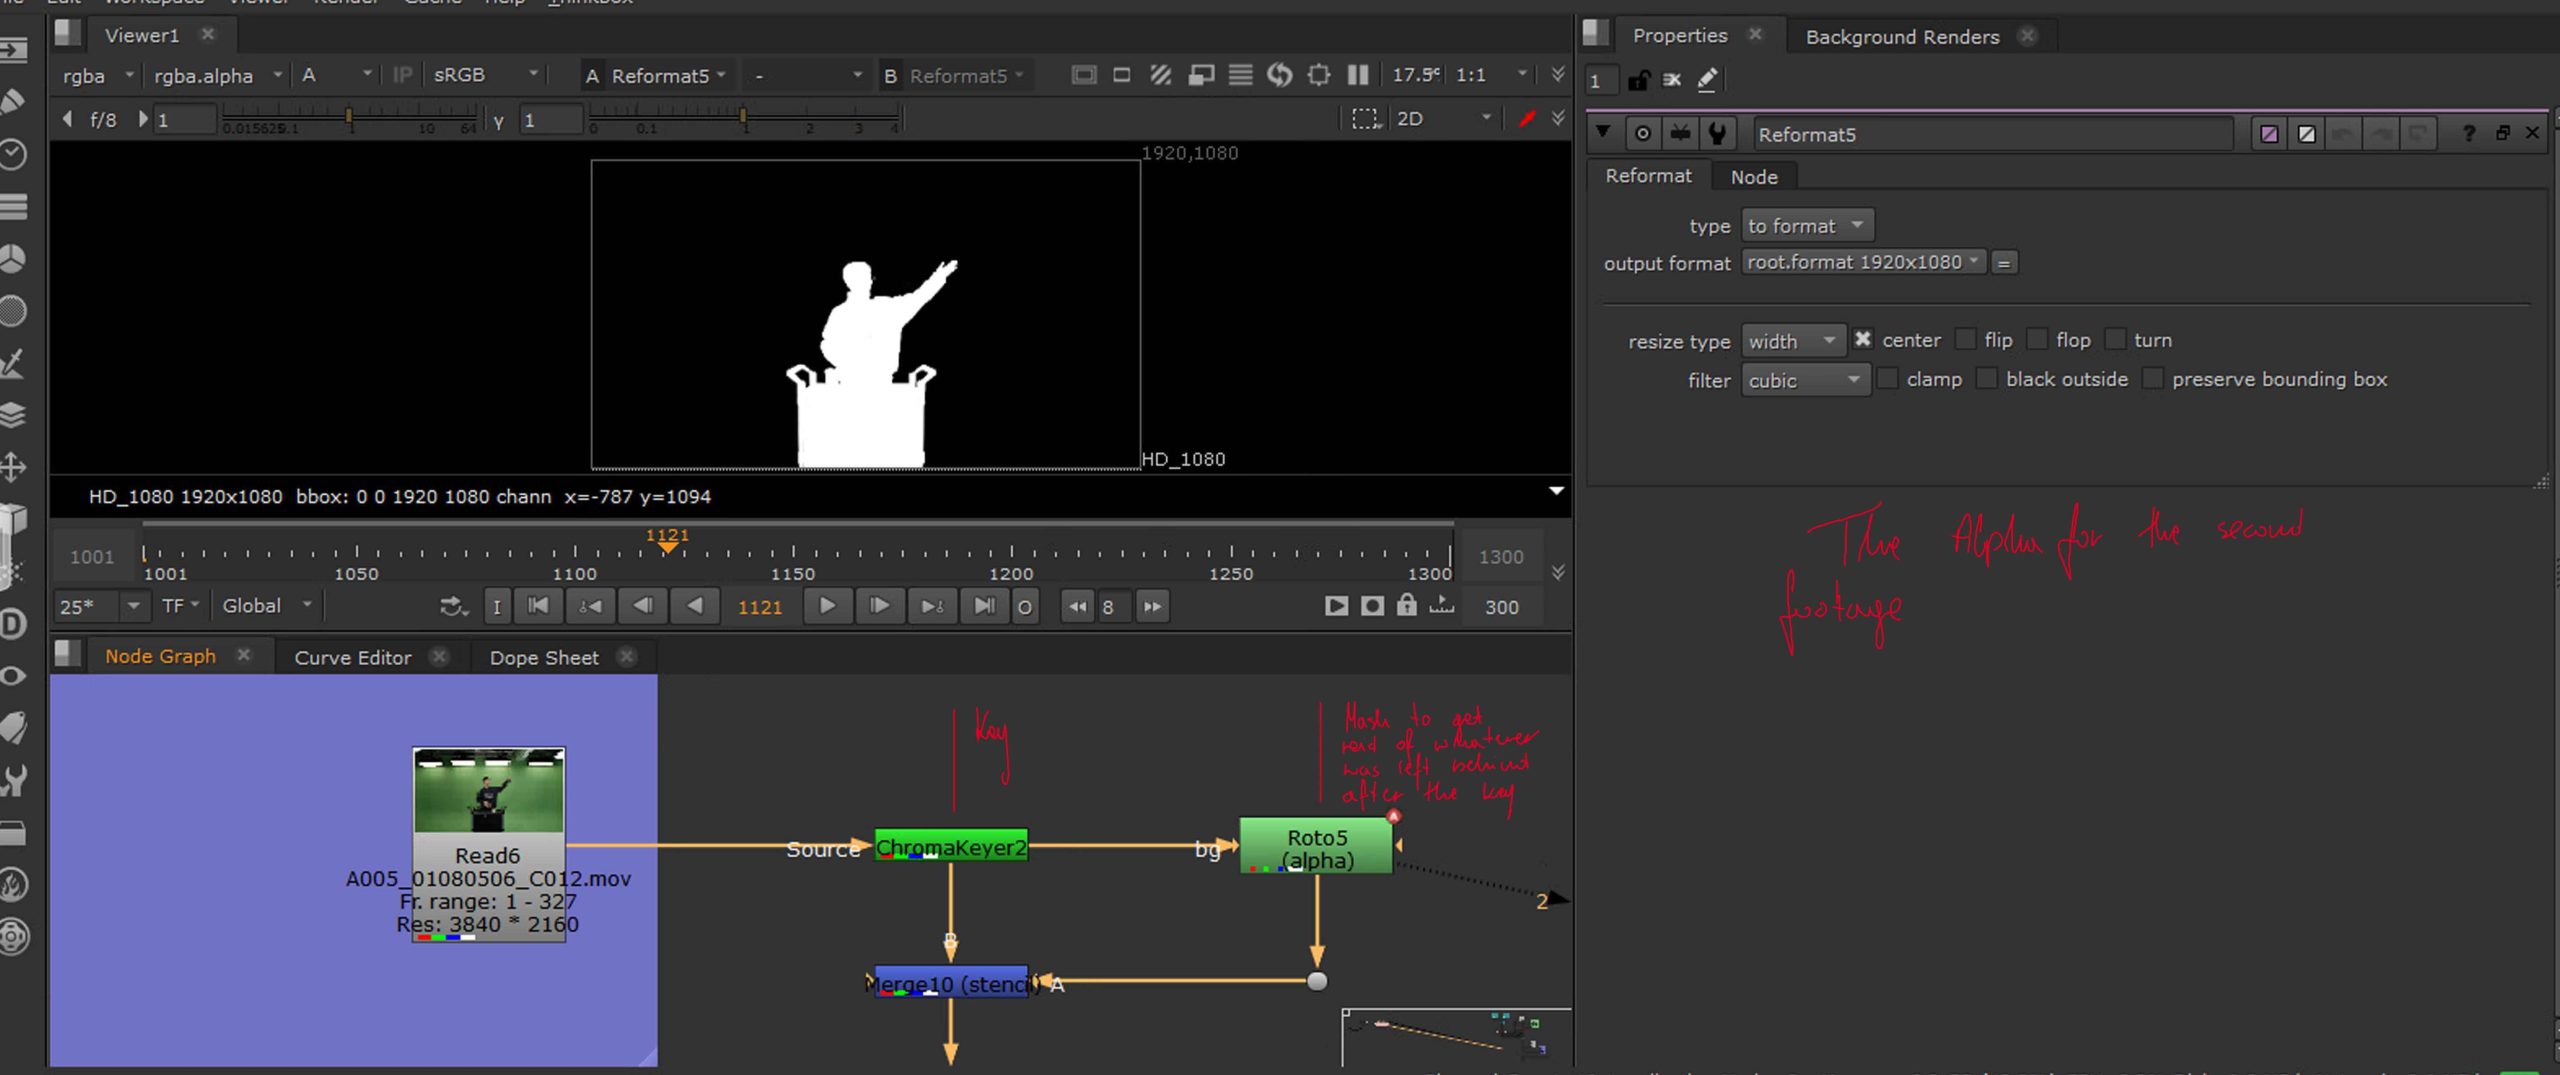

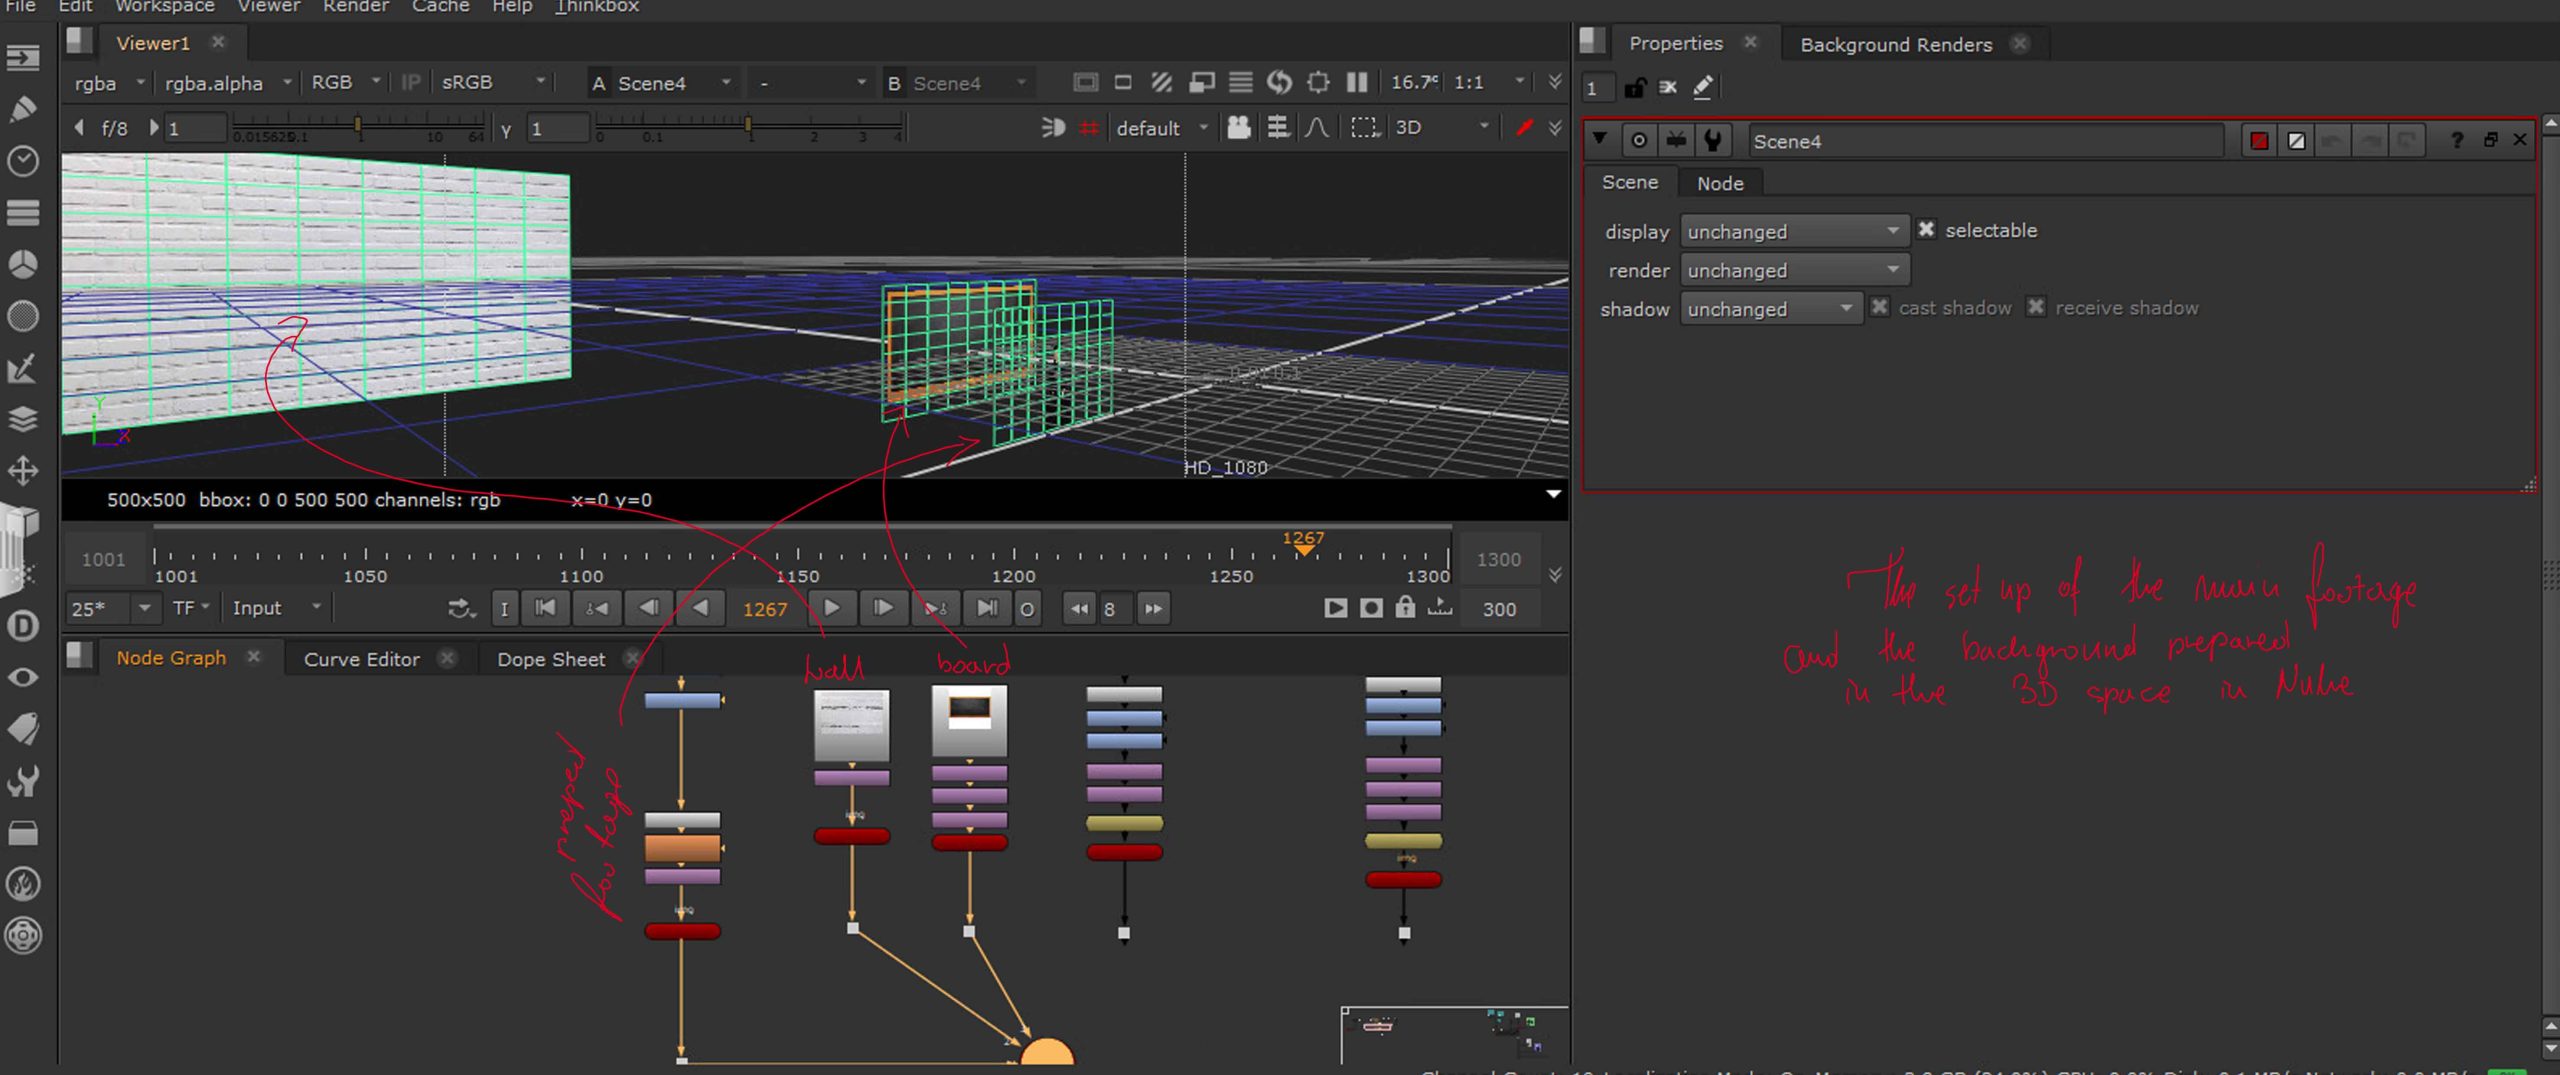
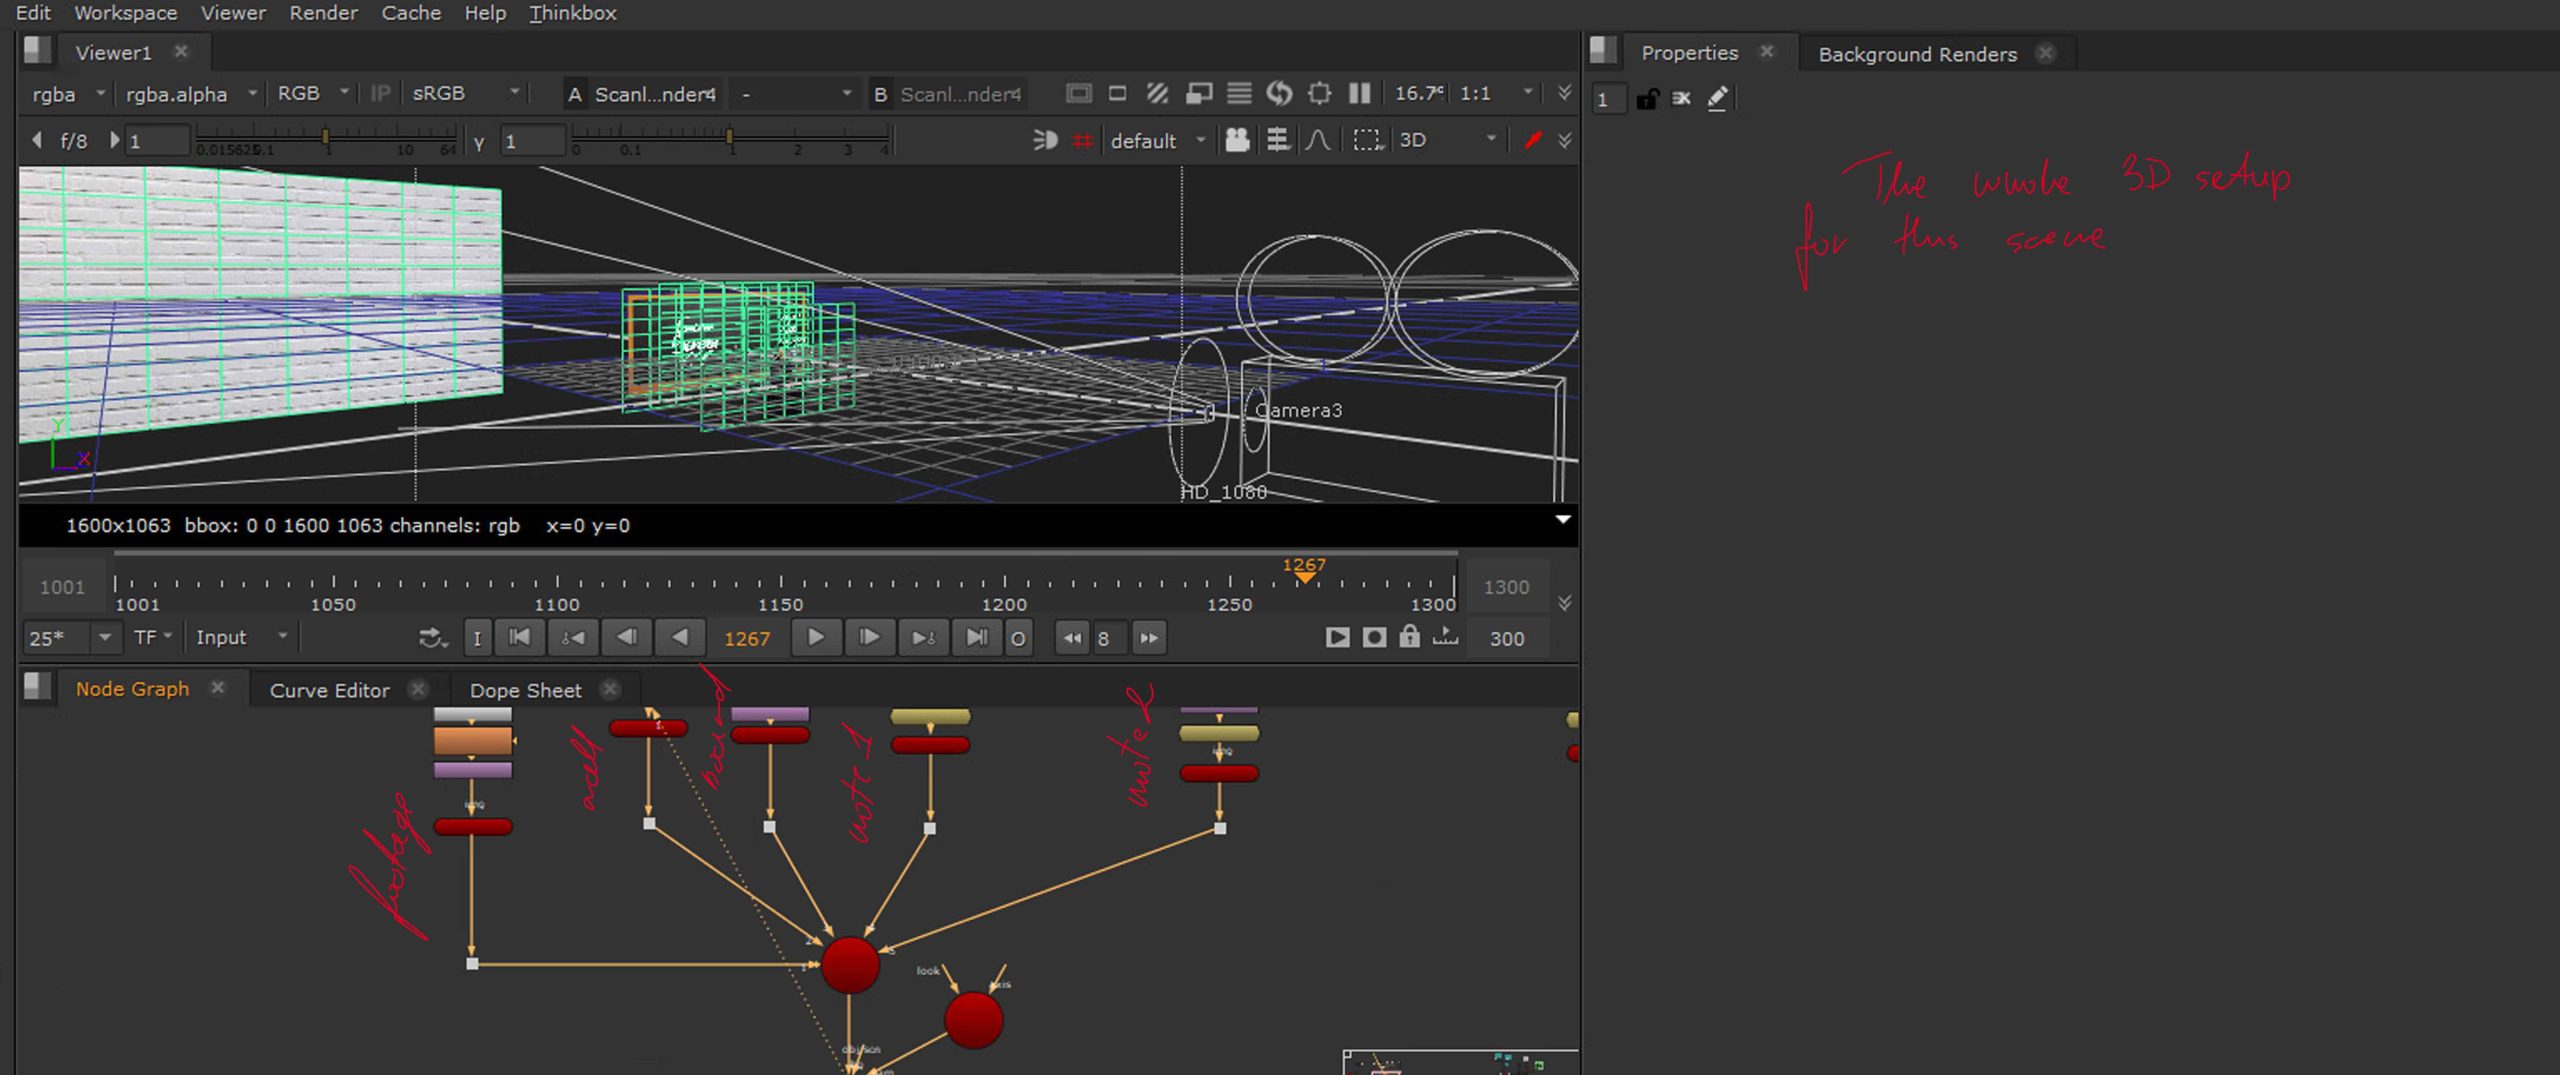
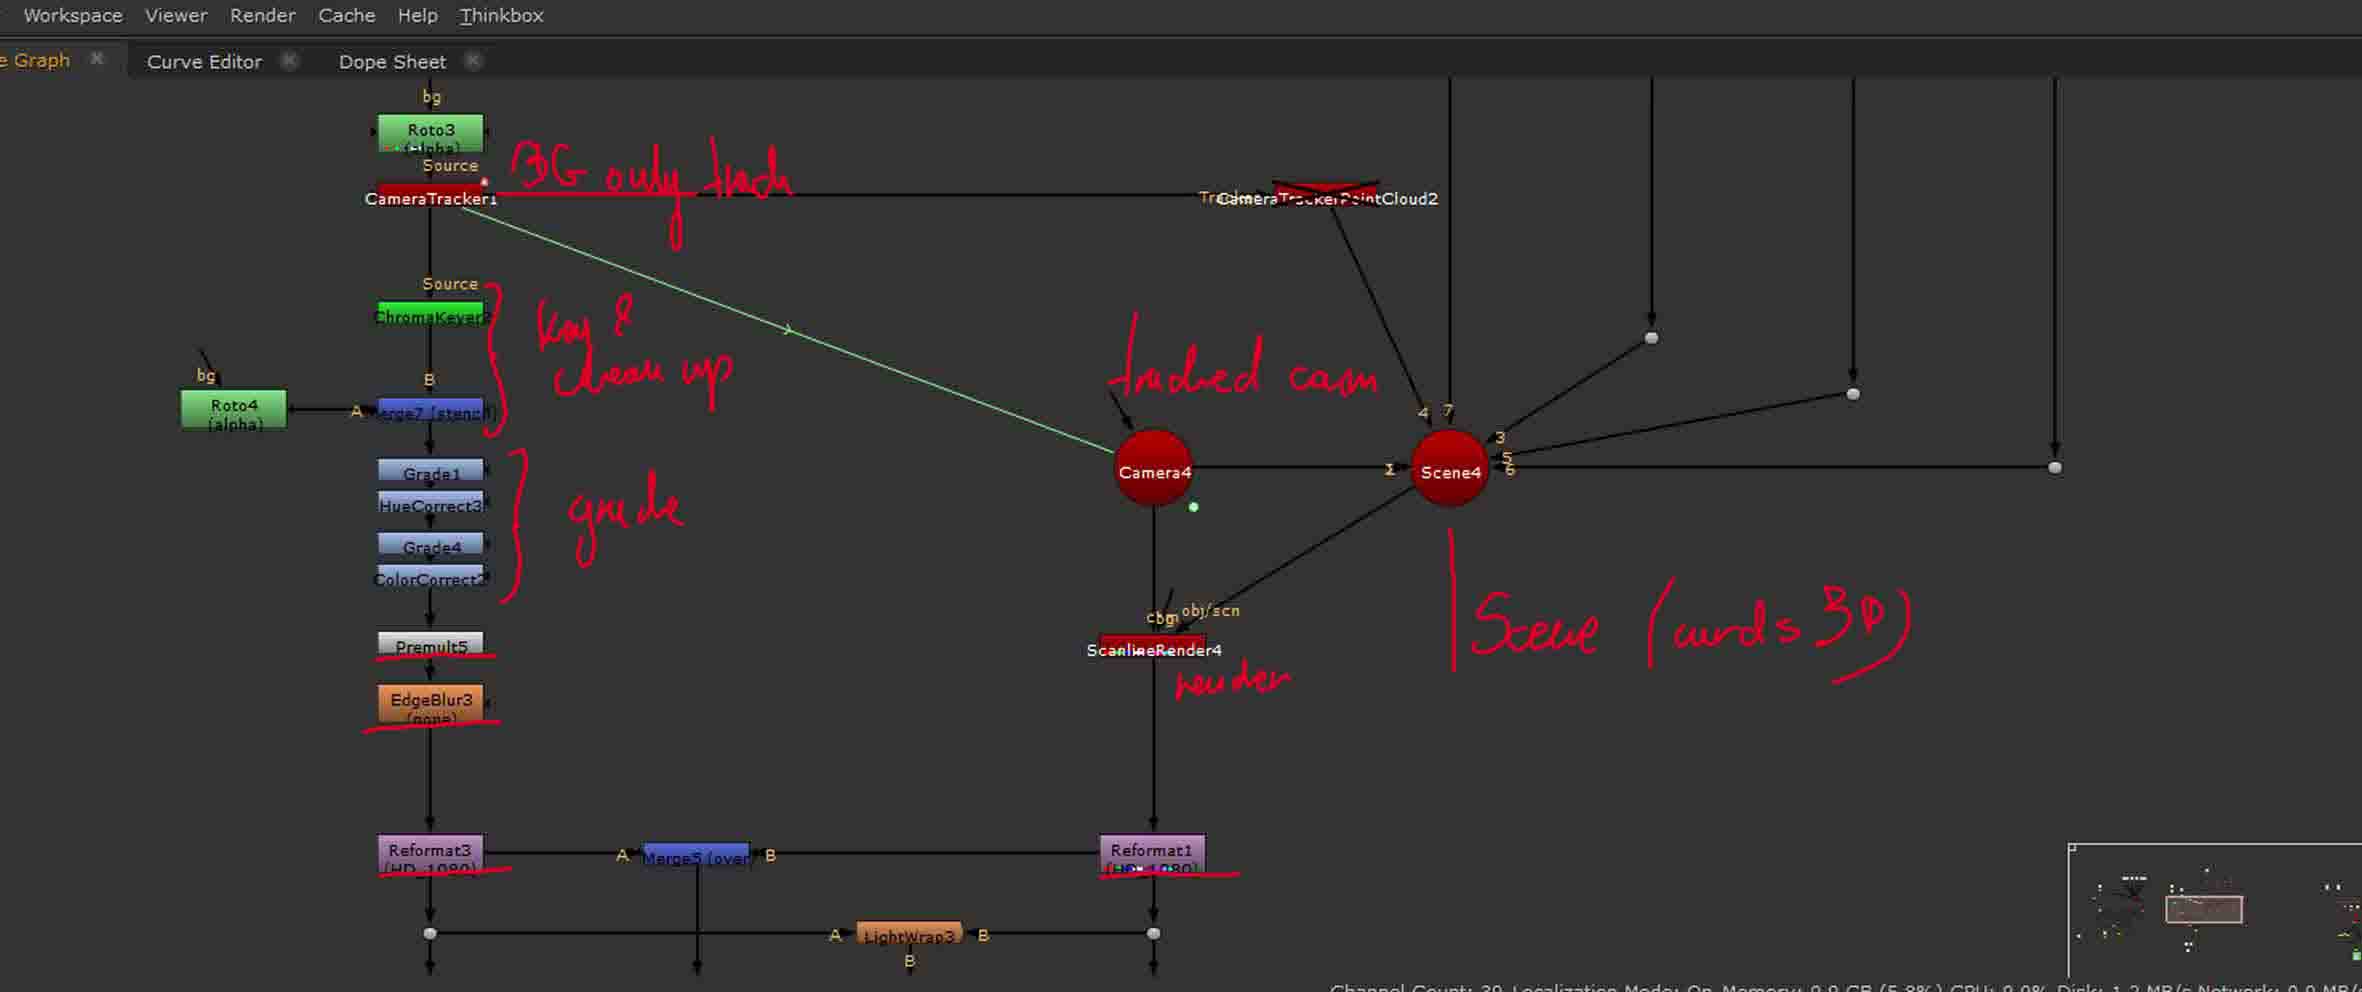
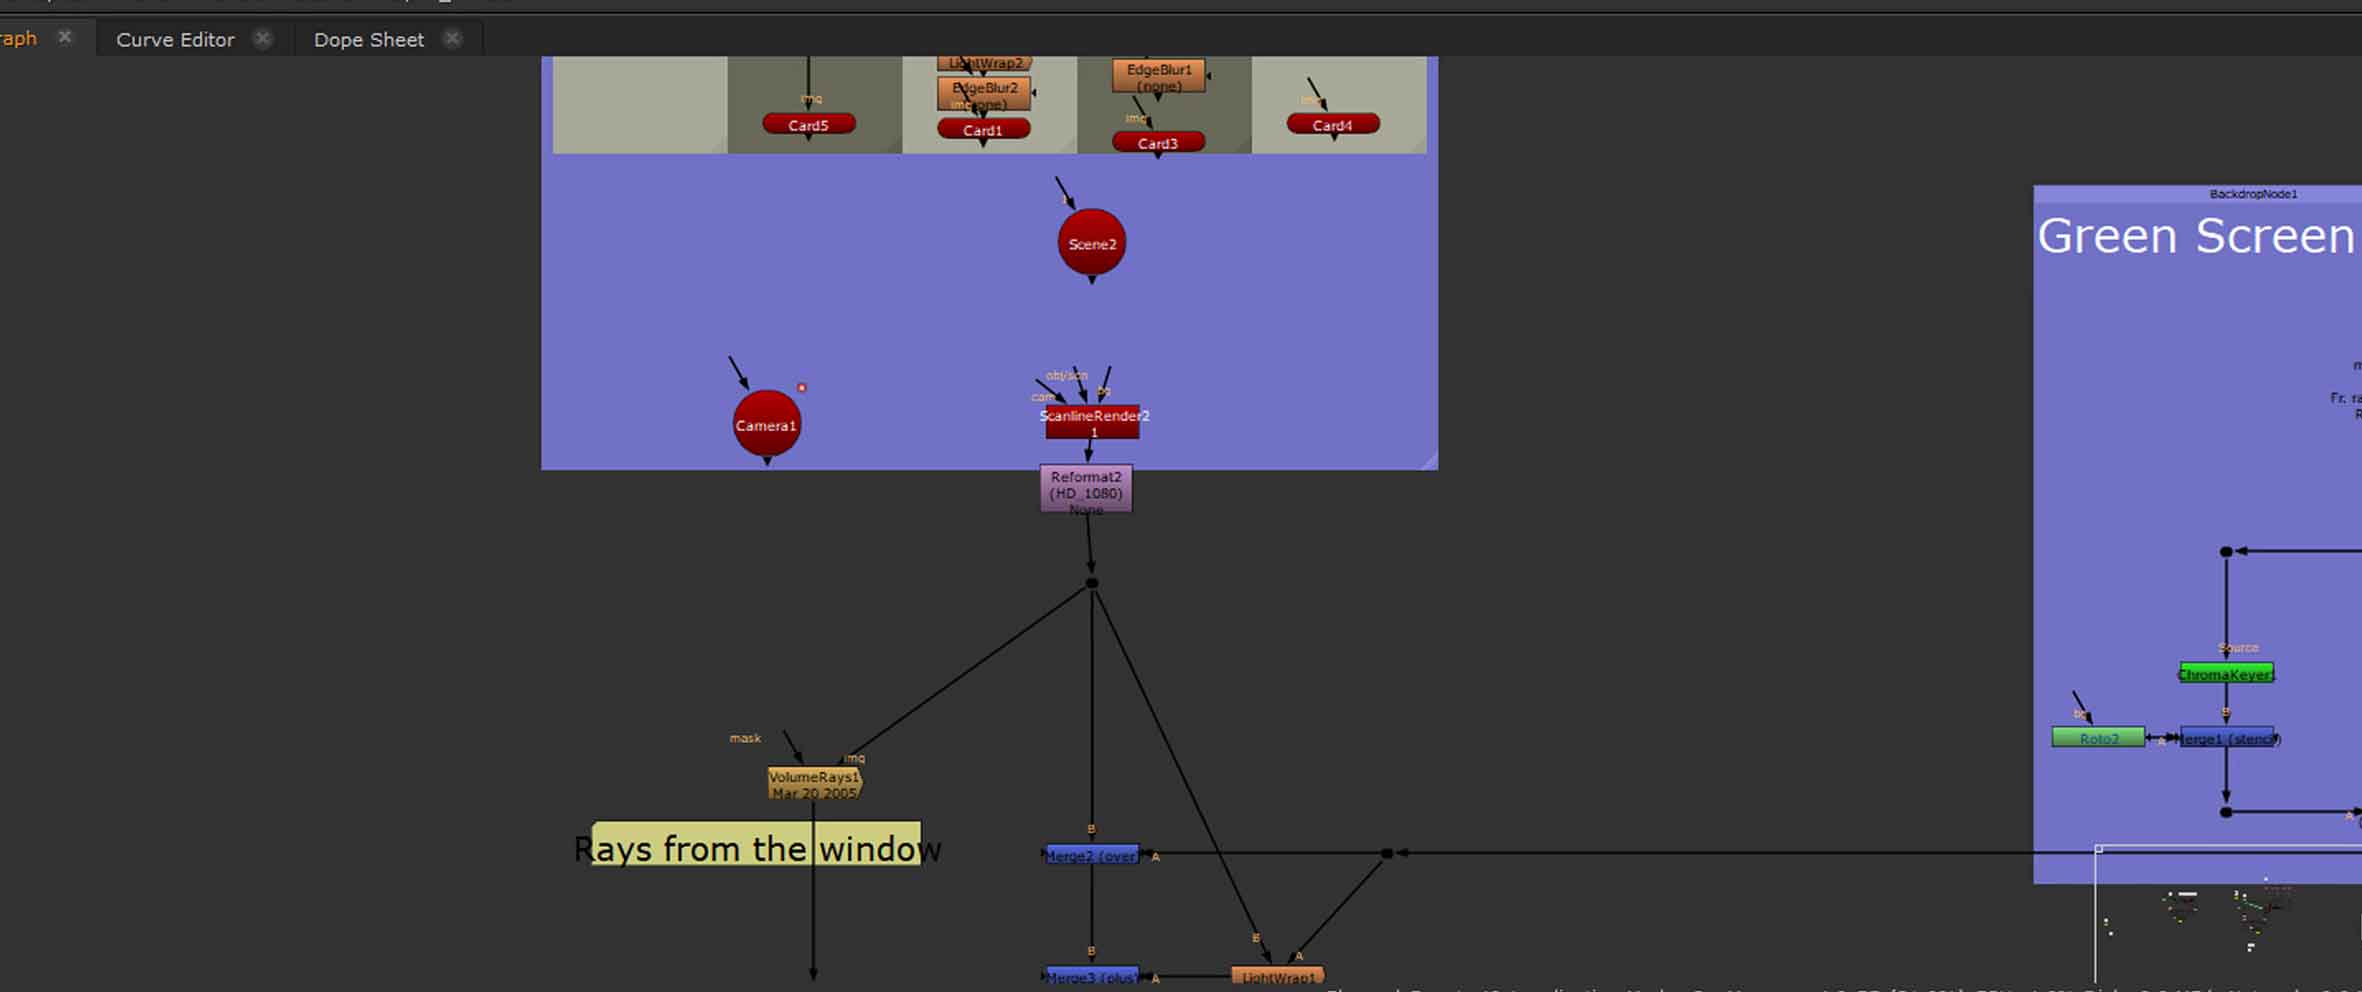
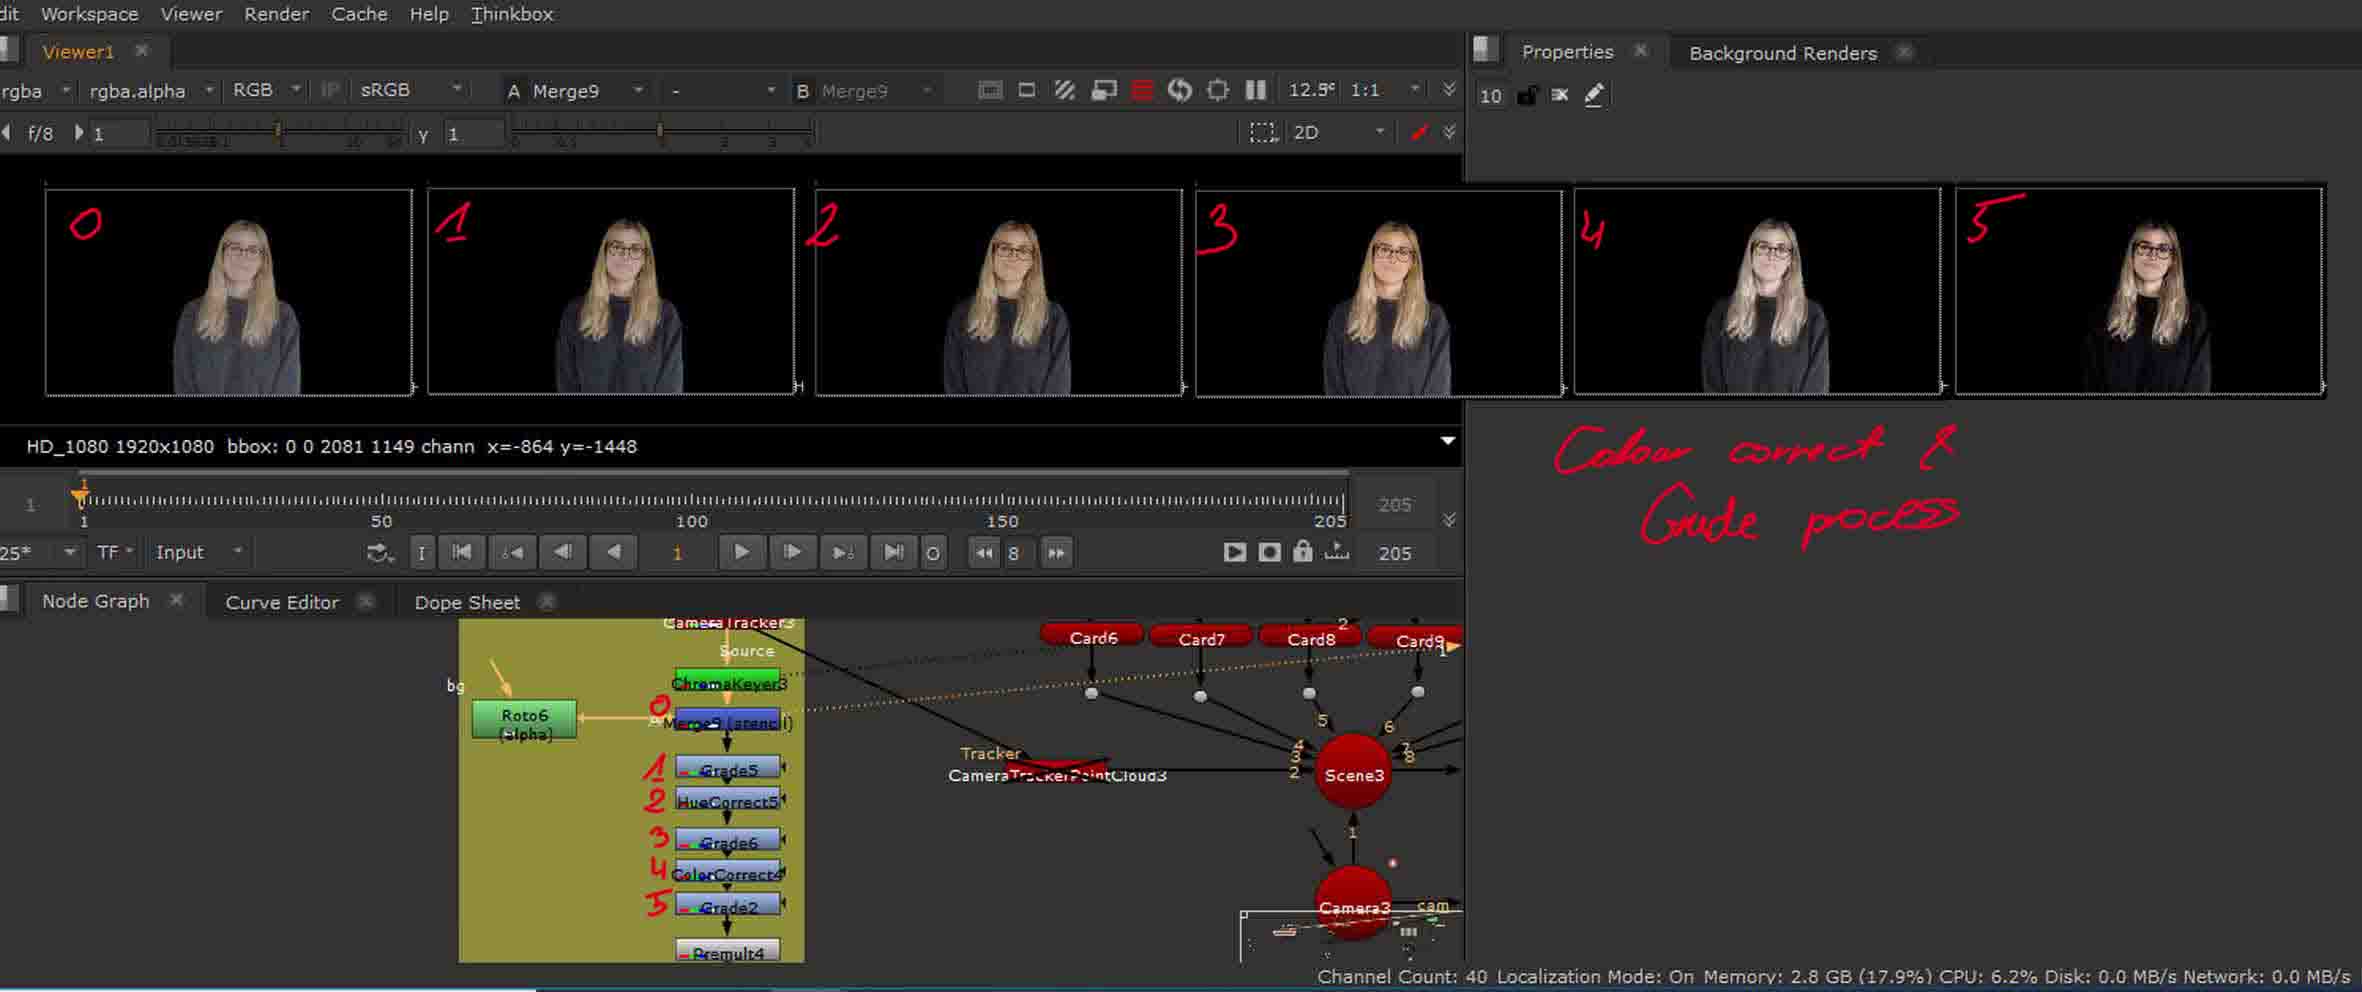
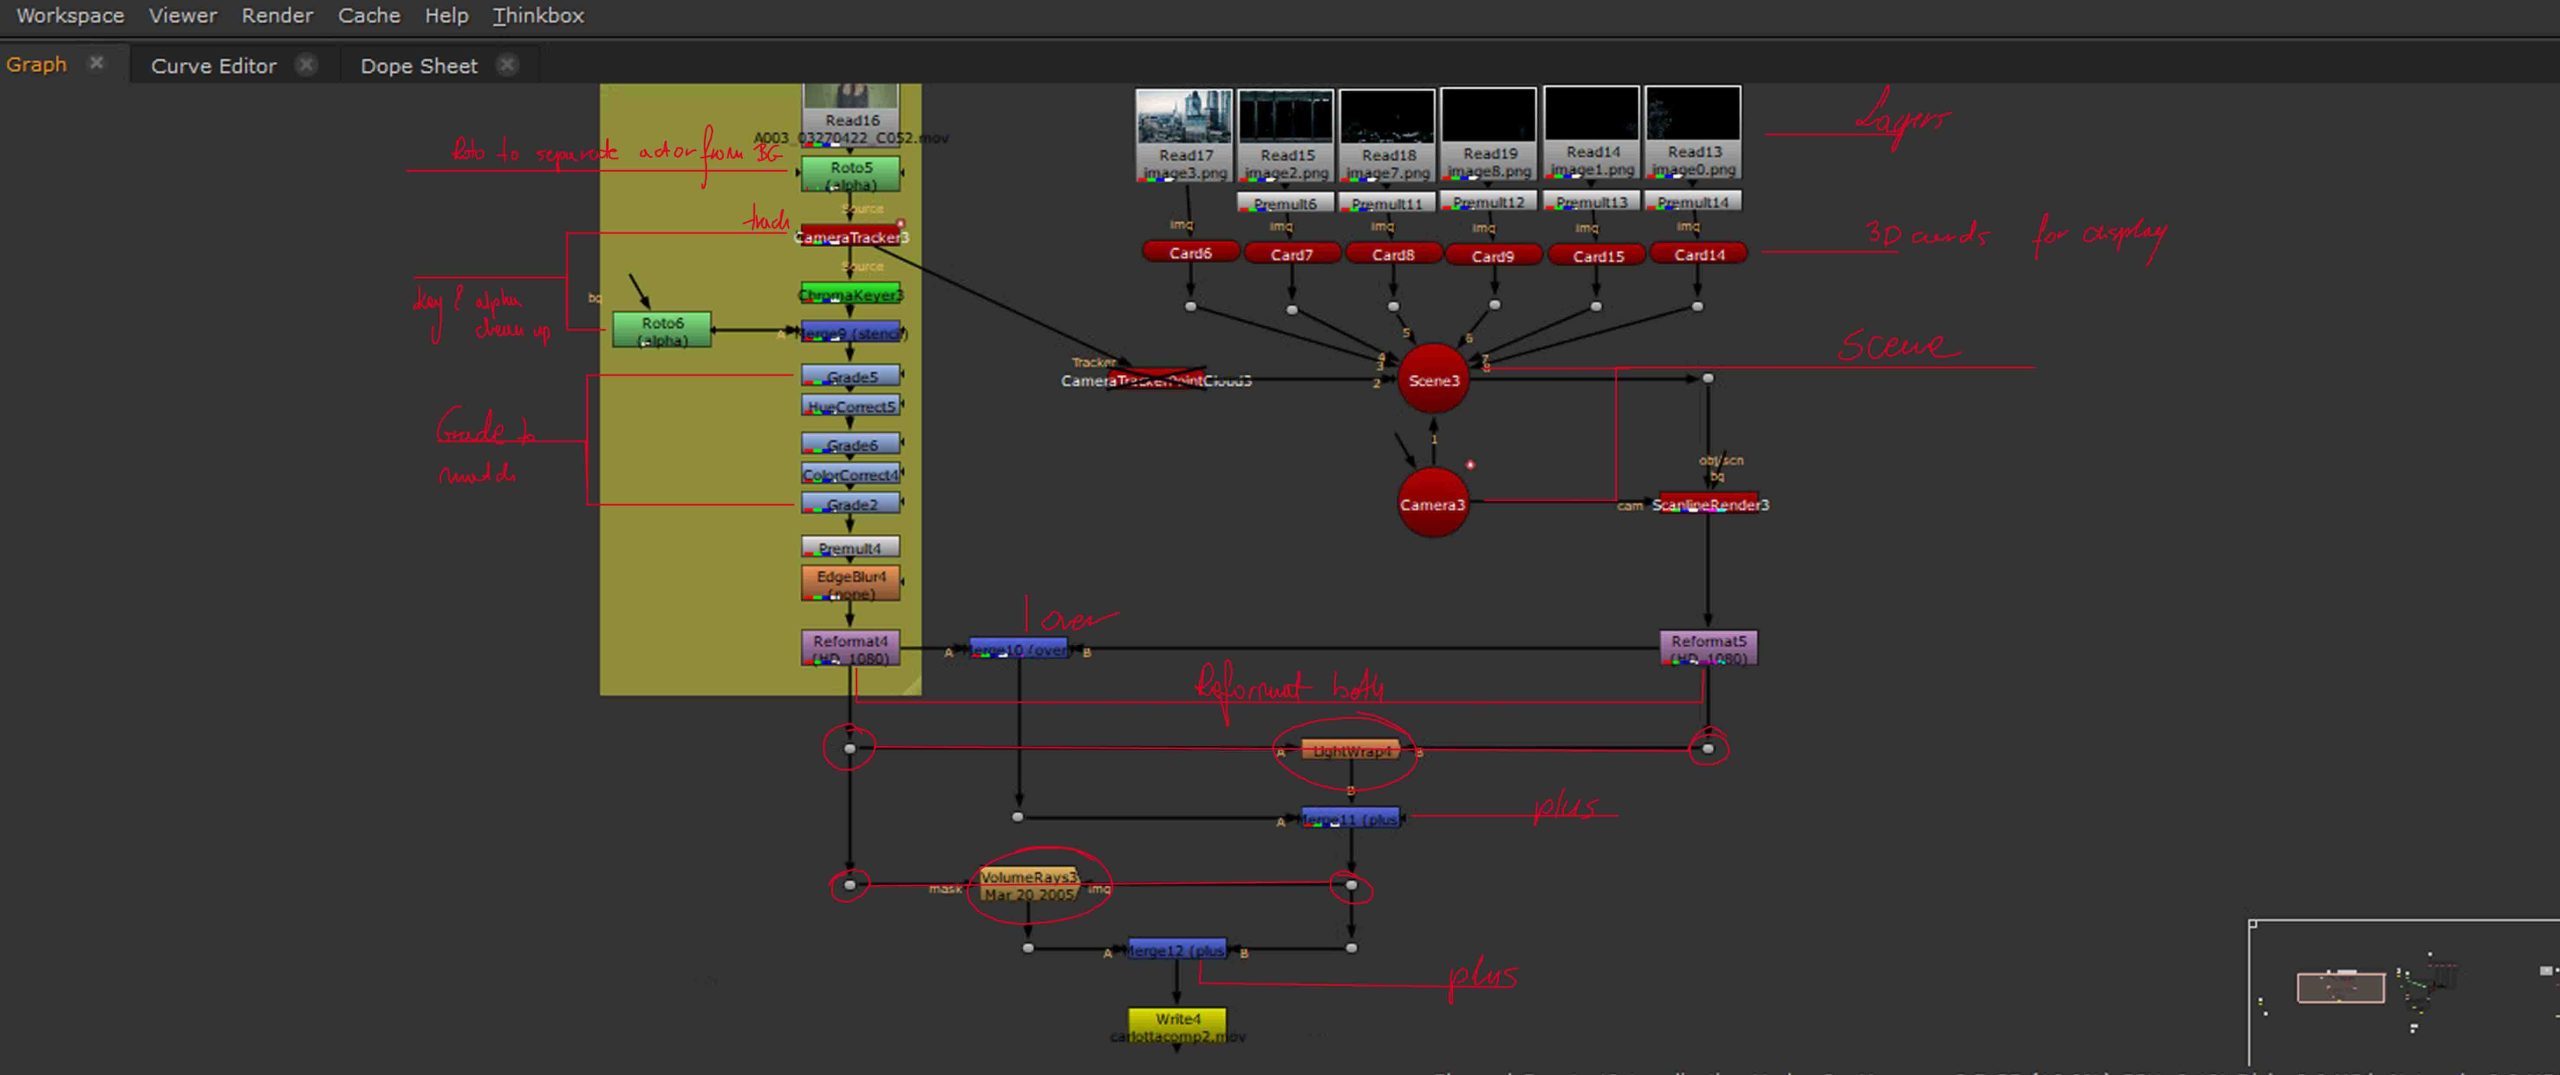
In the image below, that shows the whole script, on the left side is the script for the work on the original footage, I have started with keying and clean up of the alpha, I have prepared the grade and colour correction nodes (but I worked with them when I had the background done to make sure the two match well) after which I have blurred the edge slightly to break up the harsh line created through keying and then II have placed the footage on a 3D card which was then made a part of a scene with cards on which I have displayed the created background (left side middle part of the script with two images on the top).
The background was created by getting a couple of pictures off the internet (white brick wall and a blackboard) which I reformatted to make sure they were the same size, and projected them onto a card placed in the right space within the 3D space. The blackboard needed some transforming and cropping to make sure it fits the environment I was trying to create and that there was no remains of whatever surrounded it in the original picture.
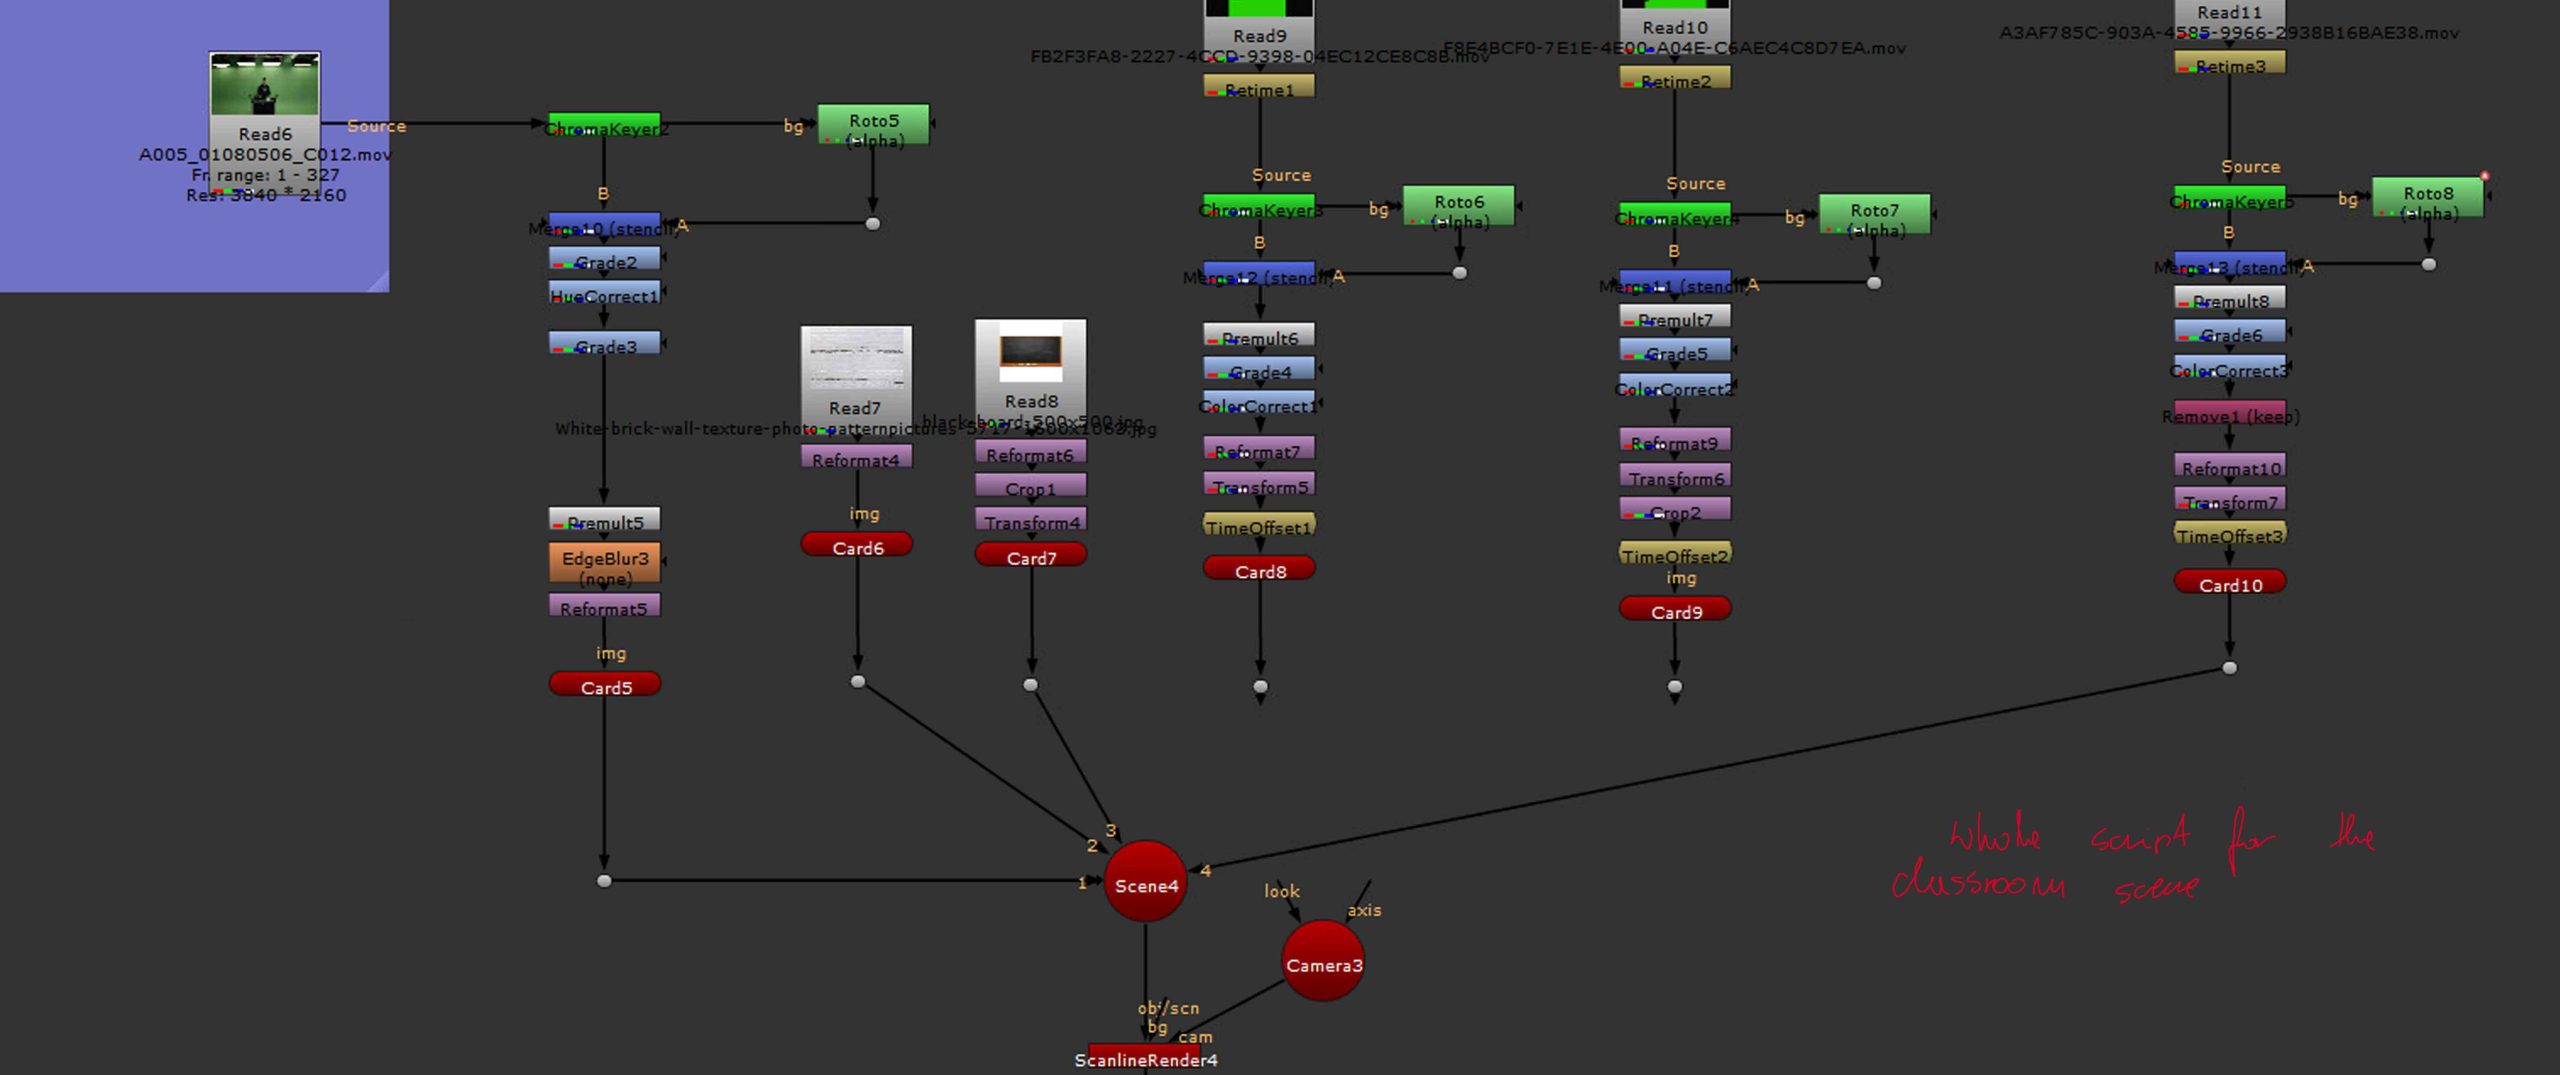
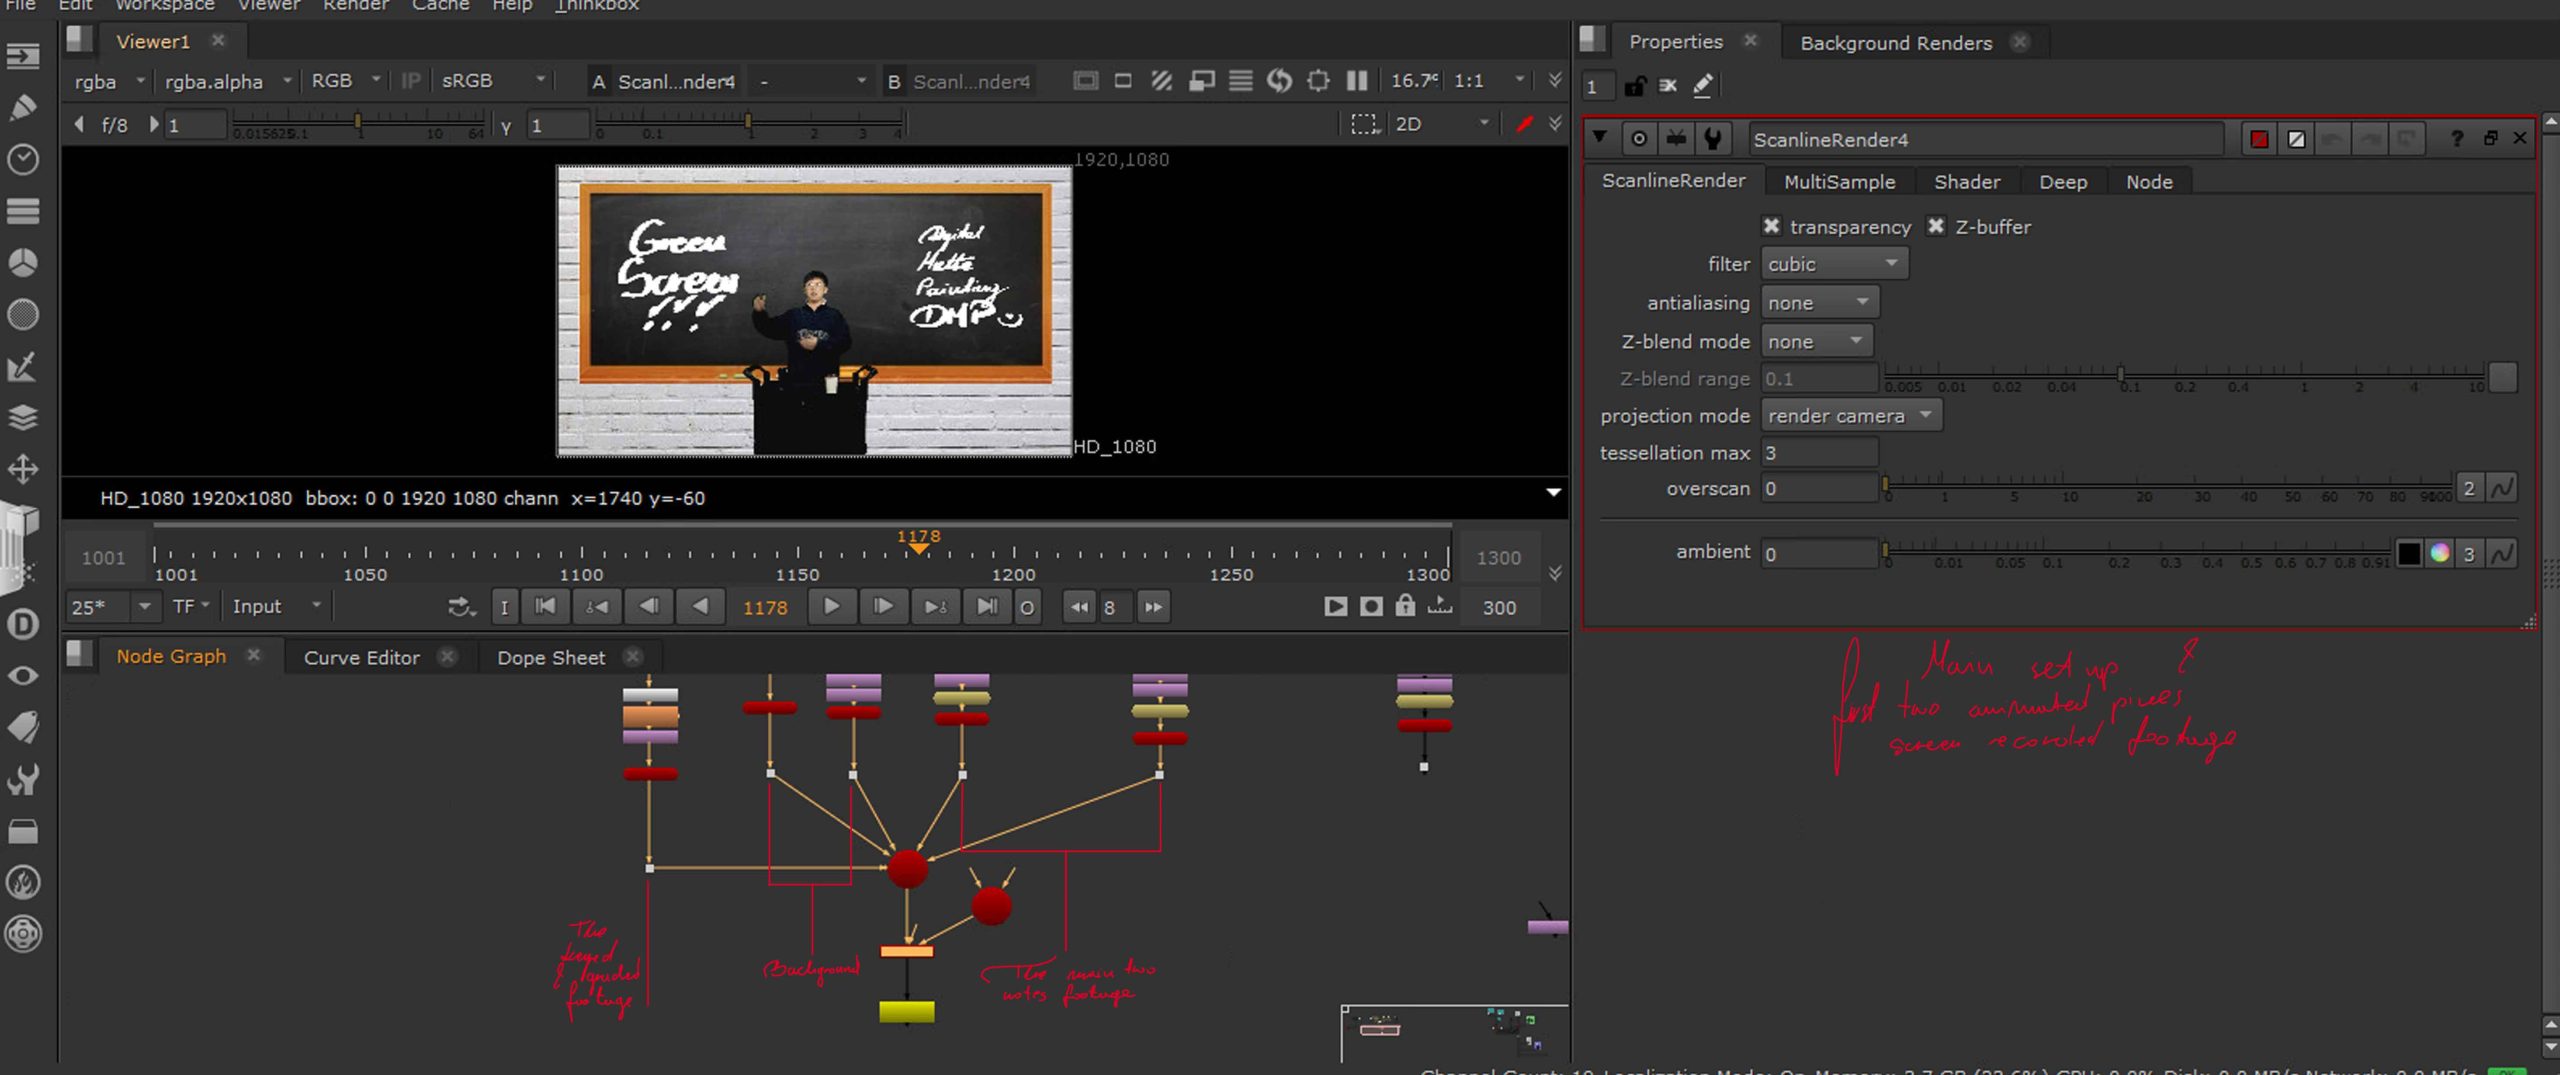
The next screen shot shows the keyed footage with alpha working and the background all in place, furthermore it shows the handwritten animations on the areas of the board to which the actor points. The script below the picture describes which part did what and can be more closely viewed in the large version above this paragraph.
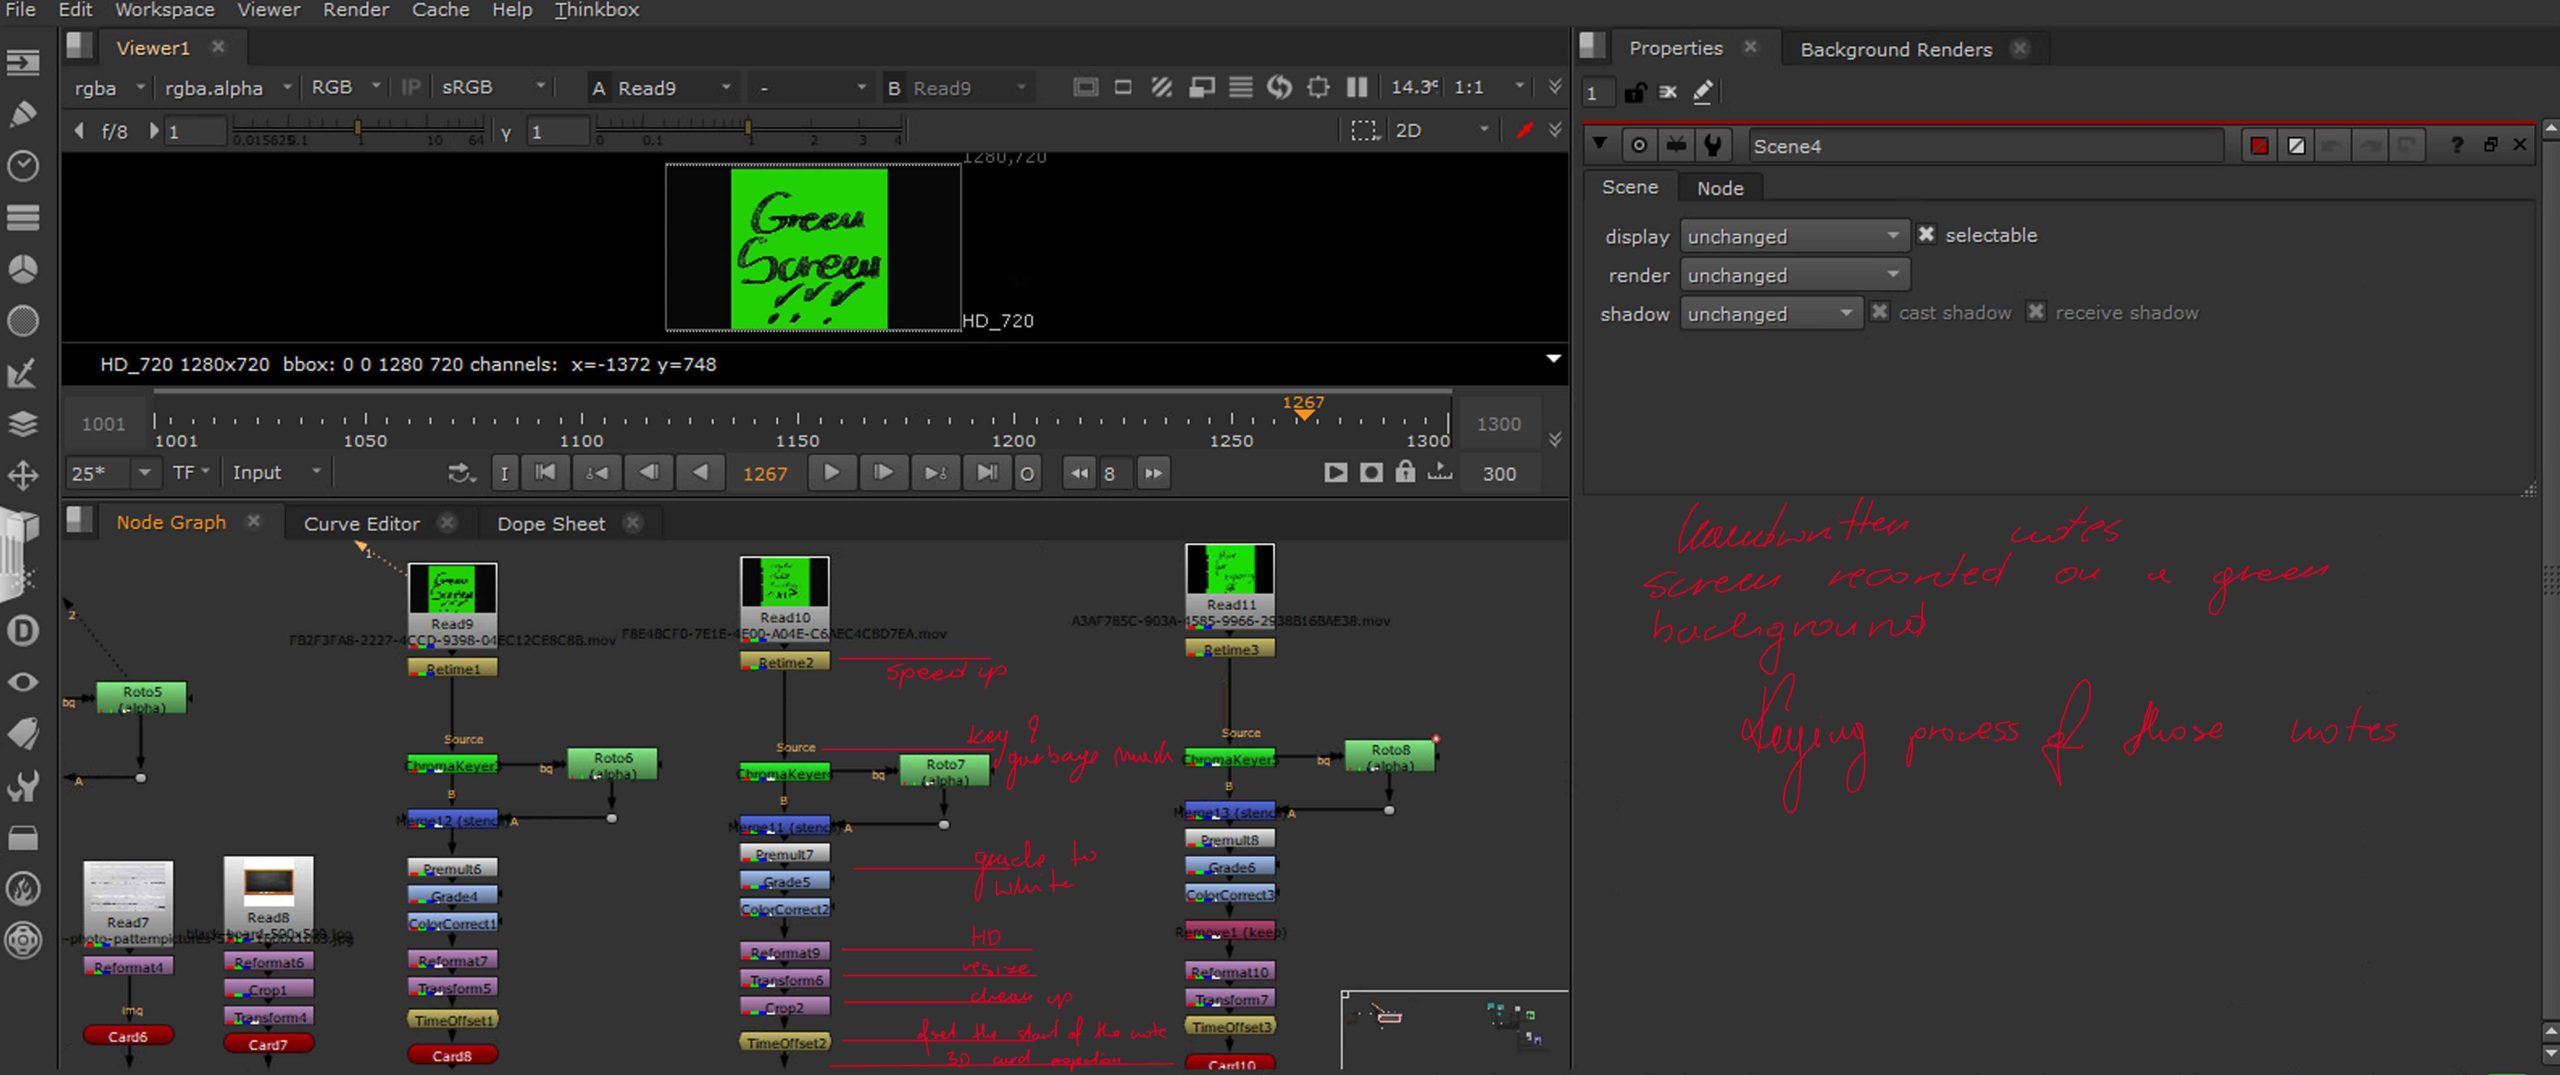
The animations were also made through the use of green screen, both for practice and because I decided that screen recording a handwritten note will be a quite efficient and kind of cool way of creating an interesting self writting (magic) board. So I have opened procreate, set the background colour to green, set up the recording and handwritten three notes, which I then cut to make sure they start and end exactly where I wanted then to, put them into Nuke, keyed, graded (to white, because I wasn’t thinking when I was writting them and I wrote them in black instead of white straight away), reformatted, and placed them on a 3D card in front of the background but behind the footage. At this time I had a little fight with Nuke to figure out how to make the notes start at a particular time, but finally I have figured it out and done it through a TimeOffset node set to the right start frame.
Below the 3D scene for the progress described above – footage and background only.
Below the 3D scene for the progress described above – footage, background and two first notes.
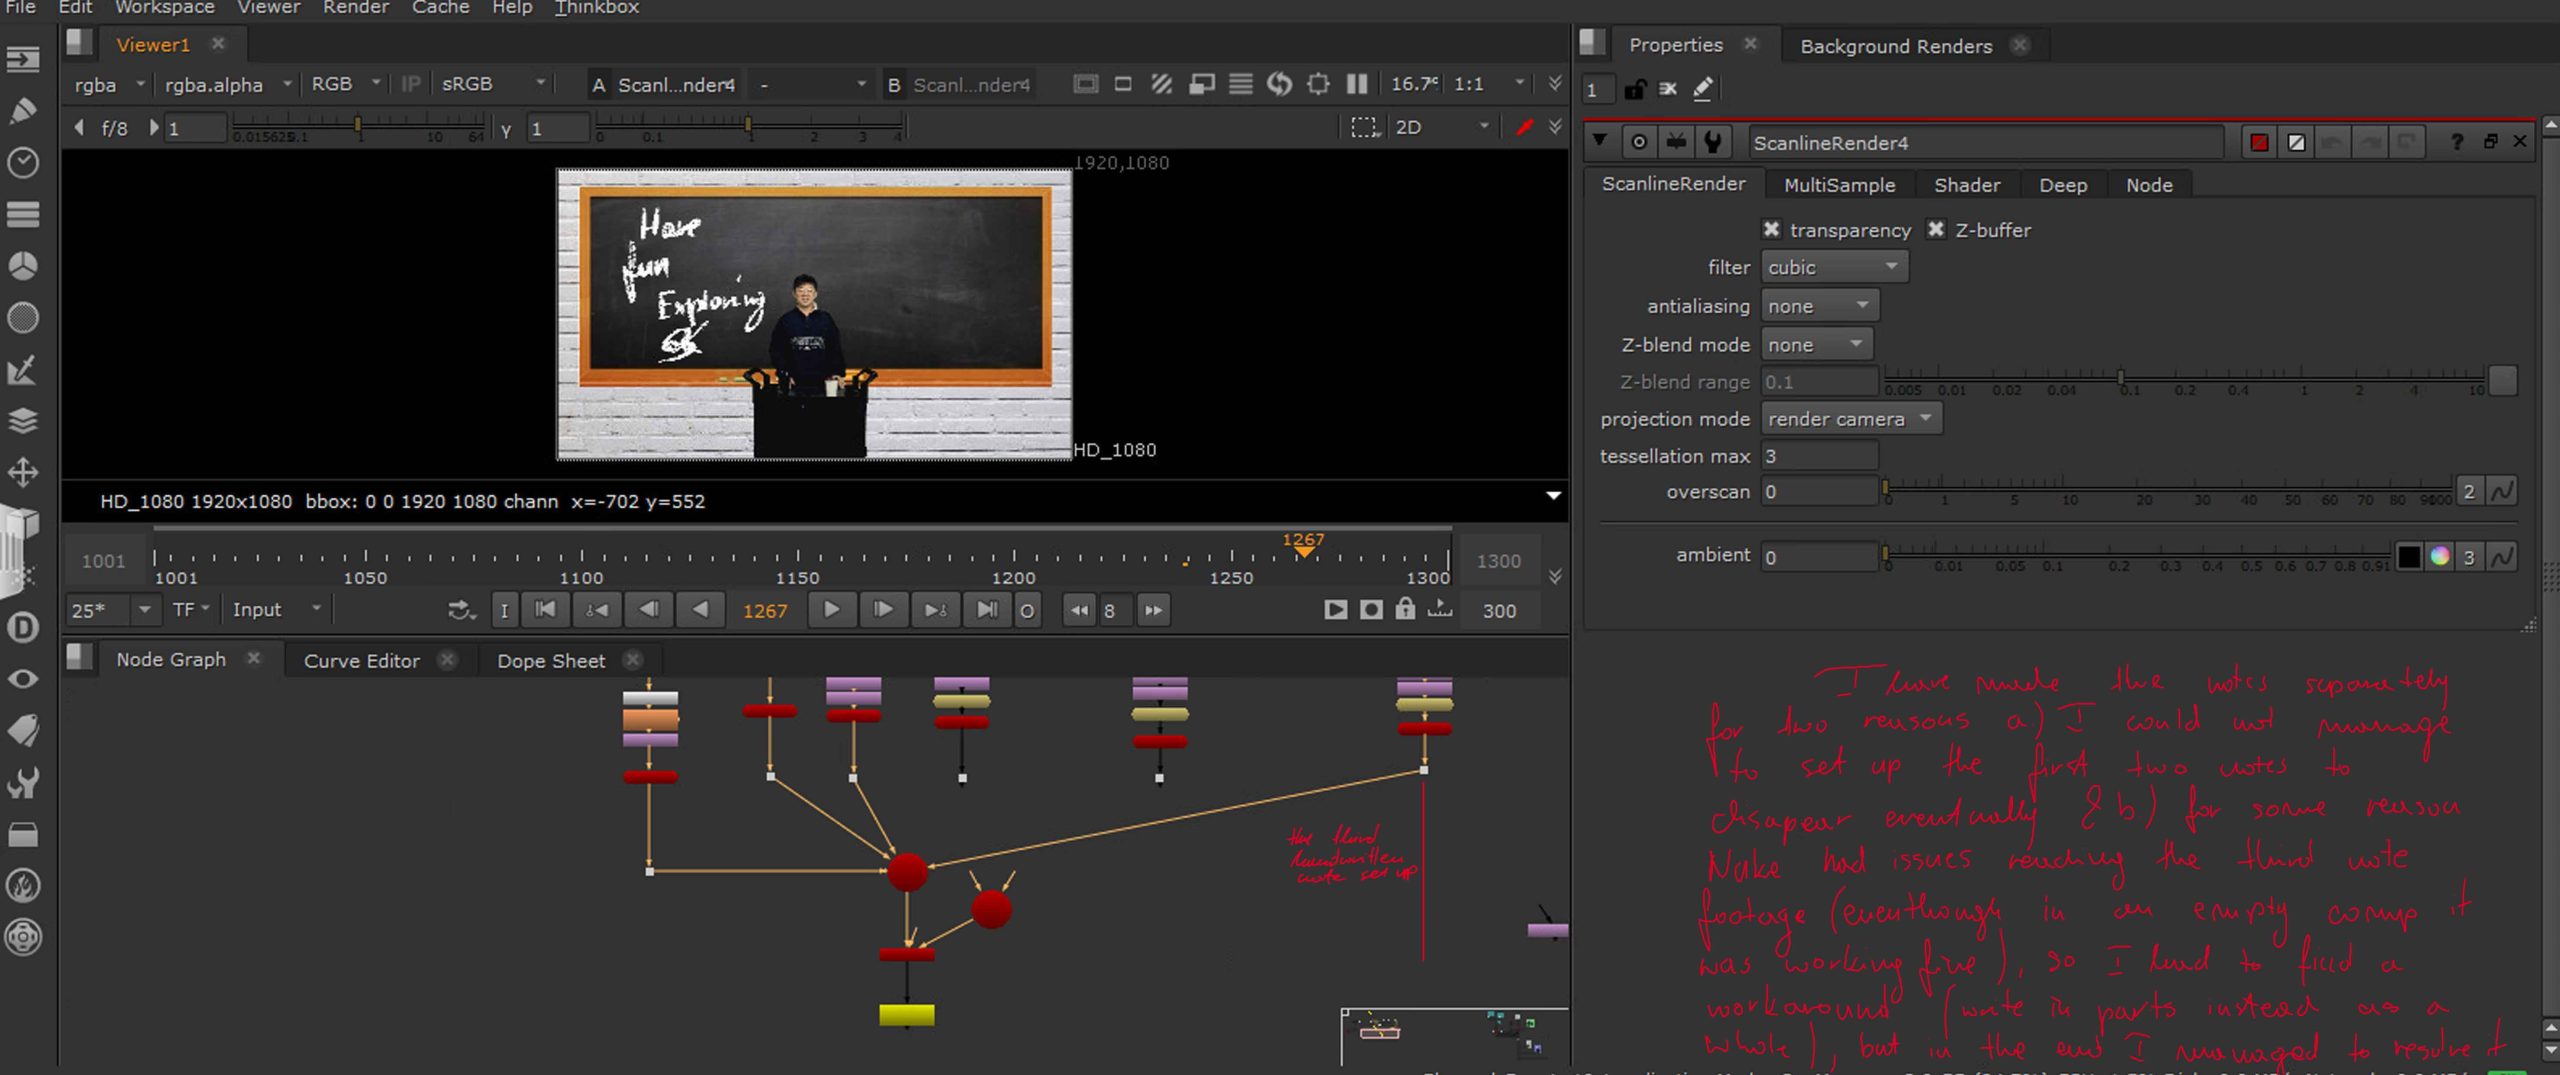
The last note was not done in the same script nor rendered at the same time, as from the beginning I had issues opening the file in nuke, all three notes were some in exactly the same way, but the last note kept showing errors in this script (it was completely fine in an empty script). It took me a while to figure out the issue (I think the last three frames were somehow corrupted and the read note kept getting broken when it got to them, when I set the frame range to five frames less than the original everything worked fine) and when I managed that part I realised I dont know how to end the two previous notes at a particular time, so at this point, instead of fighting with the software some more I decided to do a little walk around and and render them separately, that’s why on neither script all the note are connected at the same time (they were never used together). To do that I rendered the first frame range to the point where the notes were supposed to disappear and then reset the render to write the rest, with correct numbers on exr frames and in the same folder, giving me a full sequence, exactly how I wanted it.
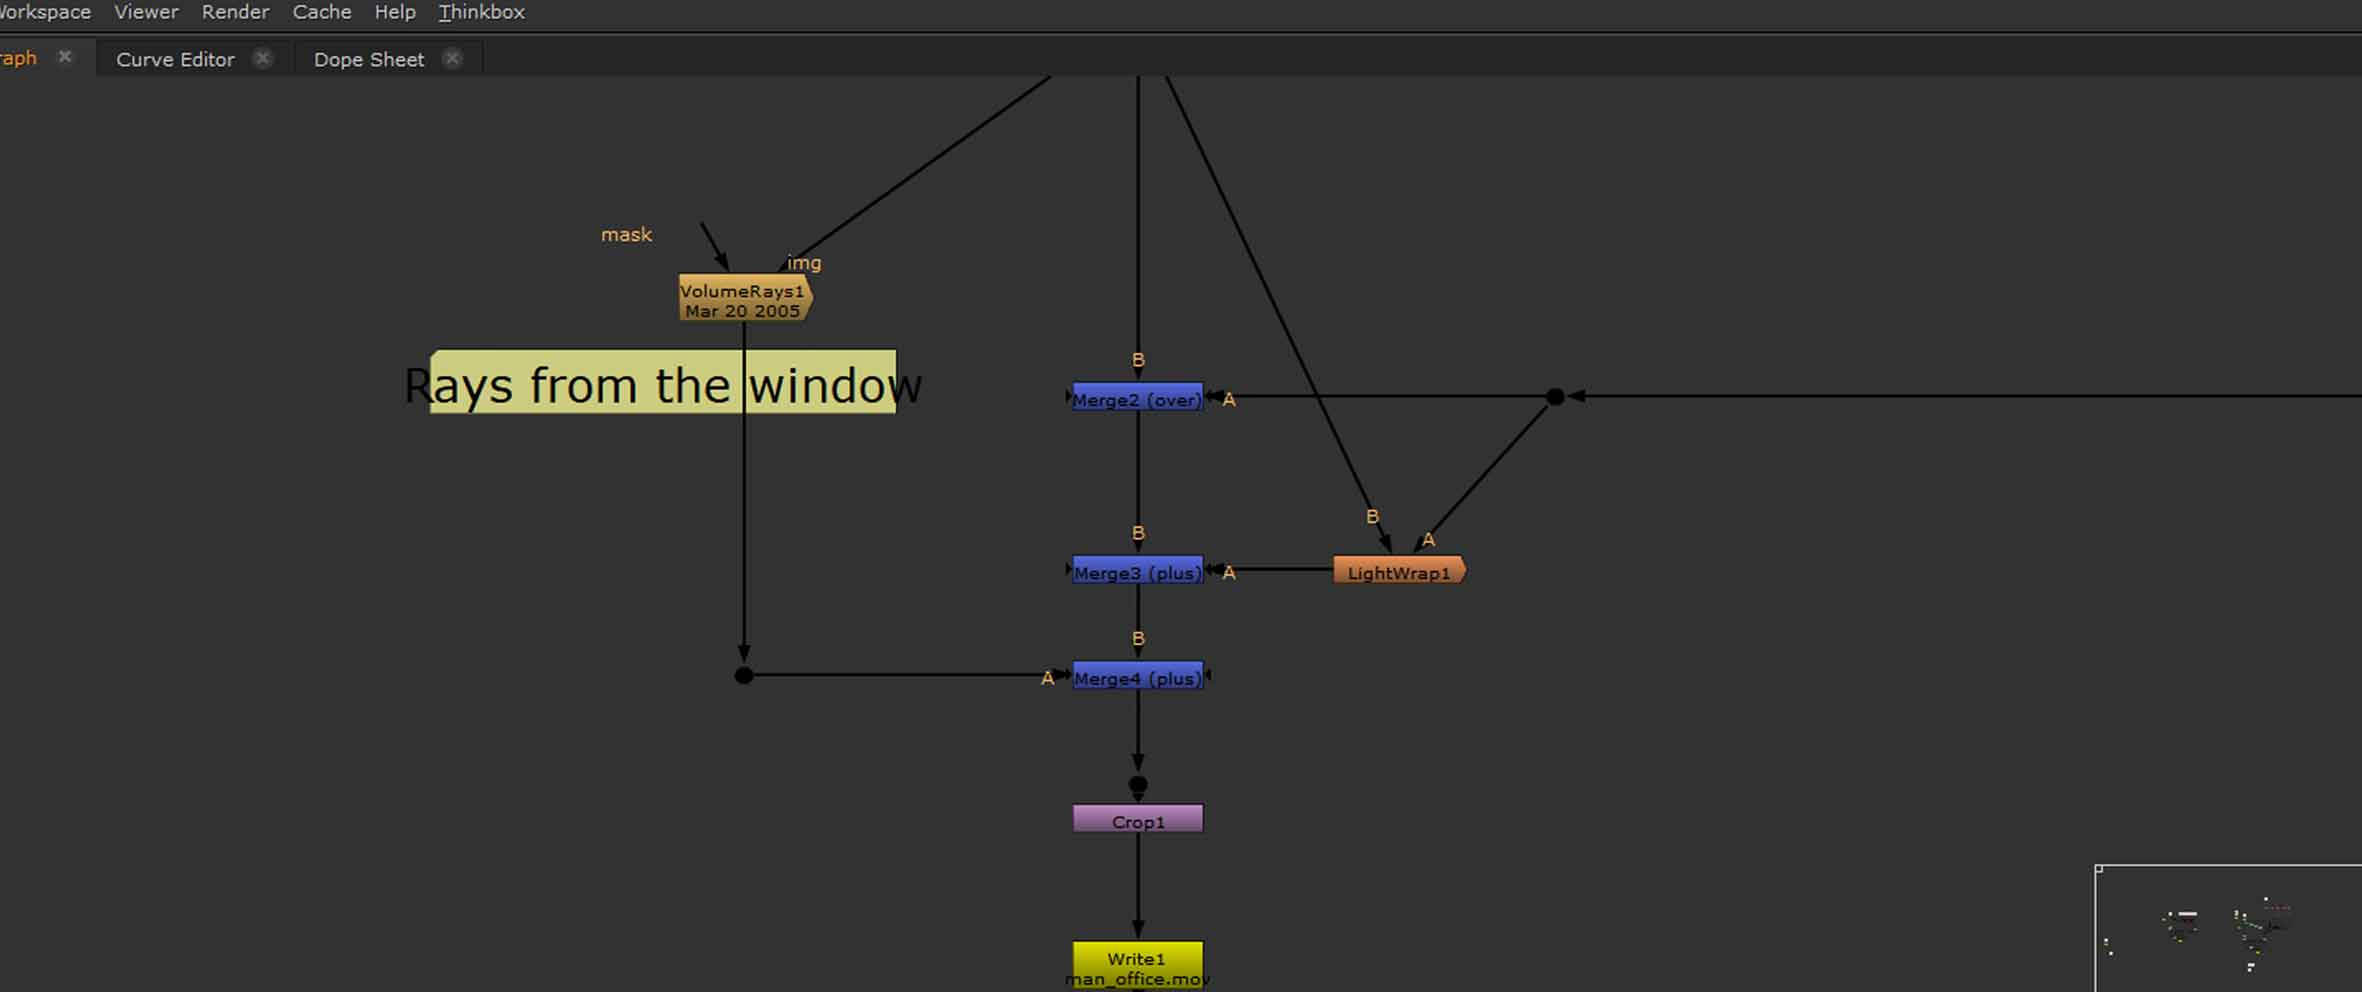
Below the script for the notes.
The original lesson script
I decided to keep the original script for the record, as I have done my example without following it and in a slightly different way, and since I would like the possibility to revisit the task in the future I decided to keep the original script too.
The final
Evaluation
I quite like the idea of the video, especially that I dont like animation and I had no idea what or how to do something creative, although looking at the technical aspects of it, I didn’t notice a few minor elements while I was working with the key and grade that now, I see as issues and could have probably been resolved in less than half an hour. First one is an issue with the key and alpha of a reflection on the table, I didn’t realise it was there until the viewing before this evaluation, I could have tried to minimize it. Although it is not wrong as such, as it follows the actor, it doesn’t look right either. And the second issue I missed is the green screen spill on his face when he is deeper in the room as well as on his hands when he is pointing to the walls and there is no grain on the background making it not match with the actual footage that had quite a bit of noise. Also realistically speaking the black board is actually a bit too high and wouldn’t work in real life, as only half could have been used. Furthermore, until right now, I didn’t even consider that I could and should have tried to add some shadows to the background to make it appear a bit more realistic.
On the other hand I quite like the fact that I was able to keep the chalky feel of the notes, despite the fact that I haven’t worked a lot with keying before, I managed to keep a good number of the small holes in the writting, making it keep that original and intended feel. And I am quite positively surprised about the general idea of the notes, I will probably play around with this idea more in the future.
Green Screen Workshop 11th May
Green Screen Workshop 25th May
The idea behind this workshop was to place an actor from a green screen on top of a Matte Painting that isn’t flat as the footage we were working on wasn’t static, the movement of the background had to match it, and to not look flat and fake there had to be illusion of parallax. The following process allows to achieve parallax and depth from a layered image (PSD).
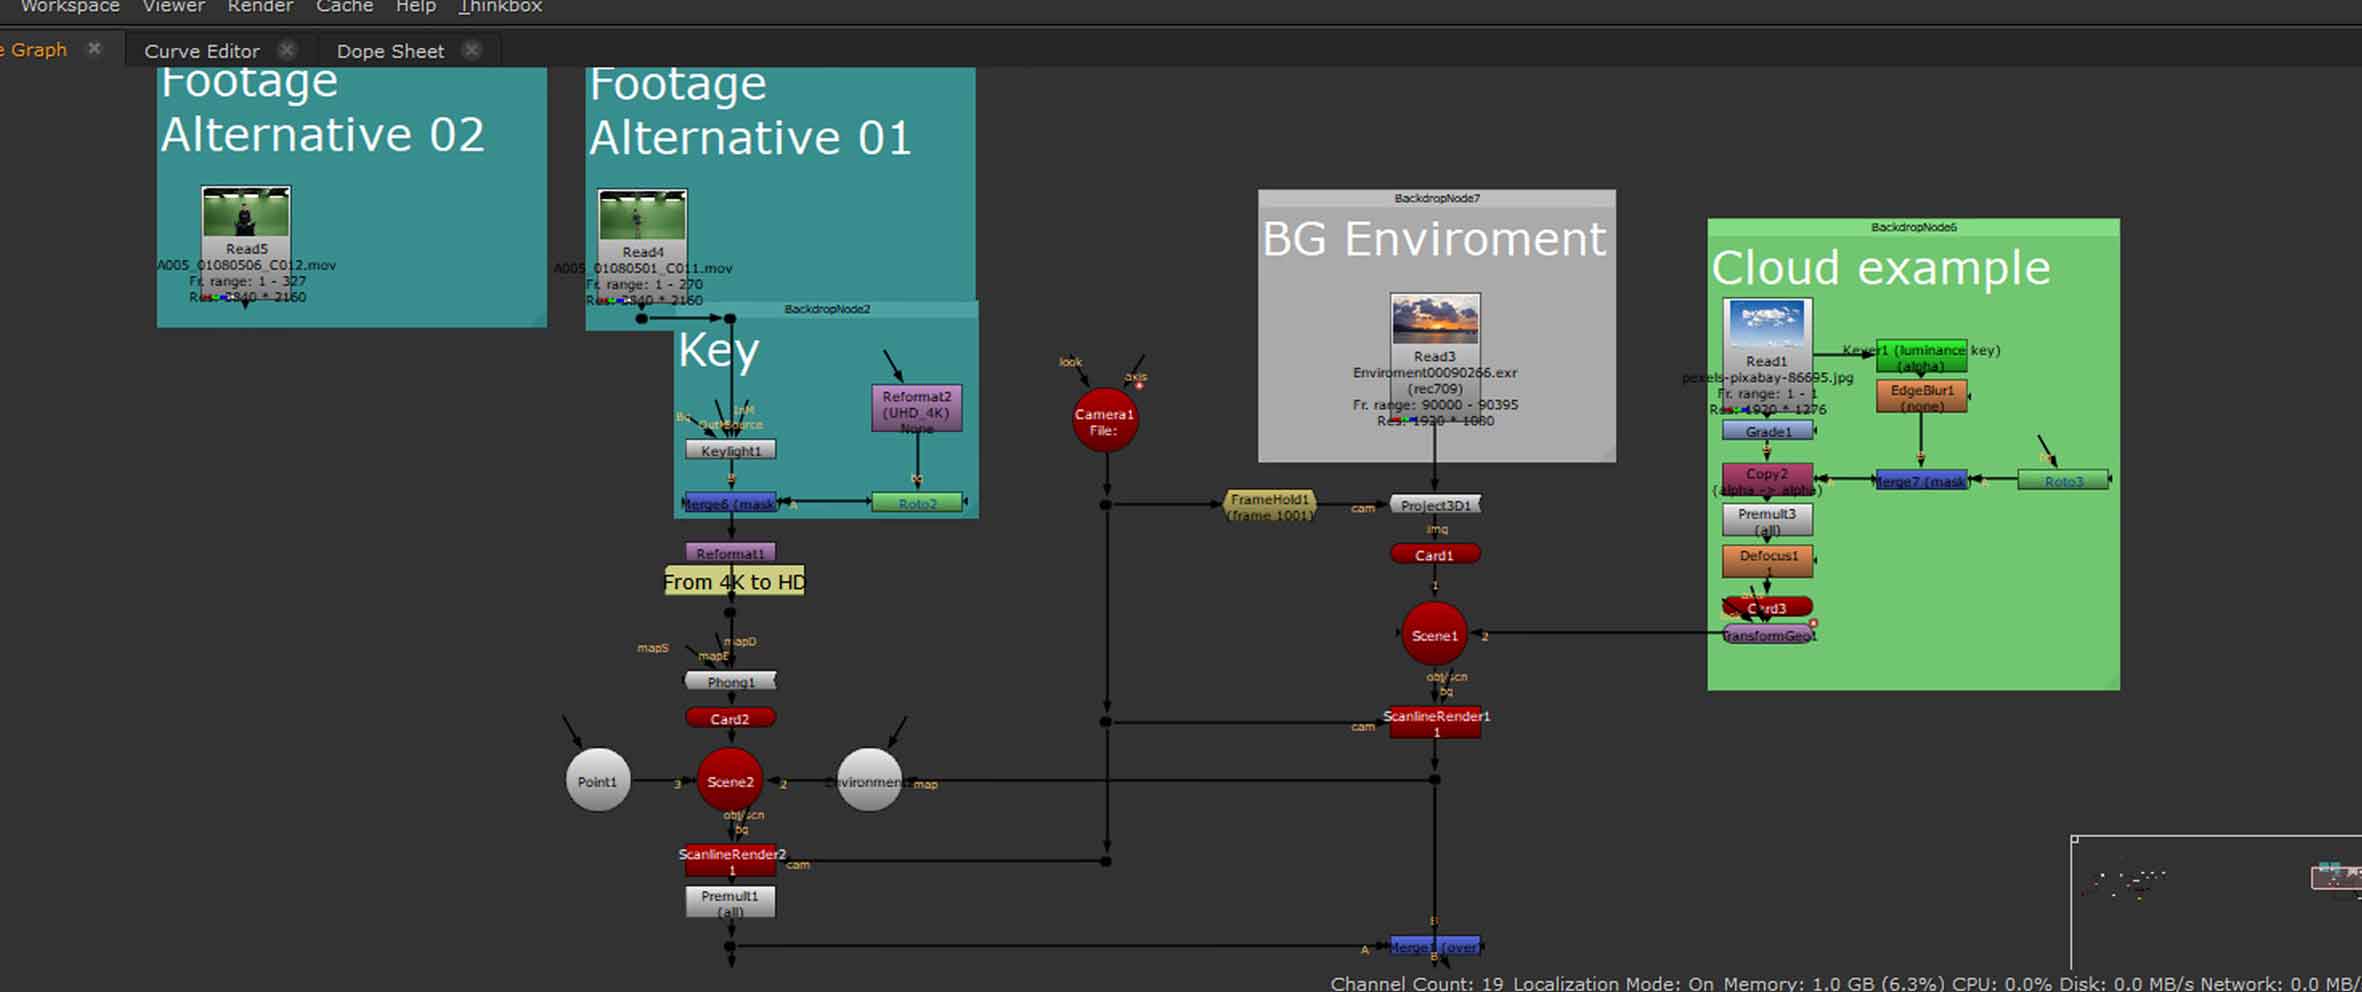
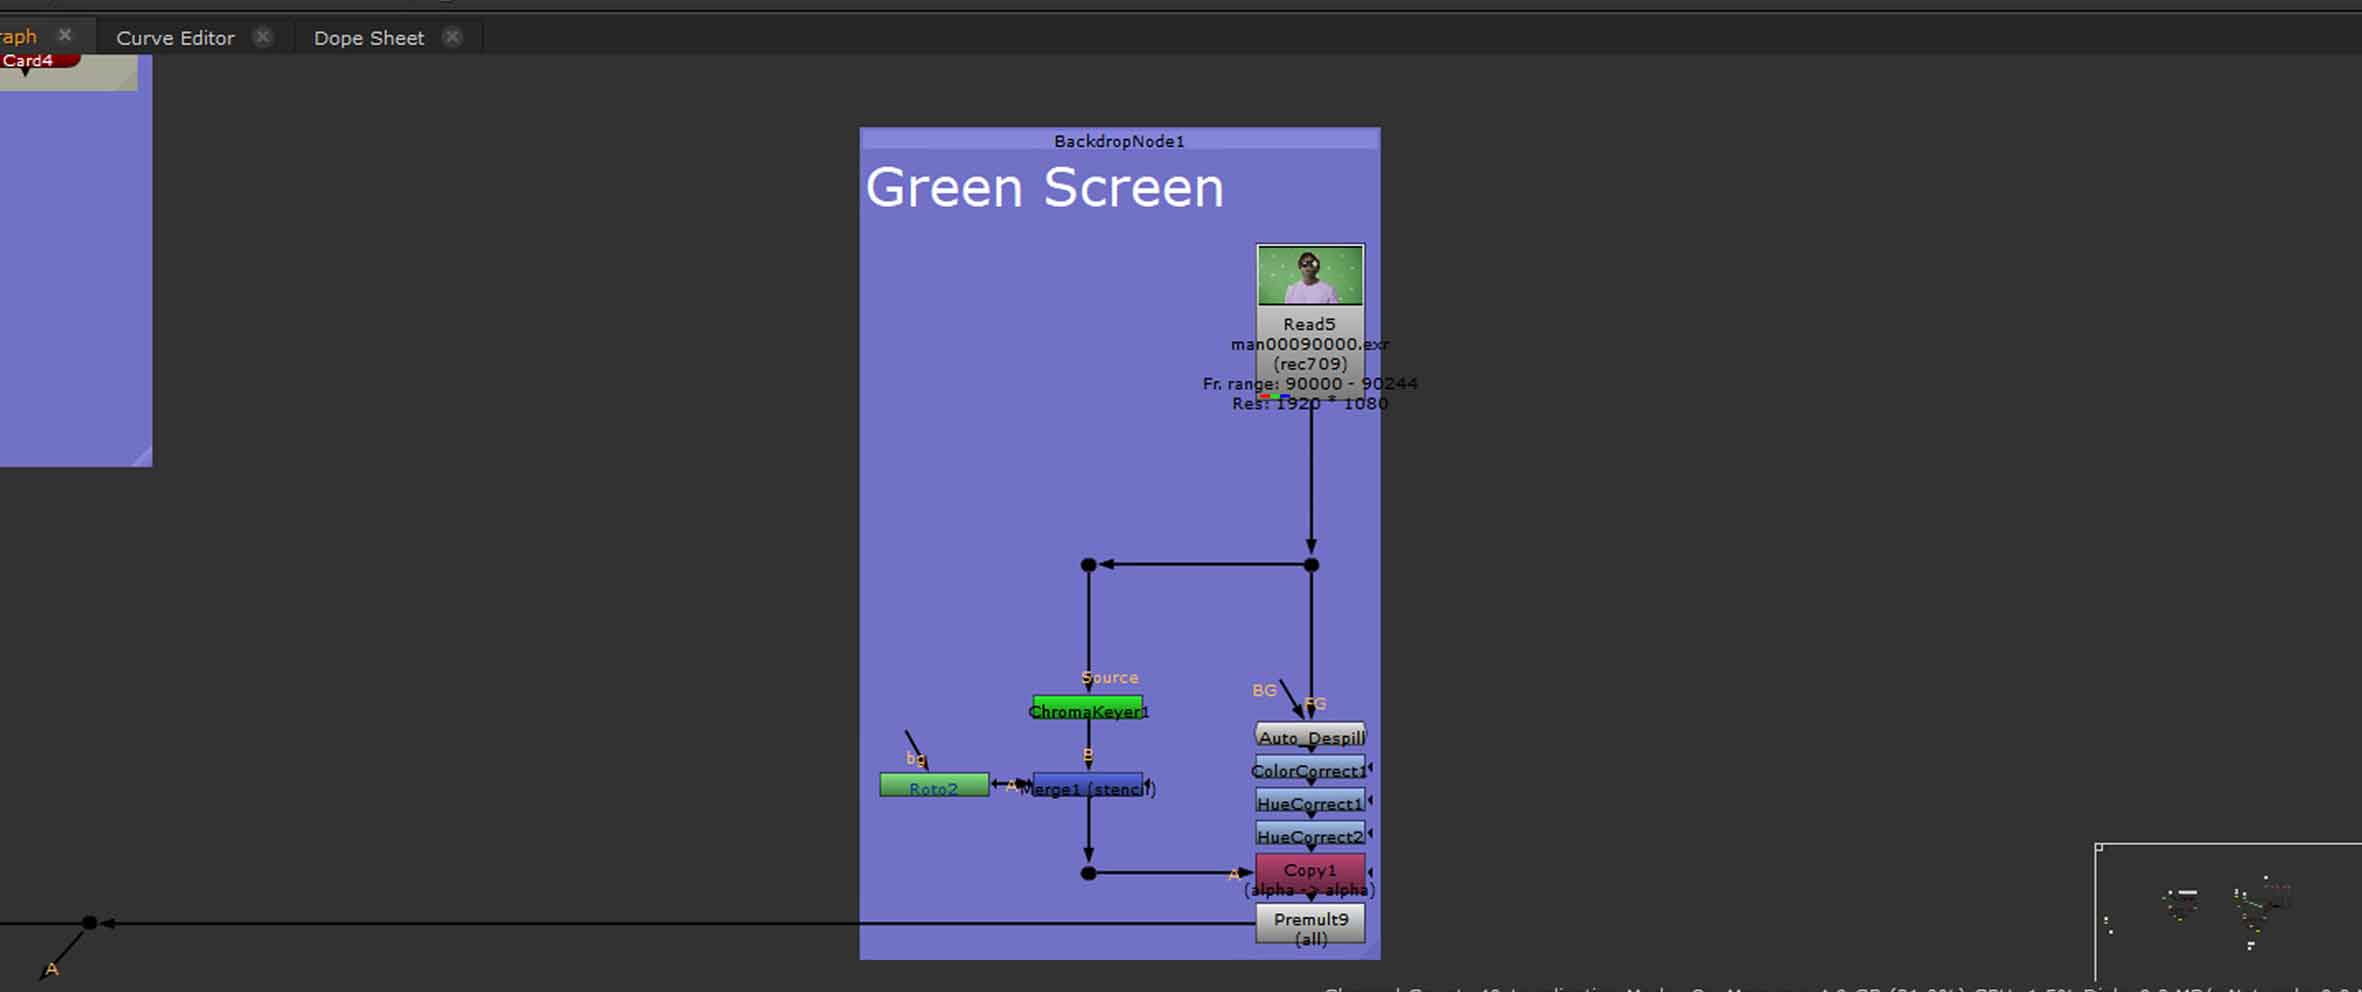
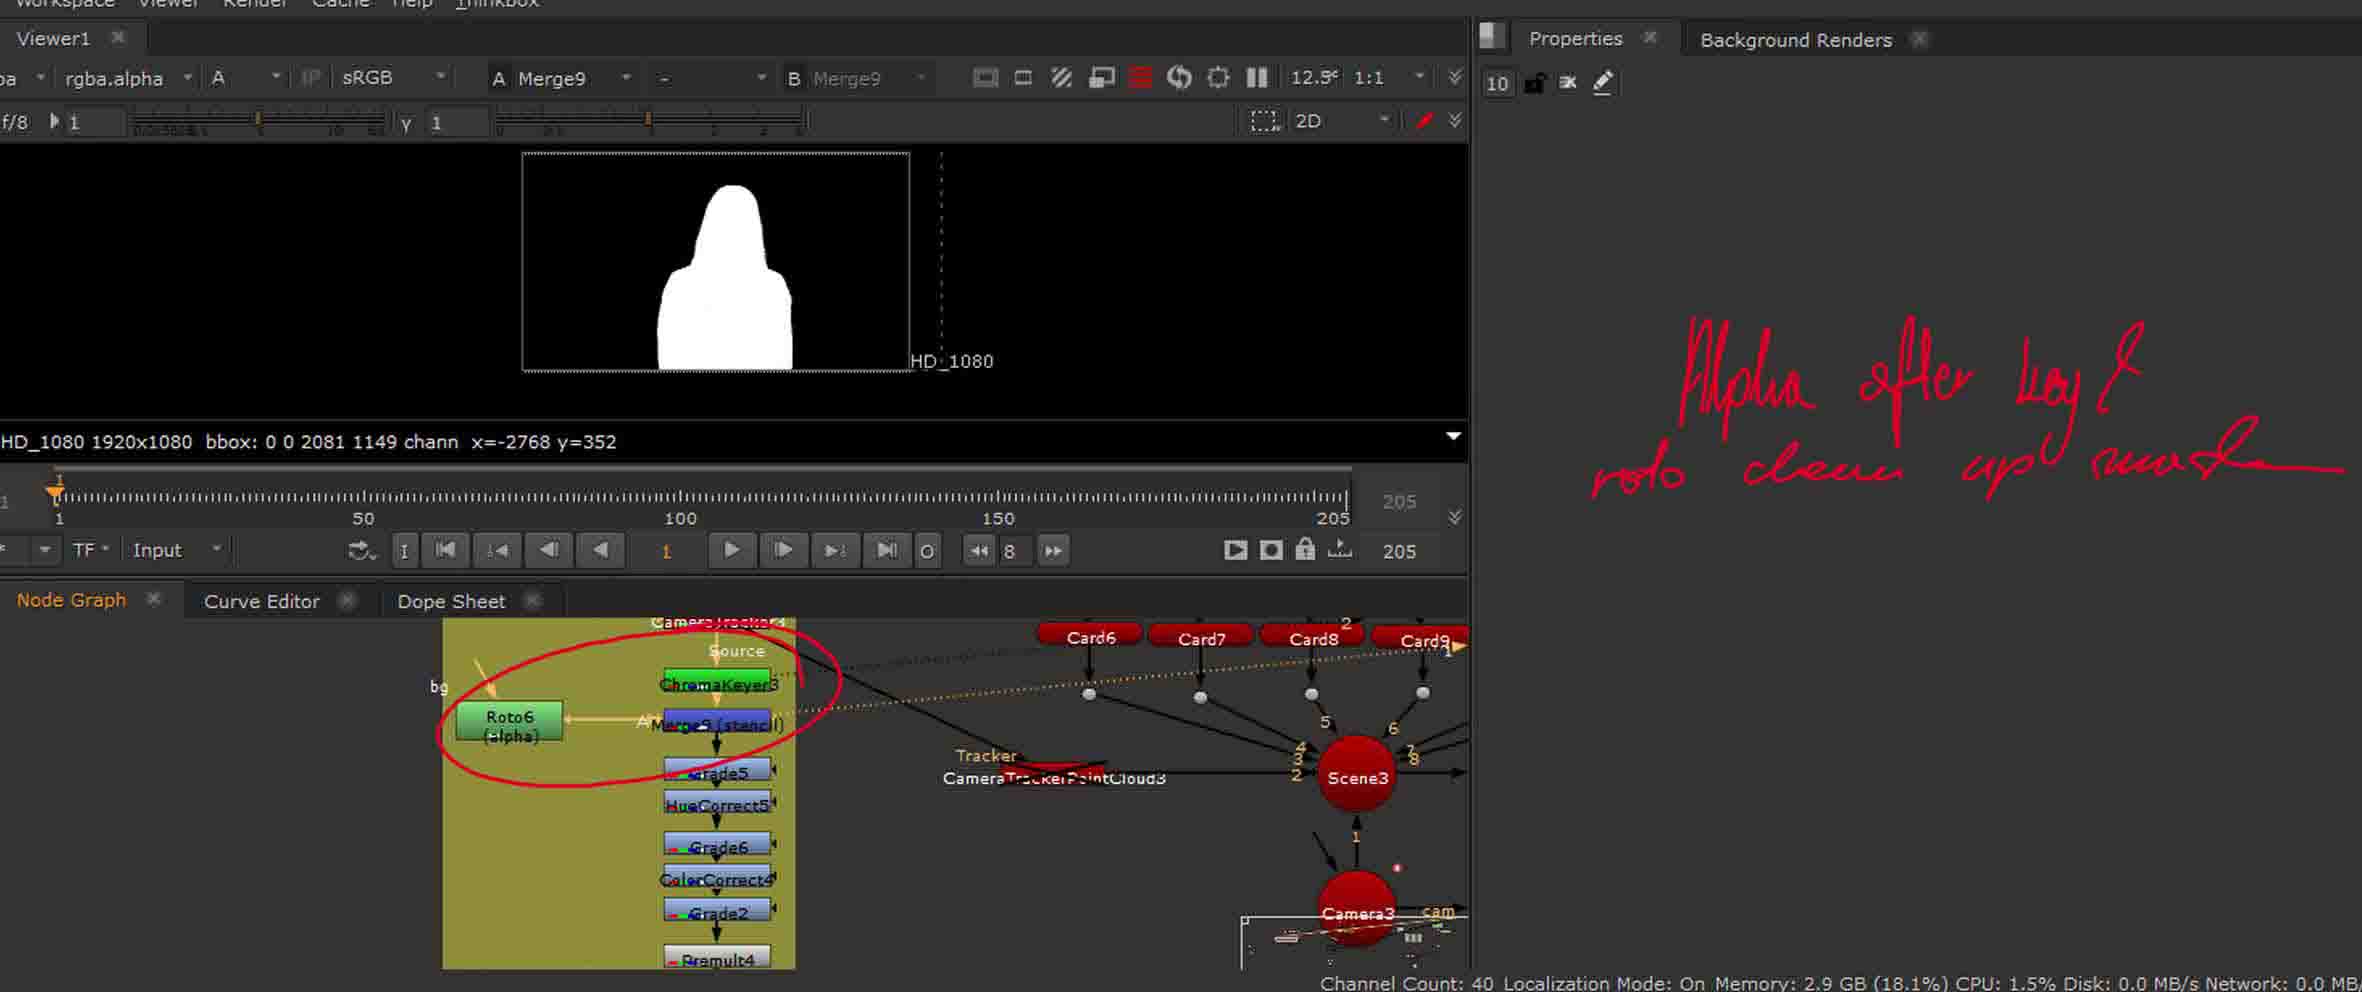
After getting a green screen footage one of the first things is to lift the key and prepare the alpha for the further work, the outcome of this stage is presented below, with a part of script showing the chroma key, roto (alpha clean up mask, covering what needs to be removed, set to remove) and a merge (set to stencil) to get the result below.
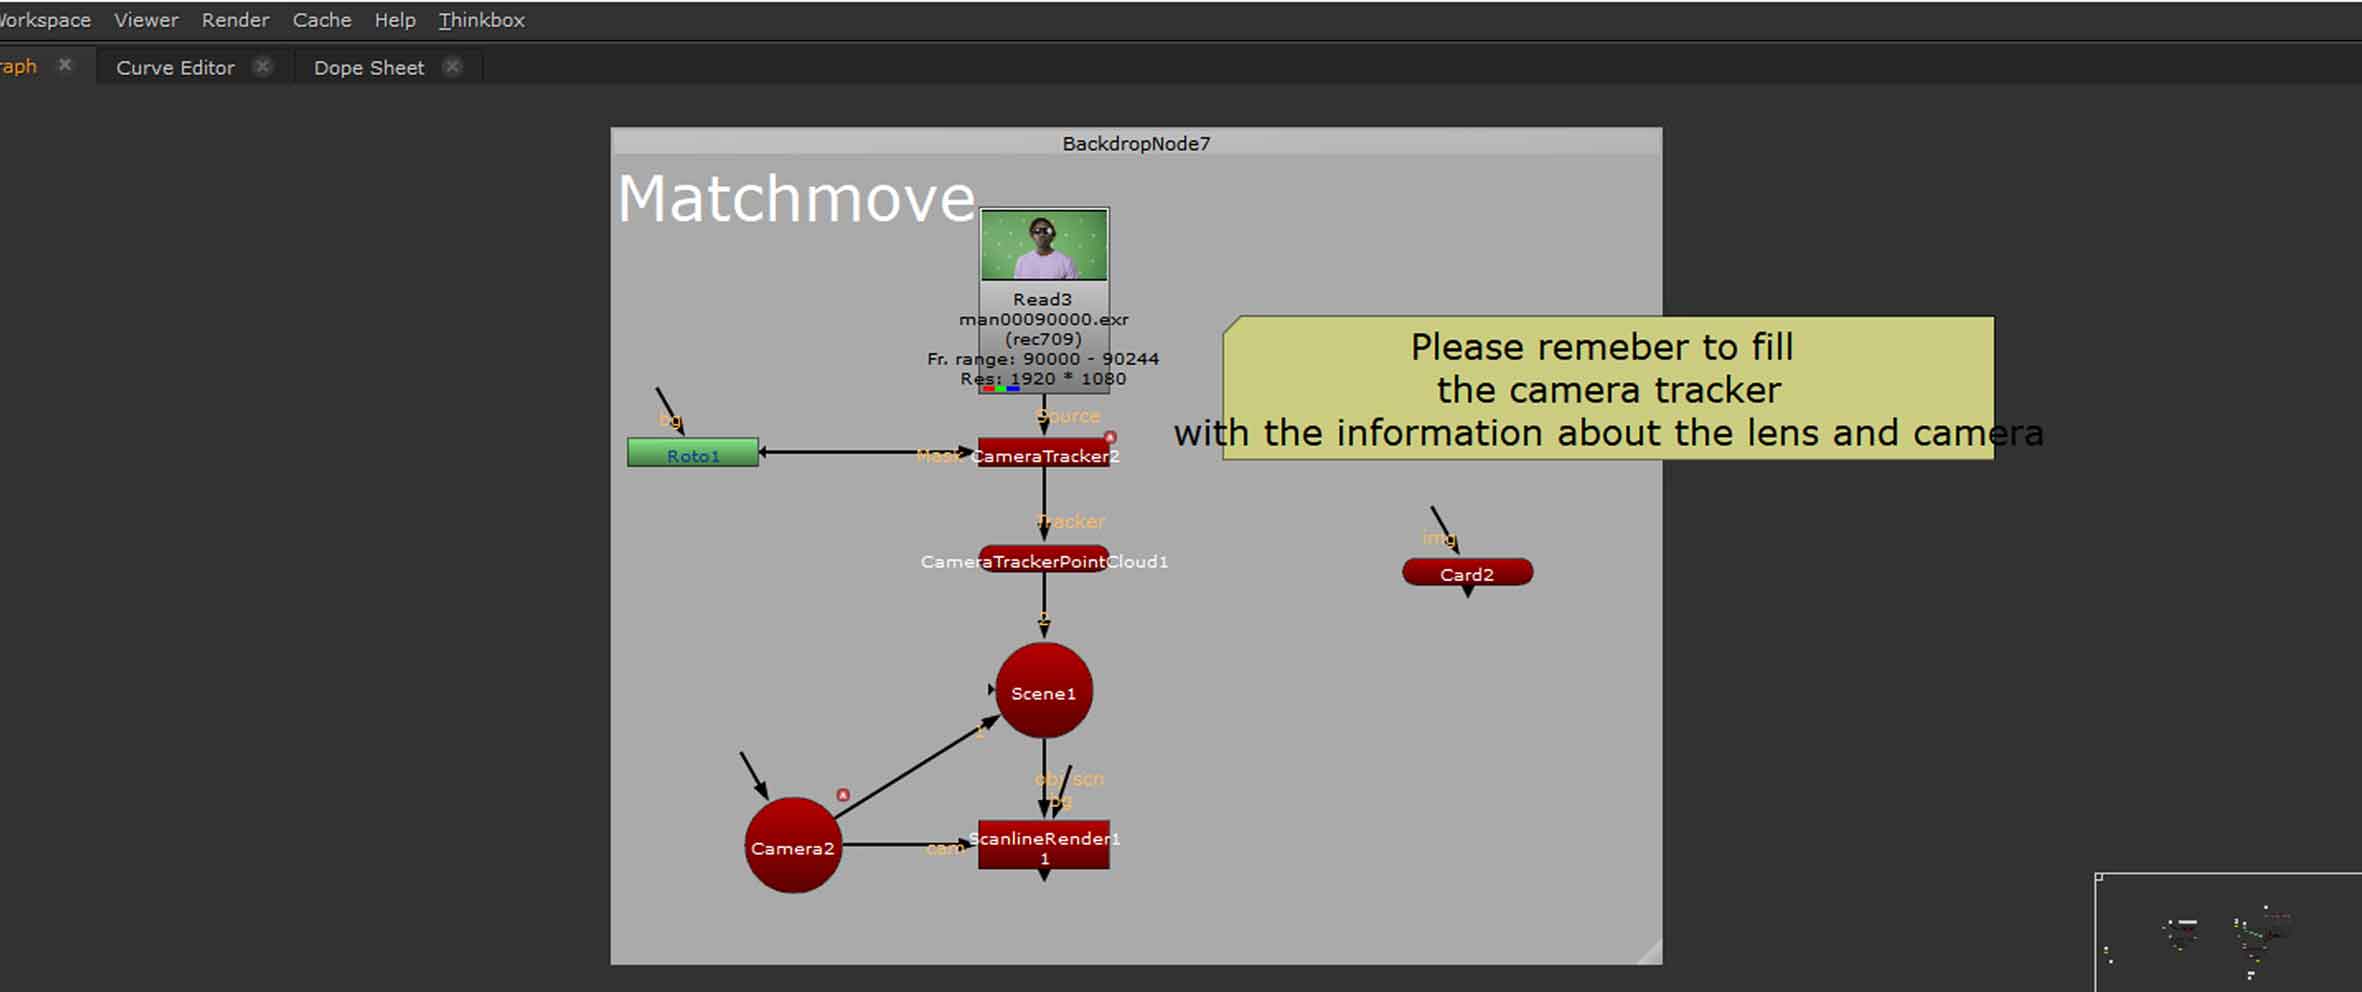
What is omitted here but visible in the whole script (second picture from this paragraph) is the match move, which was actually done before the key, the green screen had tracking markers and a moving subject so we wanted only the screen to be tracked, to achieve this we did a quick roto containing the subject (set to remove?) and plugged it in the camera tracker by the ‘mask’ link, then in the camera tracker we specified that we do not want to track what is contained within the mask and we tracked and solved the scene.
At this stage I usually prepare the grade, premult and edge blur, but I use them a bit later, when I know what I am matching the footage (background).
The whole script, annotated.
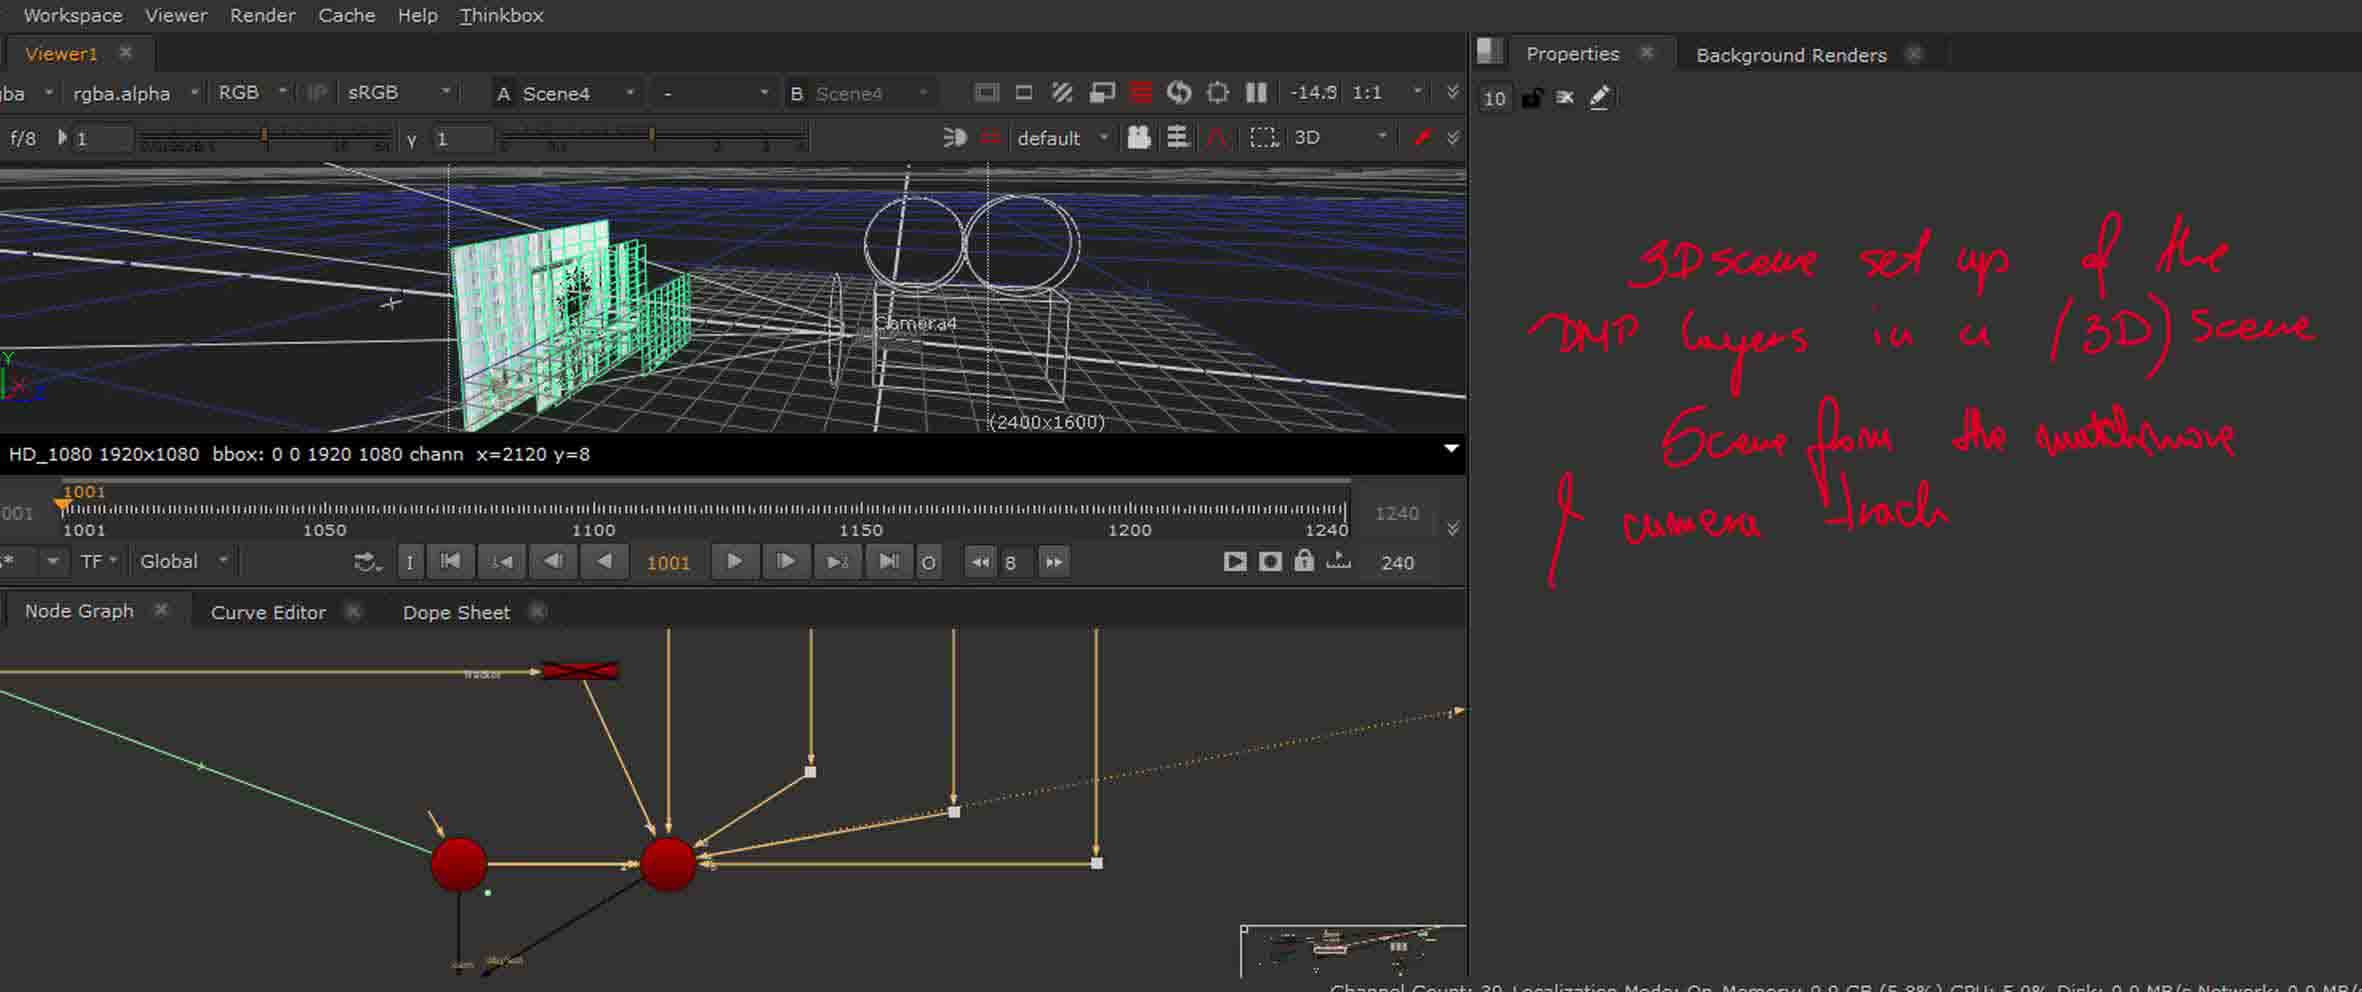
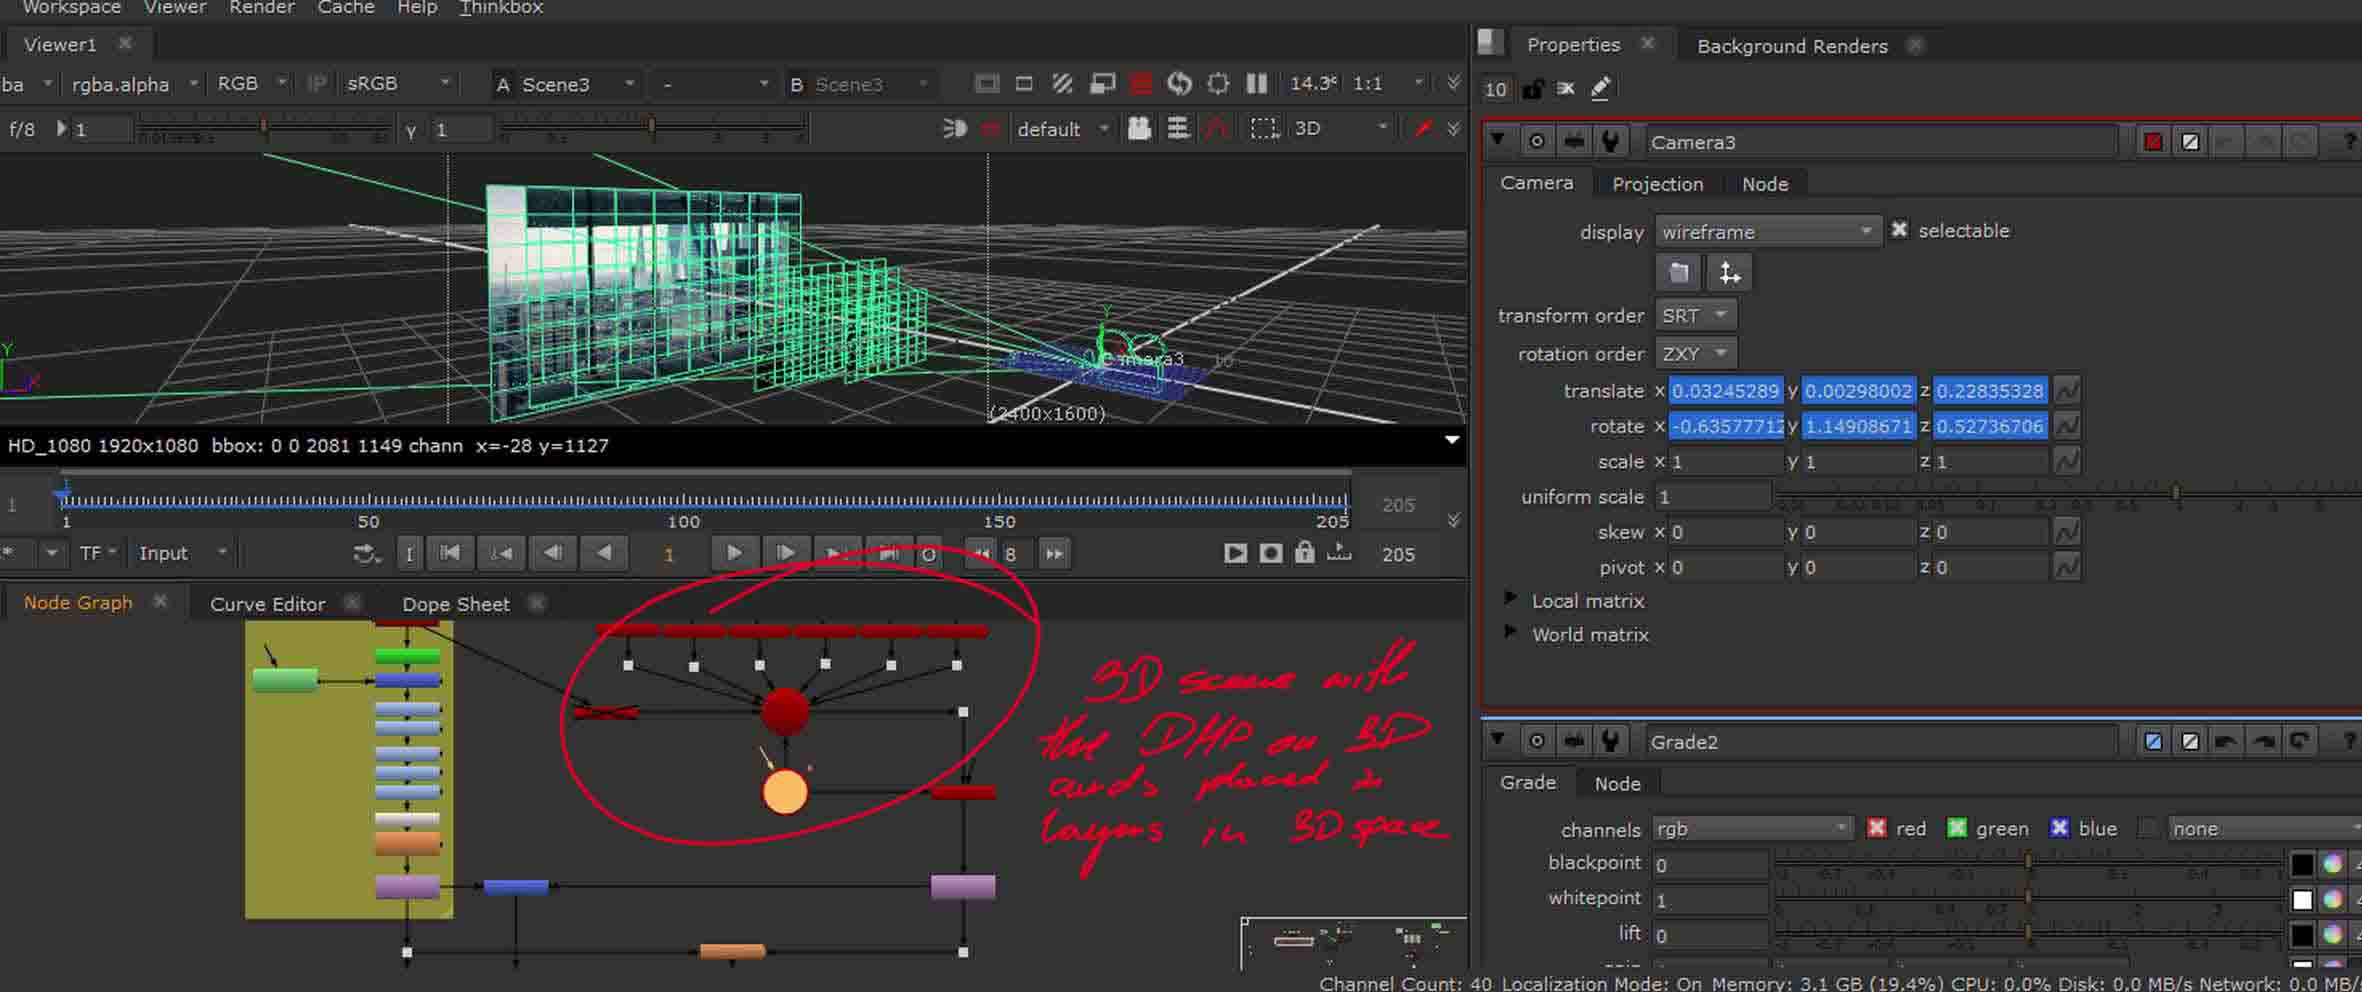
In this case the next part of the process was to get the background prepared and layered in the right way (3D scene layout and depth distance).
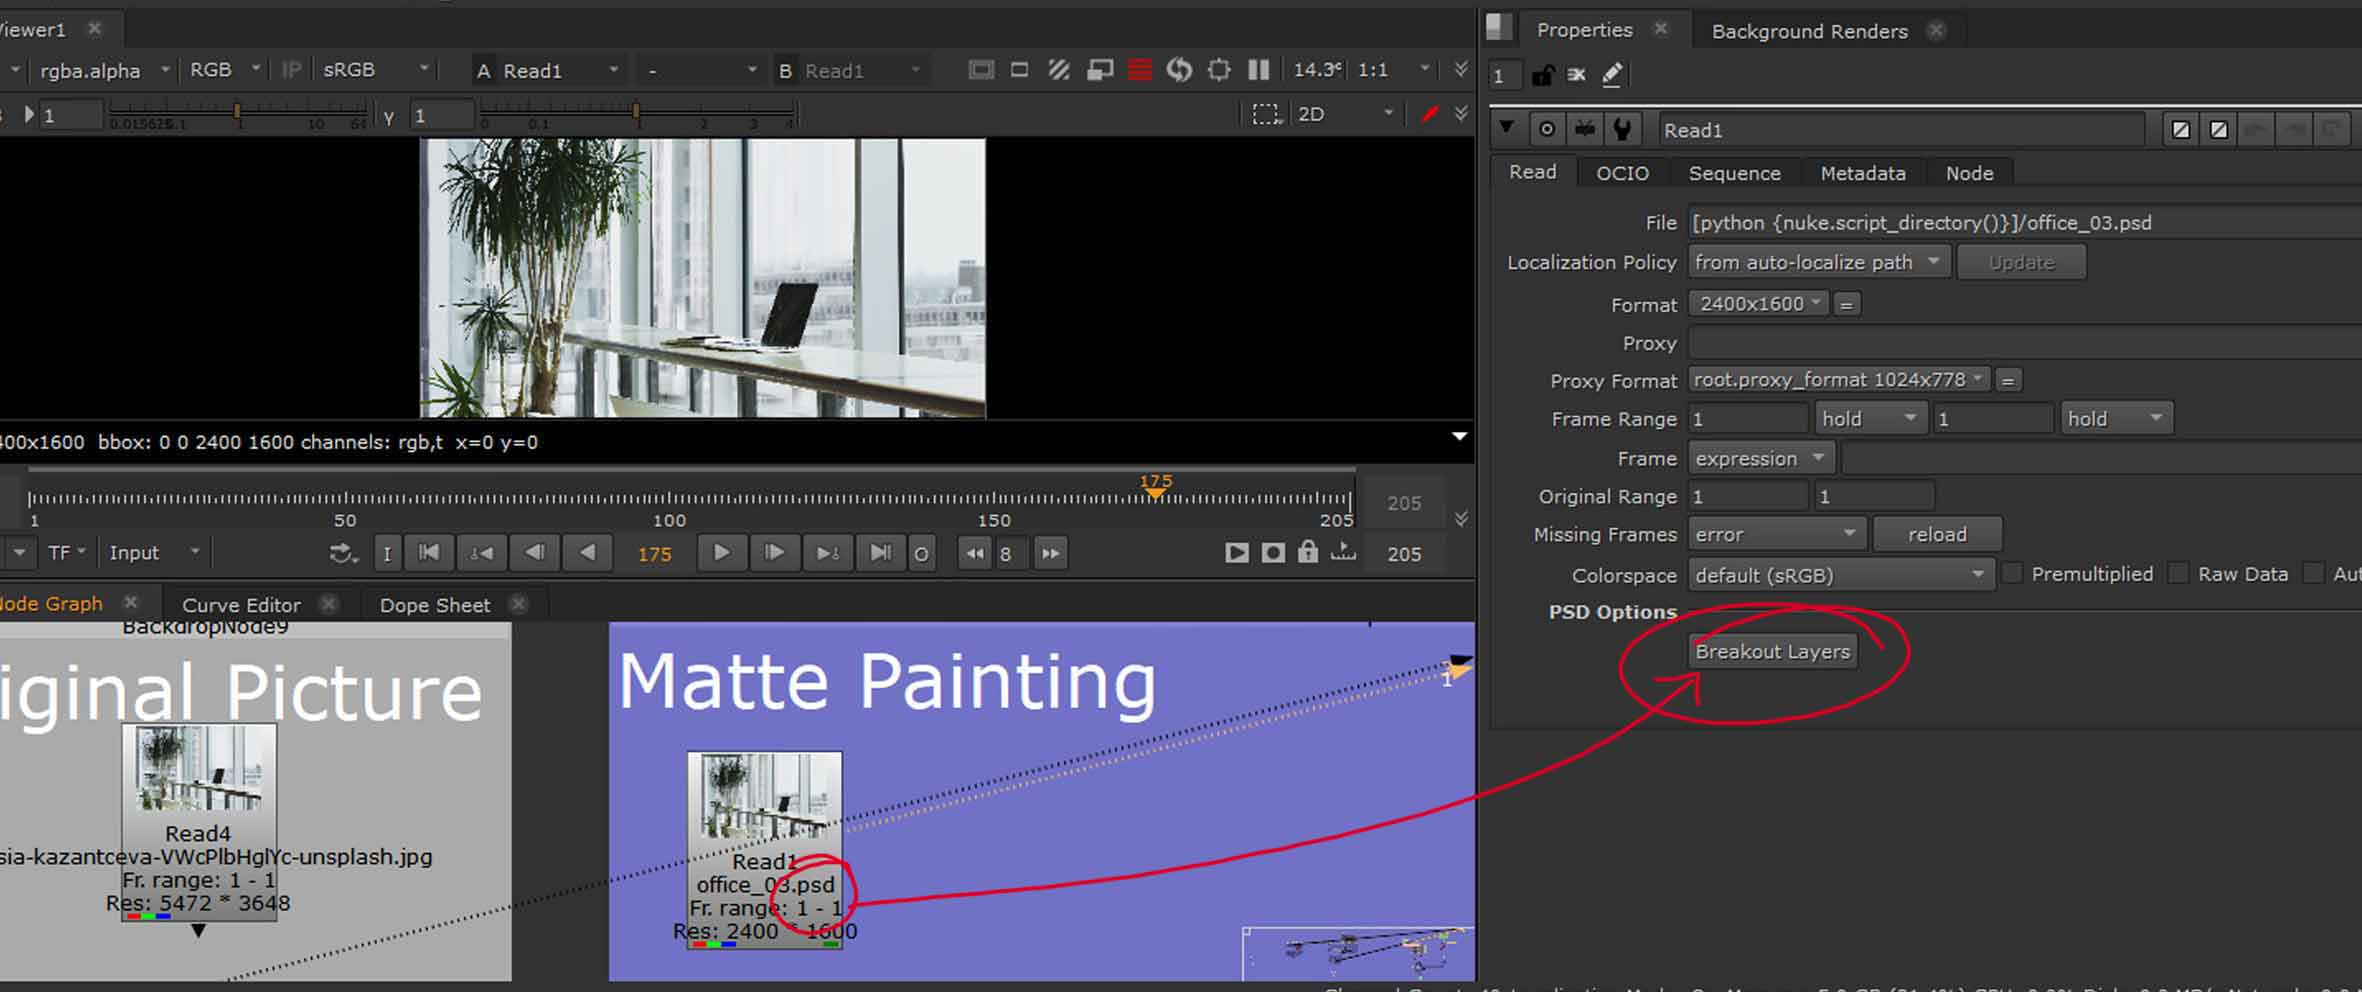
After uploading the PSD file we clicked on breakout layers which gave us this template visible below, shuffling each layer to be separate and giving us some basic options, that we deleted and worked with the general idea of this from scratch. So each of those elements (didn’t need any further work so skipped any adjustement) was placed on a 3D card (set to the camera parameters haperture & …..) within a 3d scene with a camera (all from the previously mentioned match move) and was arranged to create depth while also keeping as close to the original 2D image as it was possible.
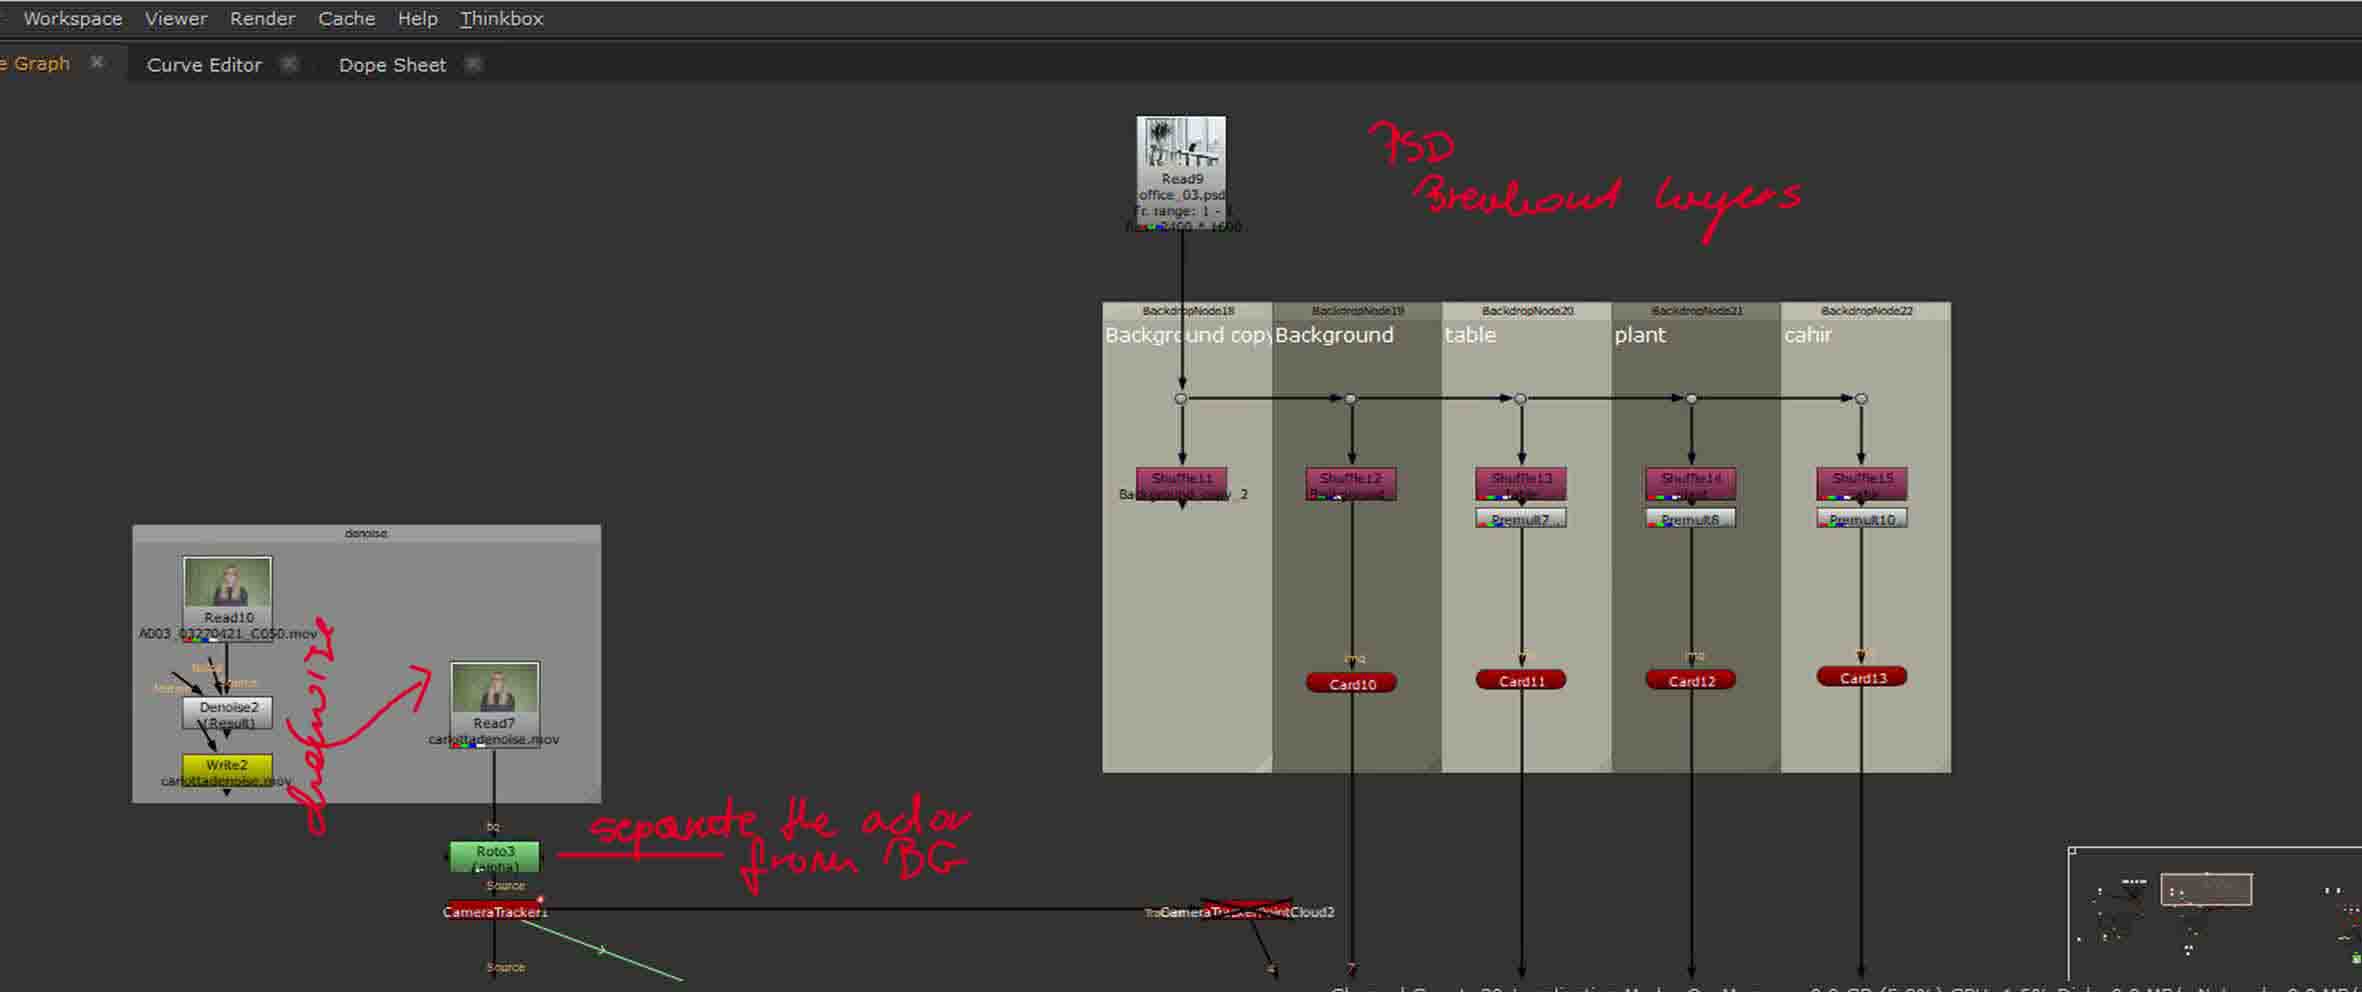
The 3D scene, camera and cards with the layers, mentioned in the previous paragraph.
Next, as I had the background prepared, it was time to grade the footage while trying to get as close of a match to the background as it was possible. I worked on that while displaying the subject within the environment (BG) but here to highlight the process and avoid distractions I’m displaying only the graded subject.
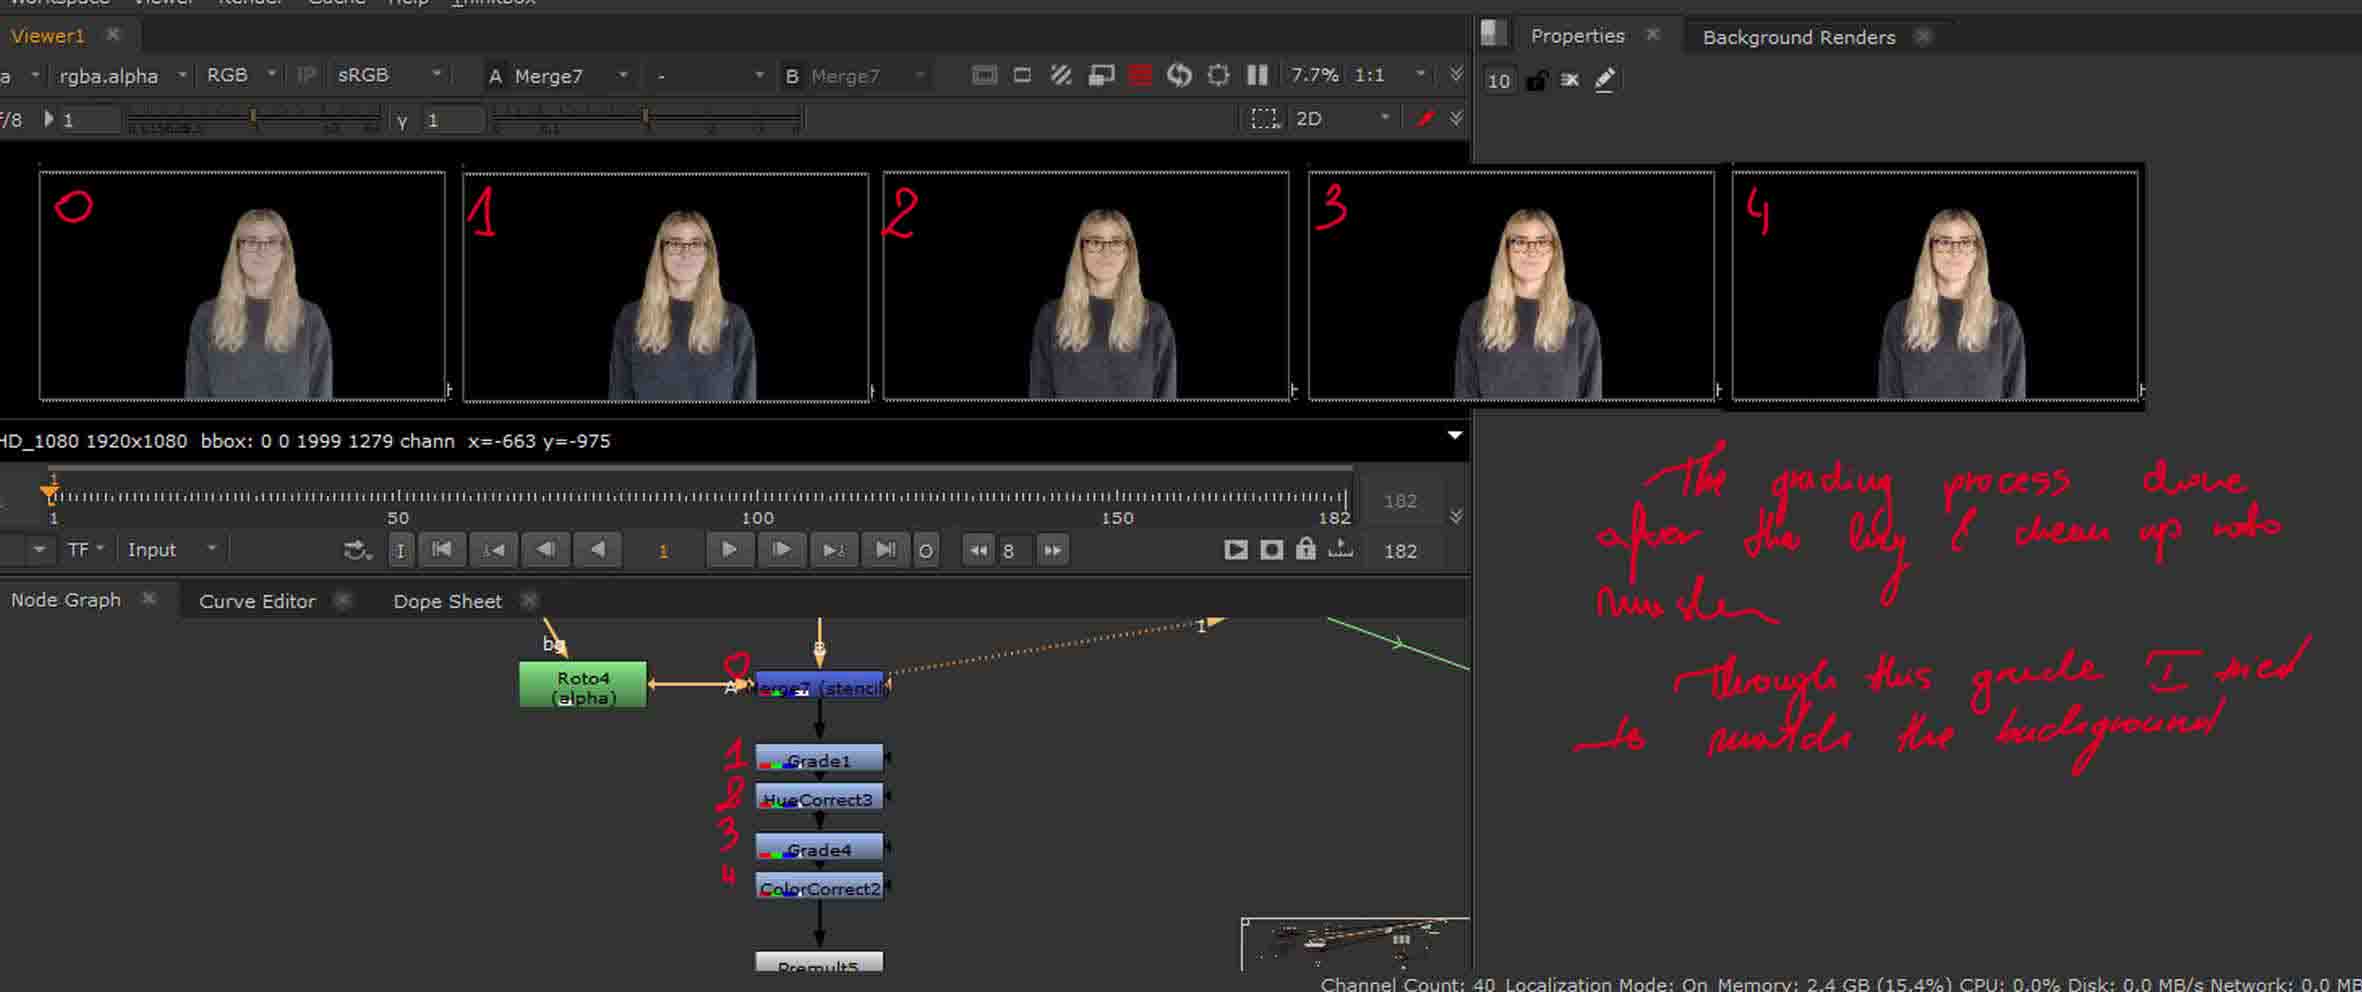
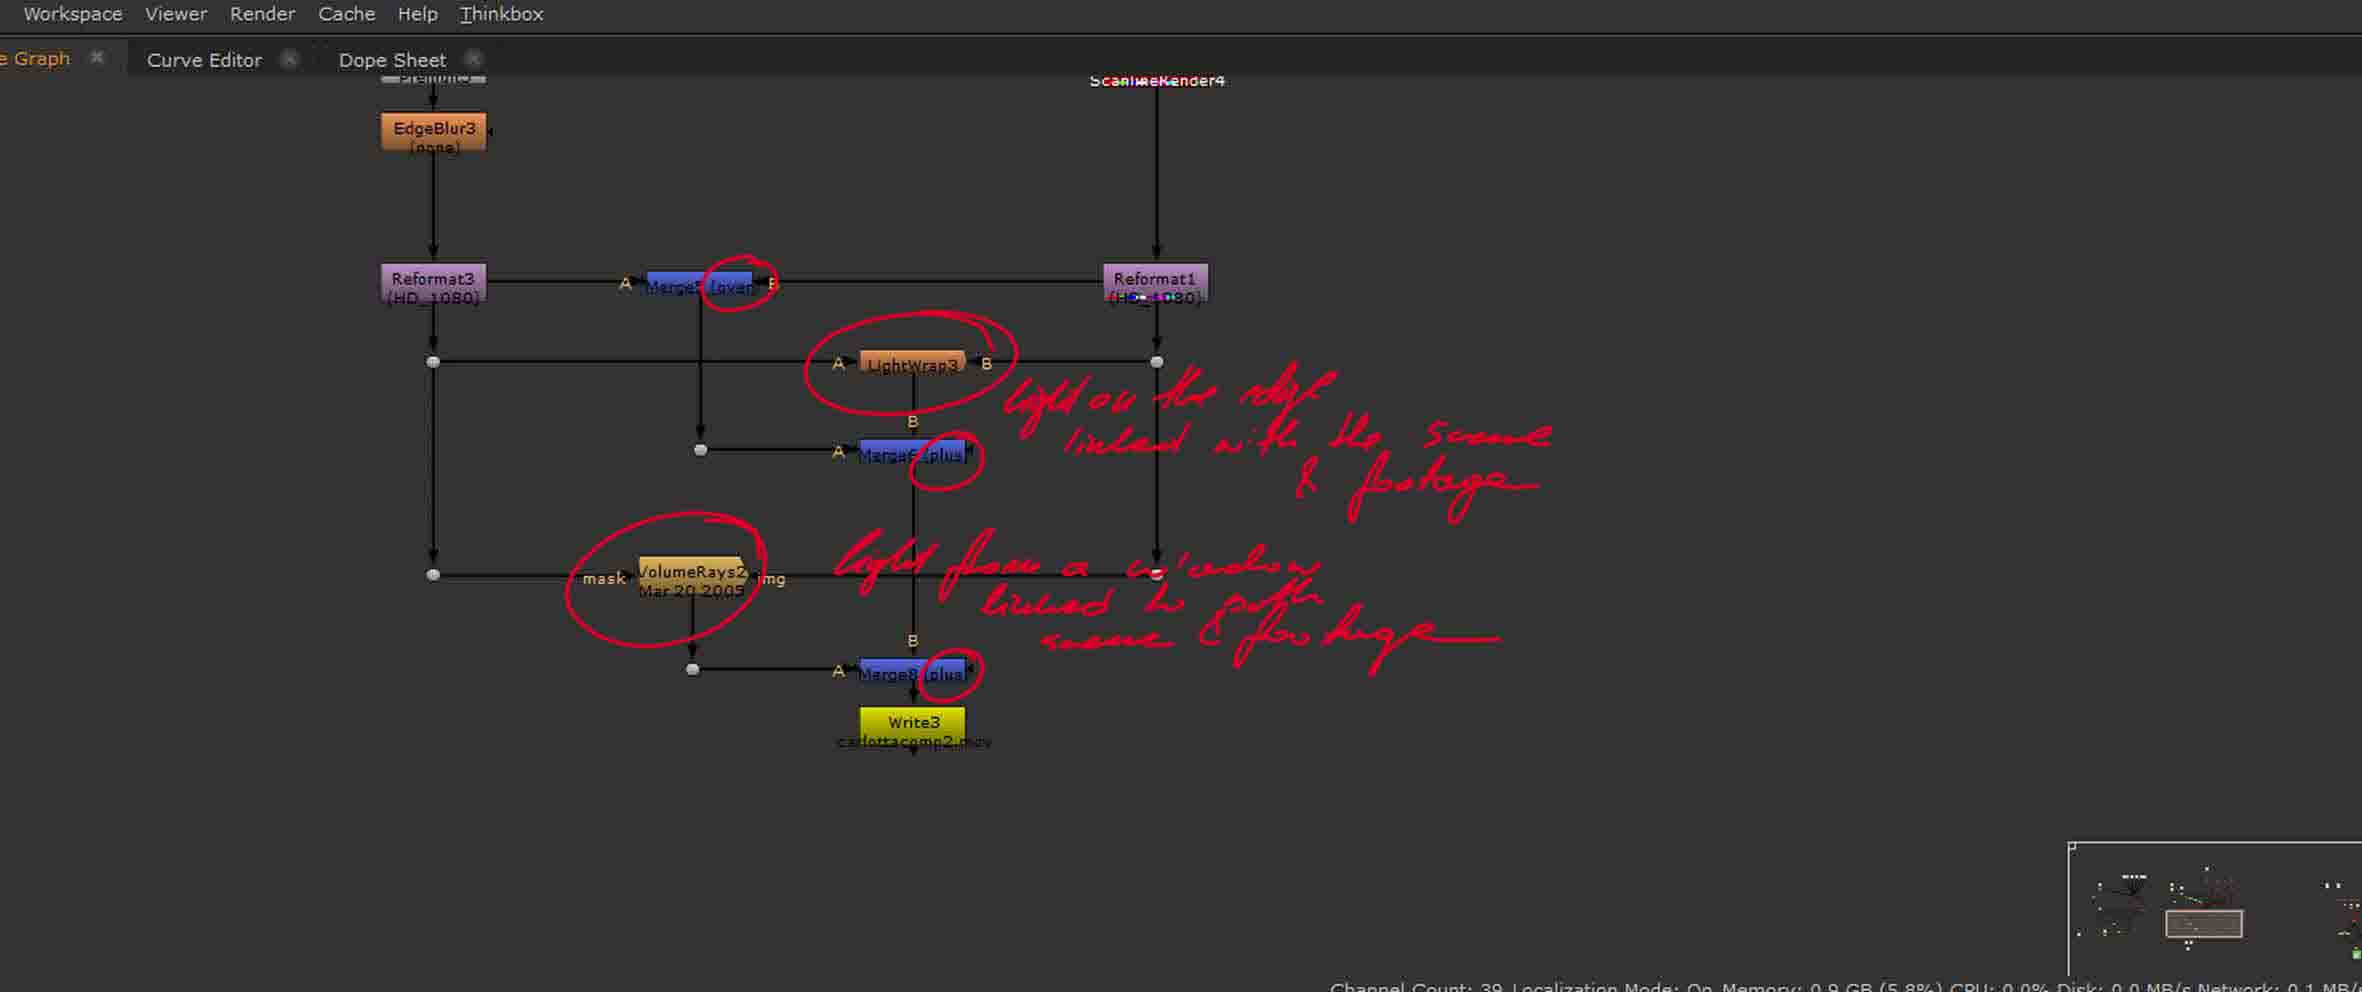
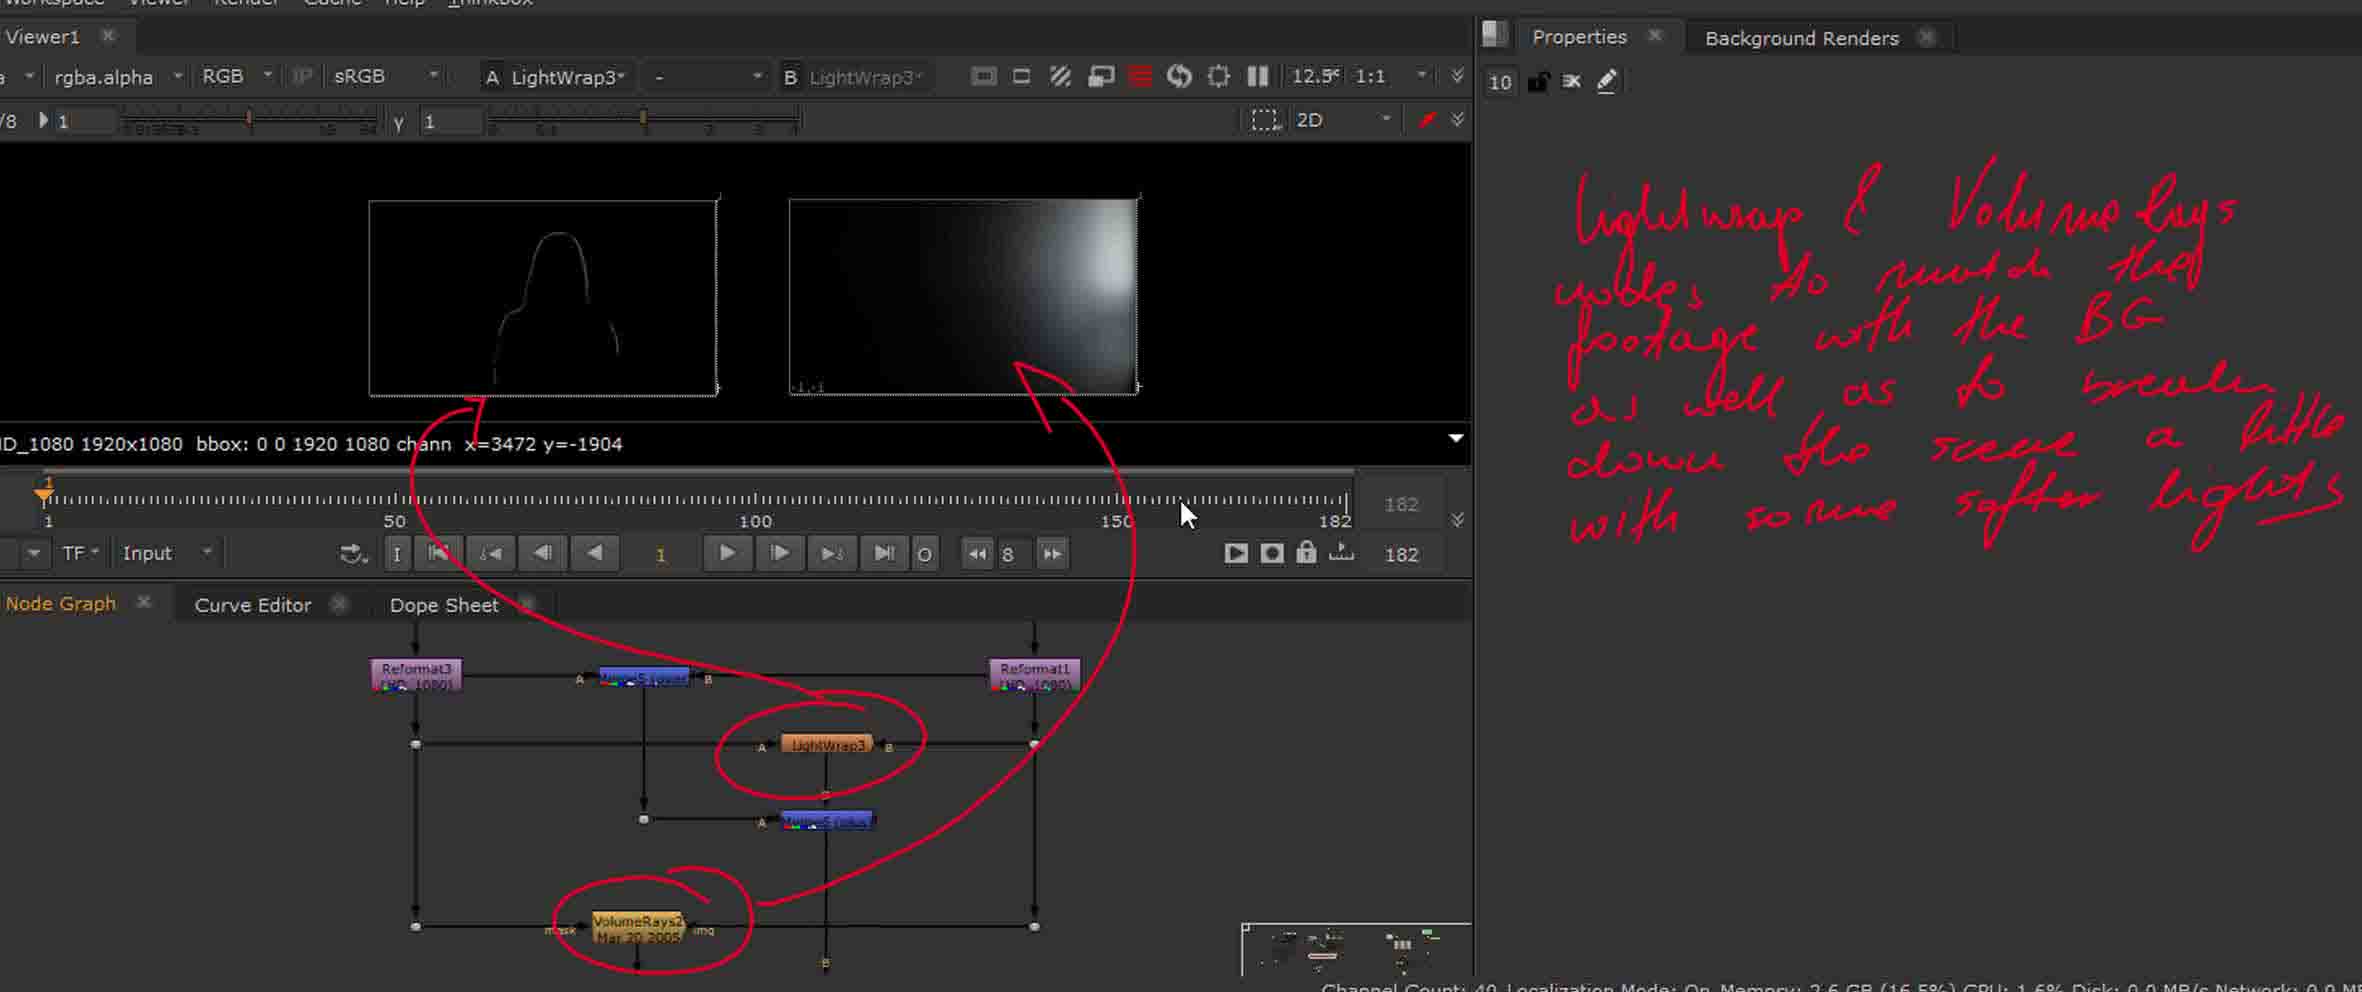
Below, the outcome of the keying and grading process, with a small addition of a tiny edge blur to break down that harsh line from the keying process.
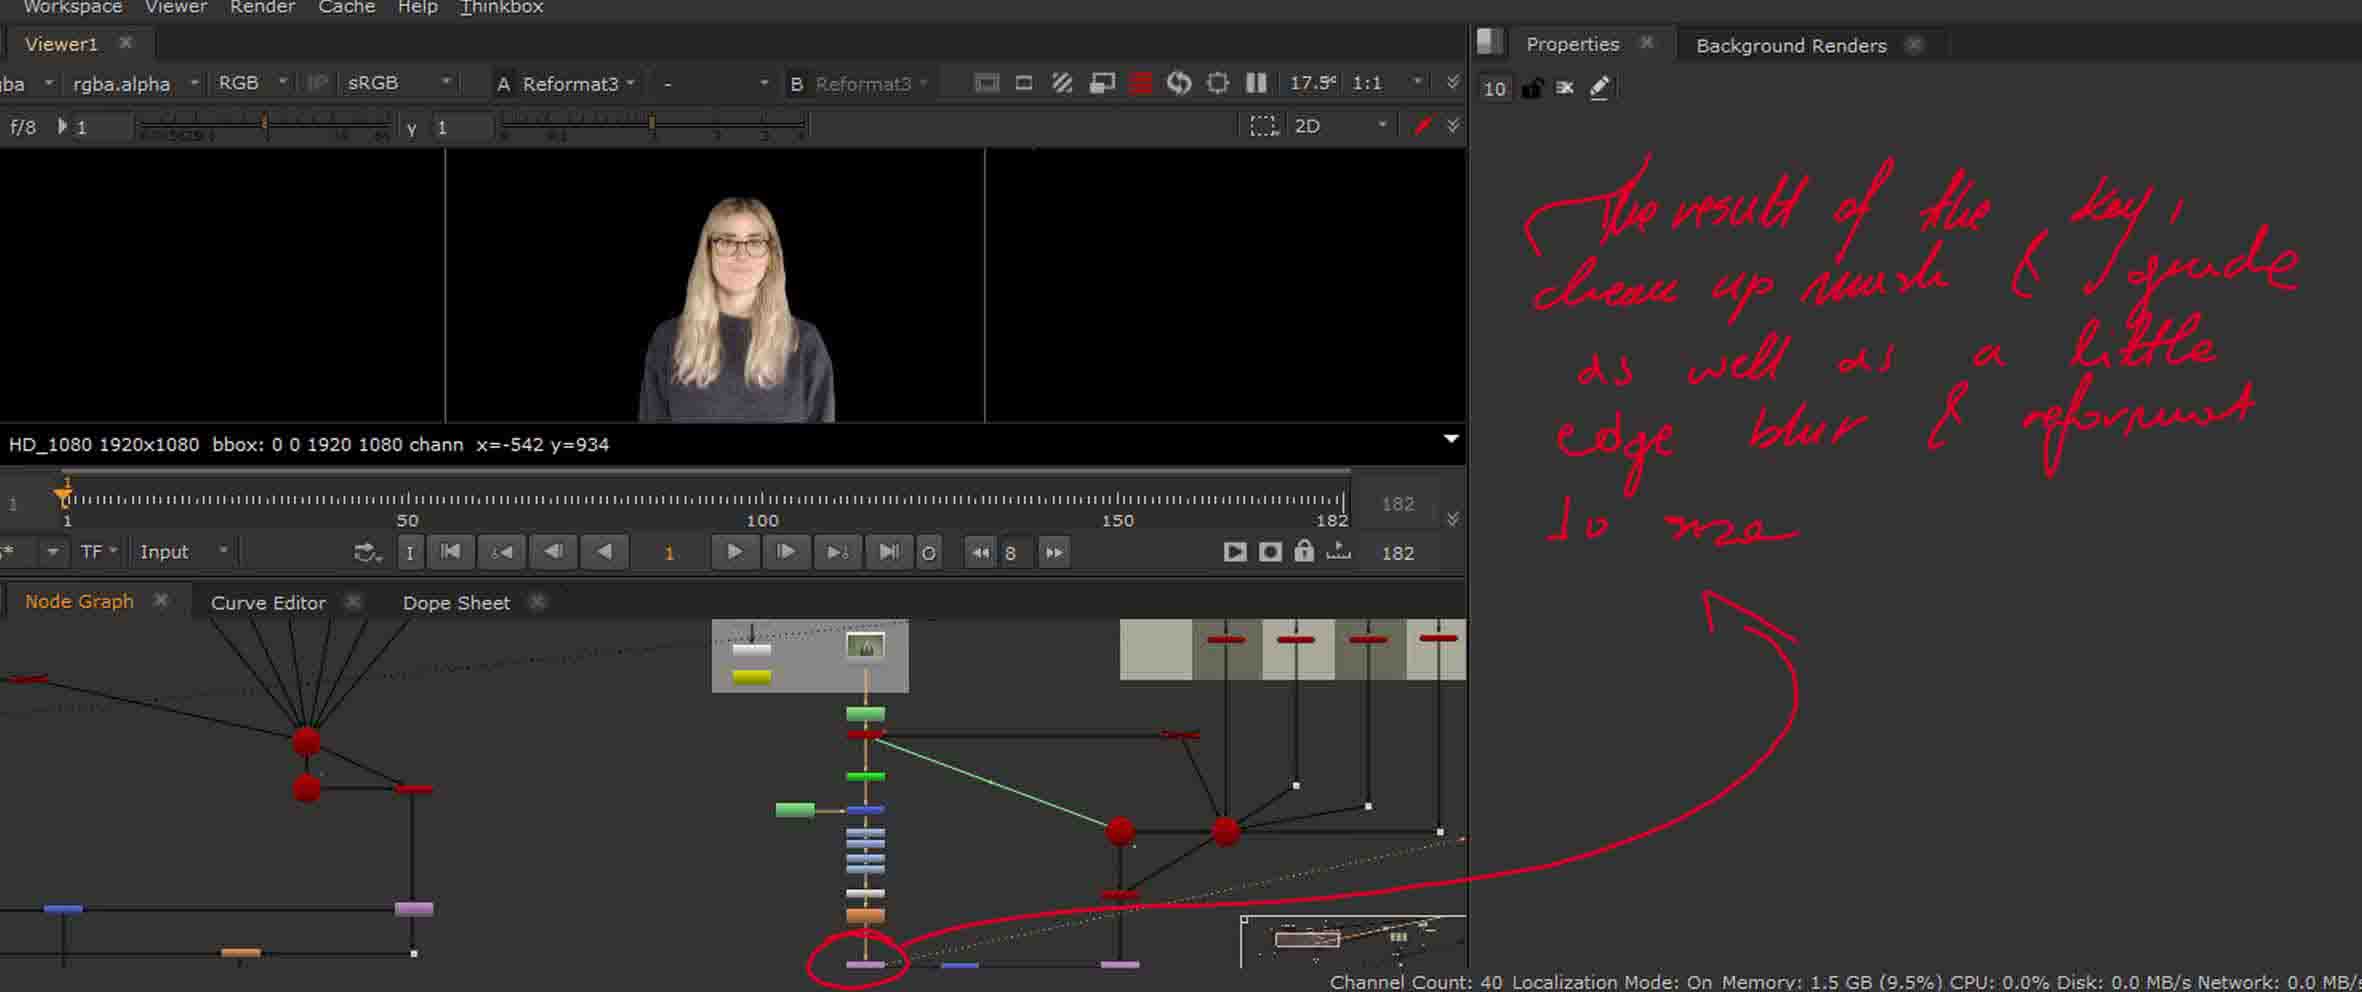
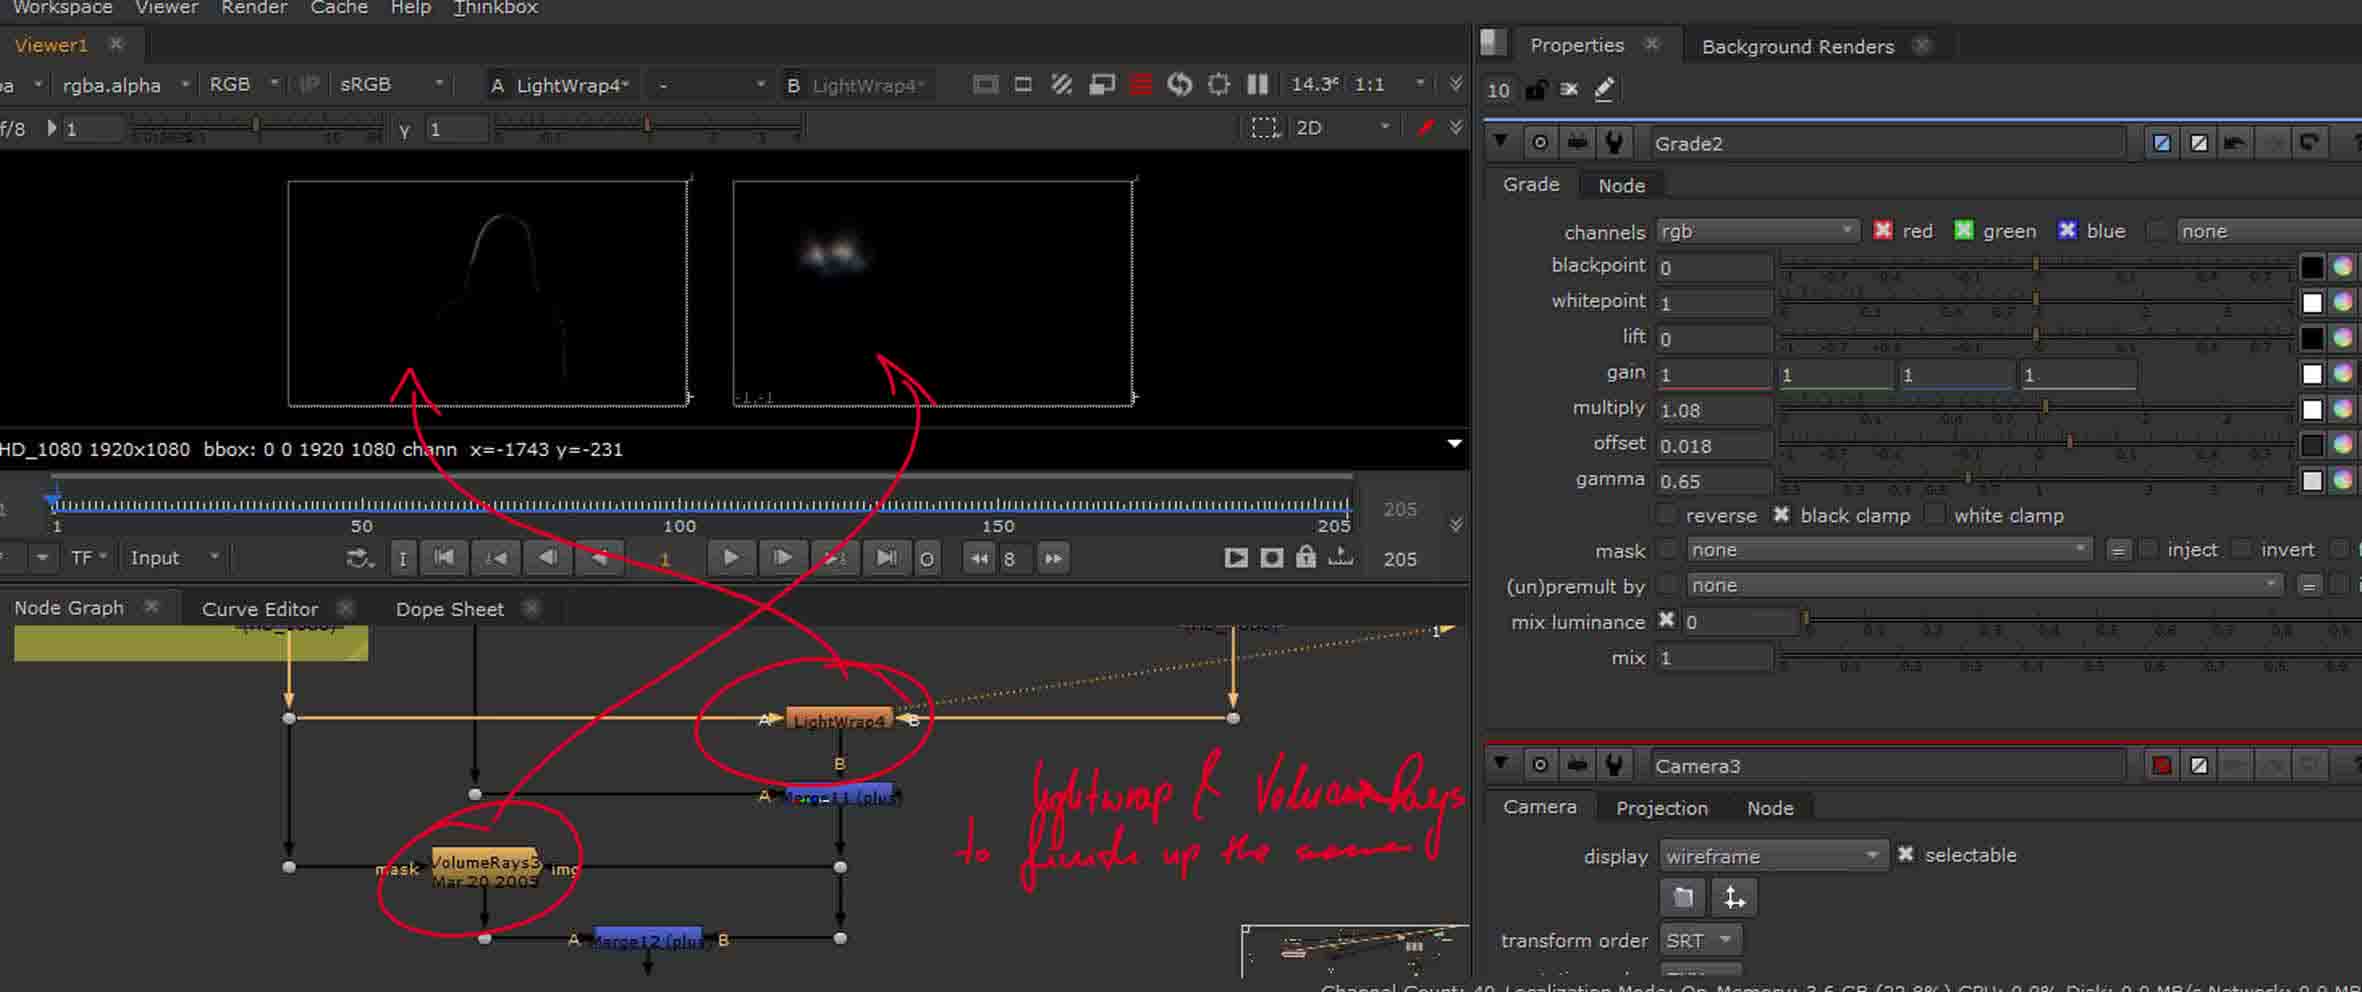
To finish up and get a nice soft edge and blend we used a Lightwrap and a VollumeRays Nodes to increase the similarity and establish a link (in the light) of both of the elements (the light spill from the environment to the subject).
The original lesson script
I decided to keep the original script for the record, as I have done my example without following it and in a slightly different way, and since I would like the possibility to revisit the task in the future I decided to keep the original script too.
The final
The extra scene for practice (trying my own DMP)
As I was interested in the idea of 3D Digital Matte Paintings for a while now, I have decided to try to make my own and use another footage from this weeks task, see how it works from scratch and learn from the mistakes I make (as I have never done this before, except of this weeks task, I knew I will have loads to figure out and since I learn best in that way…I got to work).
Since I described the process in details in the previous example I will just go quickly through this one.
Starting with the roto of the subject to make sure the track uses only the background information, then chroma key and a garbage mask to clean up the alpha, prep of the grade, premult, edge blur and reformat.
Below the script for the layers and the 3D scene representation of what was made, the only difference being me using png files of separate layers (the PSD was larger that I could send in email – I was using Nuke remotely – and there was no point of trying to do it through compressing and uploading to cloud) and skipping the shuffle node, instead placing them on the cards and in scene straight away. I had some issues with the distance of the layers from each other but at the end I managed to get the relatively ok.
Next was the grade, and trying to match the subject with the background.
As in the precious example Lightwrap and VolumeRays to soften the lighting and blend the components together a bit.
Below the whole script of the scene, annotated.
The final
Evaluation
Original Exercise scene
Even after revisiting the final render a couple times because the edge was terrible, I am still not convinced by the blending of the edge, I managed (with edge blur and Lightwrap) to soften the border line a lot, but there still seems to be something like a ghost line, which I believe was created by relatively intensive Lightwrap, but this still looks better than what I had before, so I decided to keep it the way it is now. The lightwrap on the left upper arm is visibly too much and the glasses have yellow tint which I had no idea how to remove or adjust, but except of that, I dont think its bad.
Extra scene
Considering this was my first attempt at a 3D DMP, it wasn’t terrible although There is some visible issues that this video contains, most visible being the weird jump of the environment that largely exaggerates what the actual footage does, I believe this can be cause by an unstable track or the distance between my cards but to really figure it out I will need some more experimentation, which I probably will do eventually, because I actually really enjoyed this process.
The second issue is the visibility of the VolumeRays, they are way too visible in some places and it is not realistic, because they behave like a lens flare, however they are not looking like one.
2. Interview Themed Workshops 1st & 8th June
My notes from the lessons on the interviews and show reels.