FMP Test & Trials
As in the previous term I decided to start with checking if I can get this system to work for me, to do that I worked on a few much smaller and lighter projects, learning and exploring the system without worrying too much about what I was actually creating or if it was made from scratch or using other people models.
Built in Demos
I started with the built in demos that Ziva provides. I went through all of them in various level of detail, as some I knew will be relevant and some I didnt know much about, the relevant ones I screen recorded and posted below.
When I checked out the anatomical arm demo, I figured i could use the meshes and try to recreate the rig and simulation as long as I can delete the sim rig in the first place. I managed to do that, so I ended up using it for my first actual muscle sim test (first that worked).
I have also found the manual or documentation for the built in demos. I was hoping the documentation will be done in a sort of tutorial way with explanation about what was done and how, but it only describes why they included demos and how you can access them as well as where you can find them externally.
Below some screen recordings of me, exploring the demos. A useful link here can be the documentation part about nodes, which explains the functions and roles of every node used in the system.
Ziva Attachment Demo – I started all the demos by playing them and seeing what was happening, then I compared the zTissue and zMaterial parameters to establish if anything was different, or if everything in the scene came from the attachment qualities only. When I found no differences, I moved on to the zAttachment parameters and compared the two different ones, again, there was no difference in the settings so all the different reactions in the scene come from the type of attachment, red – fixed and purple – sliding.
Ziva Materials Demo – After playing the scene to see what happens, I looked through the attributes quickly, skipping through everything that was not a zMaterial. Then after I found the two material attributes I started comparing them to see the difference visible in the scene, I played around with the settings just for fun and to get used to the way the system works and I was trying to find out how one material affects only a part of the object. On the video I havent show that, but later on I figured out that the area of affect is controlled by a simple weight paint.
Ziva Collisions Demo – Again, started with playing the demo to see what the scene is about and what is happening. After that I went on to check if there is any difference in the settings on the attributes (tissue, tet and material) but since I could find no differences I assumed that the different behaviour comes solely from the different type of collision set. So then I combined the collision settings on both balls, and as I thought, the difference came from the collision attribute, which I then played around with to make absolutely sure (changed the settings to match and checked again).
Ziva Cloth and Fascia Demo – starting with a cloth demo with a bone and a cloth object falling down on it and interacting (typical Cloth sim) and moving onto the one that is a possible workflow for a fascia layer sim. Started with playing it and pointing out which elements are in the scene and then creating a simple cloth set up to compare the settings with a default, to find out what attributes and parameters were adjusted to achieve the shrinkage and the general effect. I havent officially checked that but I believe that this is how the fascia layer I made and simulated (on tissue not bone which was a mistake on my part in the above video).
Ziva Isomesher Demo – There was nothing to play here as it was not a sim (yet, I think that this is a fast way of getting a shape close to the setup for making it a cloth and siming it for the fascia) so I had a look at the outliner to see what we working with, and I figured that everything was combined together and – in an actual sim – cached to an alembic and brought back in as a cache for further work. Then the isomesh was created (Ziva tools menu) and I had a look at the parameters of the attribute, and later compared them to a default one to see the changes again.
Ziva Anatomical Arm Muscle setup Demo – This one was the most relevant and I covered it in the most details, but to be honest it is just a collection of the topics previously described to create something bigger and more purposeful (actual muscle sim). I played through the demo, then had a look at which element is which zObject type. Next I had a look at the attachment types, and the tissue, muscle, fibre and material properties in the attribute editor. Then I had a look at the solver and eventually tried out a few different solver types to see the effects (from the research I knew which one is used for what purpose but I wanted to see the changes).
Anatomical Arm Demo Own Sim
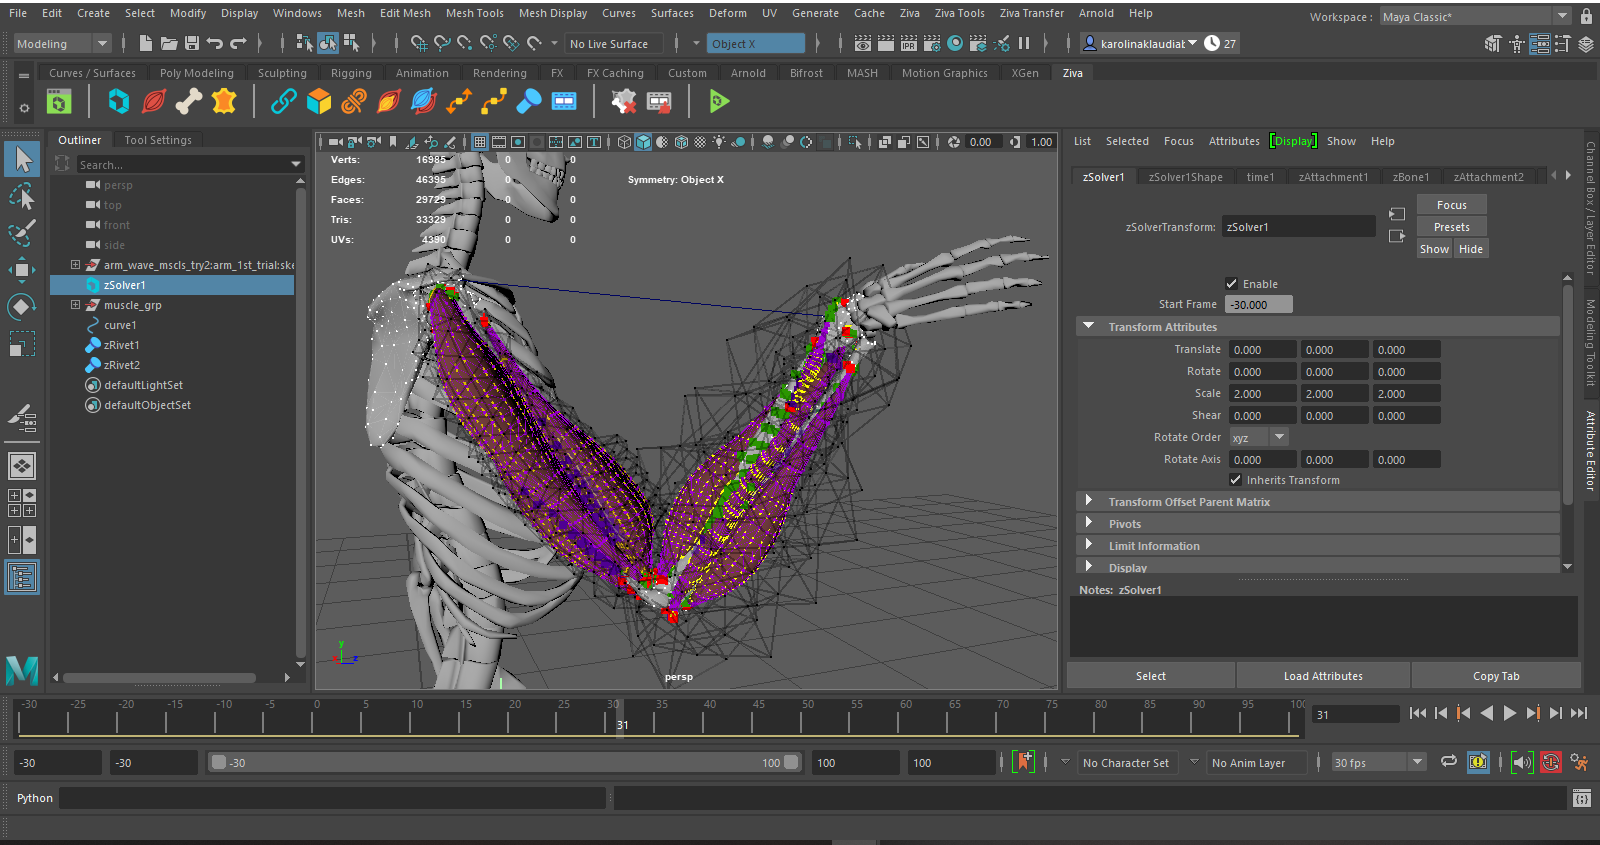
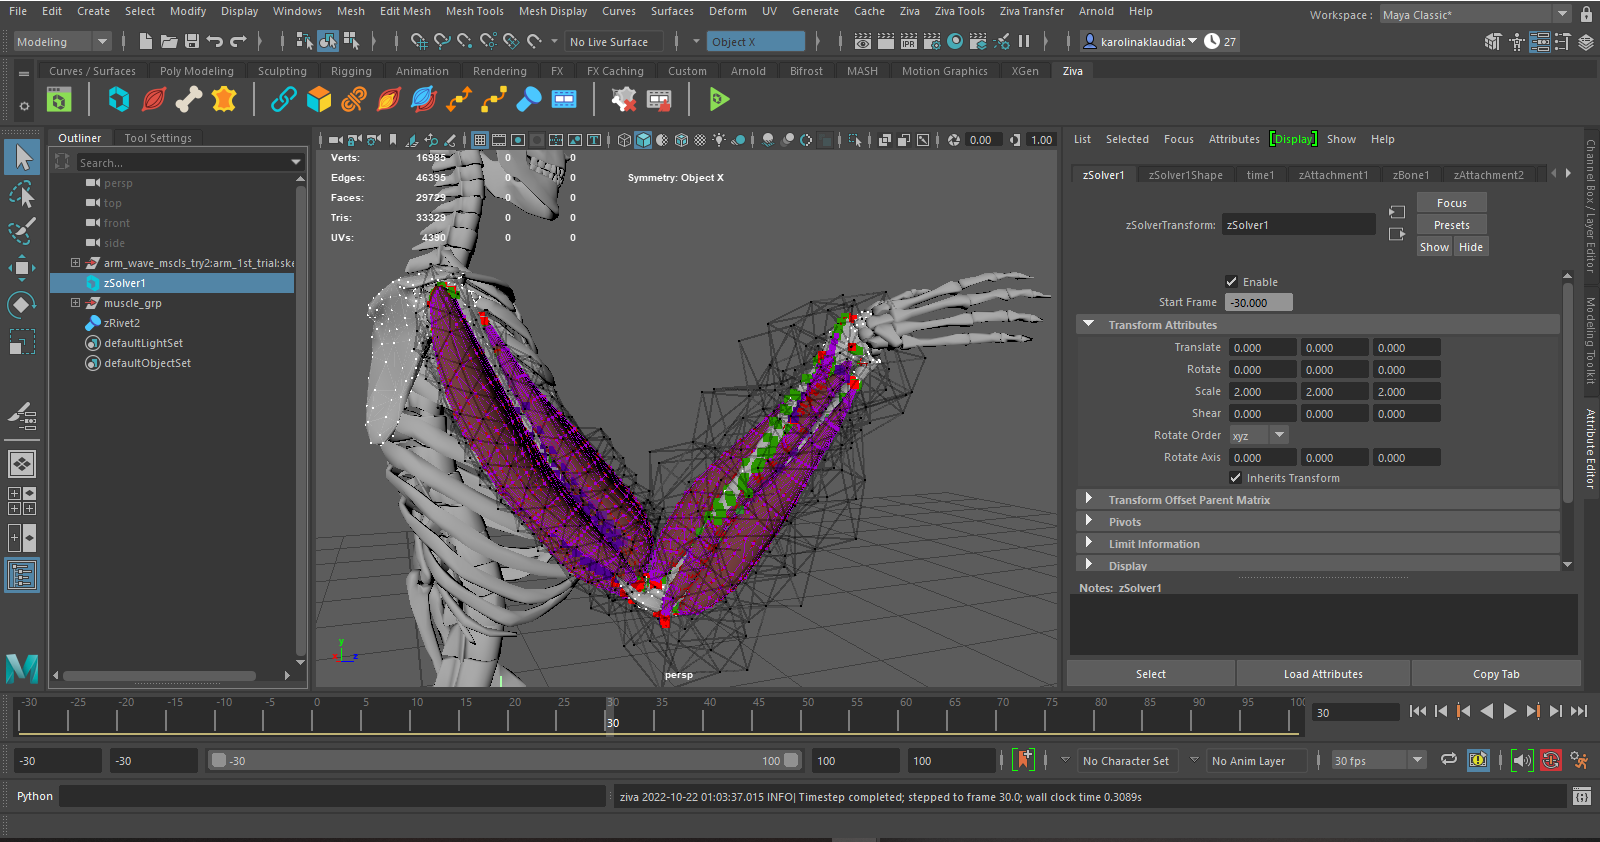
The next stage, as I mentioned before would be to check if I can delete the sim rig and redo it from scratch on the meshes supplied, and this worked perfectly so below the video on the left shows a timelapse of my work and the one on the right the result of a quick first (working) muscle sim.
- Delete the sim rig,
- Make the bones zBone objects,
- Add preroll,
- Set the Solver,
- Work on the muscles one by one,
- Set a line of action,
- Cache,
- Combine and try Isomecher and cloth for fascia (out of curiosity as I havent properly researched that).
The result of the first, quick attempt at muscle sim. I only spent a bit over an hour on this (would be faster if I knew what I was doing and was used to it) so the sim if far from what it should be, but i know it works and that I can work with the system now, which was the main purpose of this test. The sim is glitchy and not set properly.
Please ignore the jump on the beginning of the sequence thats in preroll and I forgot to adjust the timeline after cache to not include it. It is not an issue though.
A couple further notes on the sim and results, this was mainly based on trial and error, I knew the general workflow, but I knew almost nothing about the results of particular parameter changes, I knew nothing of there the attachments will work best and which type or strength of an attachment I should have used, I still dont know much about it, but in all honesty that comes with practice, so I am, not worried, maybe even my outcome wont be good enough, but as long as I learn and practice the skills I will achieve my goal for this term to the best ability I can manage right now.
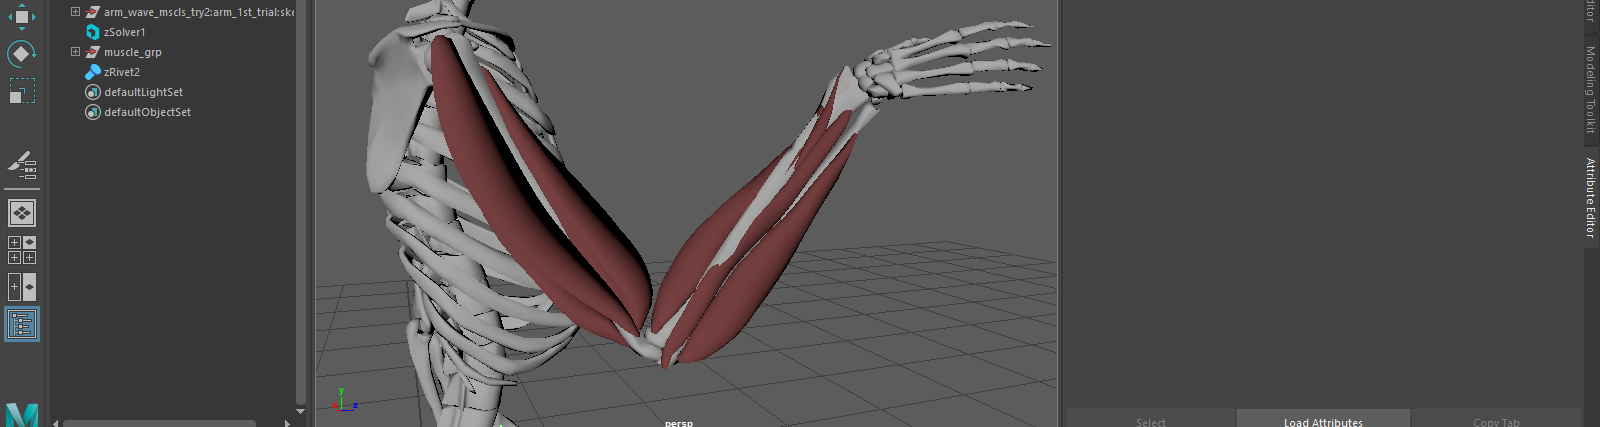
The last three muscles were all attached with default values, and nothing on the tissue or material changed, except adding the line of action (one in the scene, not accurate or correct, just a trail) as I didnt want to spend hours on a one test, especially that I was planning at least one more.
The result of the fascia was completaly unstable, as I’ve done it in 20 minutes, no cloth sim with so much contact and collision can be set correctly in such a short time (and most of this time was actually waiting for the isomesher to do its job instead of setting the cloth sim), but it doesnt matter because it was only a quick experiment (not even sure if I did it in the correct way).
Waving Skeleton Come back 🙂
The demo I have redone in the previous section was always working, so I am fairly sure that I could do the sim on it back in the last term too (havent thought of it then), what was the issue was an external model that I brought in from outside. I know now what the issue was and I can simply fix it, and since I dont like feeling defeated by a project it will be my second test piece 🙂 – first because it is all already modelled and animated and second so I can make sure that I know what the issue was and that I can fix it now.
The issue and result of my last term attempt can be found in the links below.
https://www.youtube.com/watch?v=_uVoXDQiErM&list=PLWyA5Gdk3T5Uqp4BpSytYUItErTomm1eg&index=3
https://www.youtube.com/watch?v=1BrAfFjXt-k&list=PLWyA5Gdk3T5Uqp4BpSytYUItErTomm1eg&index=4
Work and Results
The video above is a timelapse of around 1.5 hour period in which I was working on this model. The workflow covered the same areas as the previous demos, so I wont be covering that again here.
To make sure that I figured out the issue, I started with the same file I worked with previously, also when I set everything up, I made sure to keep it on default and play it to make sure that the behaviour is the same as I remember it from last term. Then when I made sure that I was at the same stage as previously I adjusted the scale (which I thought the problem was) and I did get a response from the system. Everything started simming the way it was supposed to.
One thing thought, I worked with both extremities of the scale, and personally I find it more comfortable and controlled when the scale is much bigger, so in the future I will have to plan my work accordingly (scale up the models accordingly to the scale I want to work with in the sim stage).
The result video above first covers the solver. While the solver is selected, it will show all the actions and reactions that are happening in that silvers part of the sim. In this case I wanted to show the tet mesh adjustement I tried out, and the working of the line of action tool, which automates the fibre contractions imitating the muscle flex.
As always with tests, I exaggerated some movements to make it very obvious, but in this case I also tried the more subtle approach of simply adding gentle effects that could look believable (still nowhere near there but less jiggly than last test, I believe that the scale also affected that, making it more difficult to control)
Lastly, I modelled the muscles from scratch last term, but they were actually never finished as I decided that I dont want to spend hours still modelling without knowing that the sim will work, so I started testing instead. Now I picked it up just to check the sim, I will not be correcting anything at the object level in this project.
Muscle Firing + Muscle Line of action
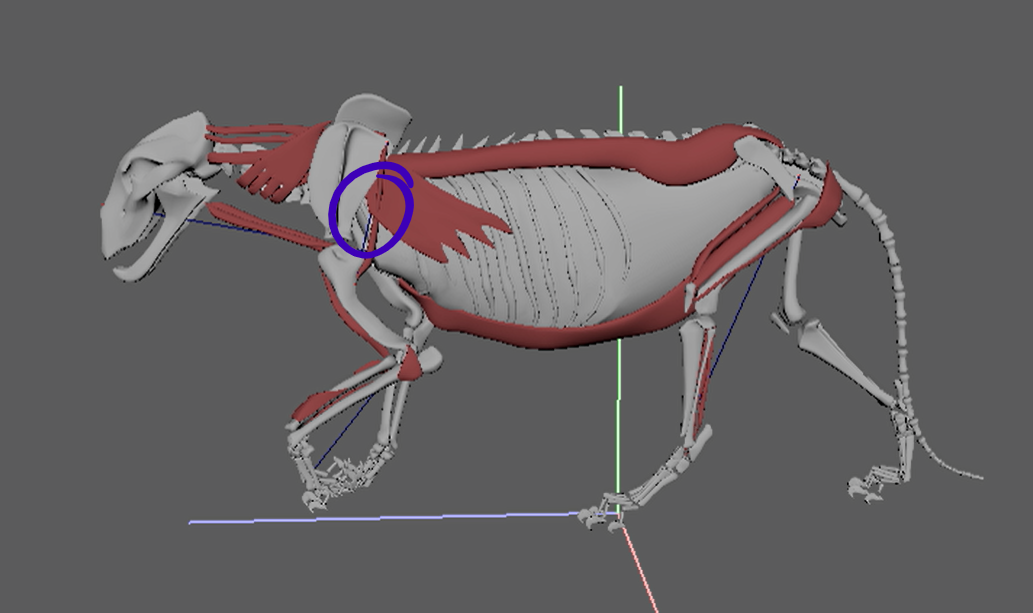
The use of line of action (a simple two point curve attached to the bones and muscle objects) automates the muscle excitation, in short, the shorter the line gets the more the muscle flexes. Muscle firing is marked with yellow colour (red and purple are attachments and green is collision) on the left below picture (the curve is also visible, at rest it was set to be the length of the whole arm, at the screenshotted frame it was the shortest, meaning the most muscle contraction), the picture on the right shows exactly the same setup with the same settings with no line of action on the same exact frame as the picture on the left.
To make the workflow faster I didnt bother with more than one line of action, I was just experimenting with the general idea only and seeing what can be done with it. I also wanted to see how the placement of the line of action in relation to the muscle affects the result.
Coming back to object level, the work I did on the muscle meshes was incorrect, with muscles penetrating each other as well as the bone. I knew it was an issue since the beginning, but it was faster to make them penetrating and then sculpt away whatever was inside other muscles and the bone, I never got to that stage as I decided to test the sim before to make sure it works.
I believe I did most, if not all of the upper arm muscles, but I know for a fact that at least some (probably most) lower arm muscles are still inside the bone. This, at the simulation stage causes issues, one is clearly visible on the picture above as one of the muscles is pulled inside the bone. Originally I thought that it was a collision issue, but then I realised that the two muscles are connected by a sliding attachment, and the one that is inside the bone literally pulls the other one behind it.
Its a good learning experience as I never knew what issues it could cause, but I will not be correcting this, unless I redo the whole muscle sculpt for another, proper project somewhere in the future.
Originally I planned just learning the muscles and I wanted to figure out the fascia, tissue and skin layer later on as that seemed easy and straight forward enough, but as I was doing this test, after trying out the zIsomesher (and learning that I dont have to model the mesh, I can just isomesh it, making all 3 models maybe a 10 min job) I have decided that it costs me close to nothing to make a quick test and it can save me time and stress later.
Again, it was a quick test, the quality is terrible but it doesnt bother me, instead it gave me some idea of the workflow and possible issues for which I should leave some additional time. I was guessing, but until now I wasn’t completaly sure which element required what type of simulation, but now I know for sure, that the fascia is a cloth sim, and the quality of this sim dictates what happens down the line. This means I should hurry up with the tests and muscle sim, so I can have enough time for getting it to work at least acceptably.
Additionally to some visible issues with the sim, there is some weird glitching that happens at the cache level, but I didnt bother with it as it doesnt matter, it is just a bit annoying.
This one plays through the cached sim on each of the layers, while showing it from different angles and highlighting some details. I havent covered the workflow, as I will still be trying things out and experimenting (especially that in this case I have done some stuff differently than recommended, which means I still have to try out the recommended one).
Again the movement is a bit all over the place, there is collision issues, and the sim is a bit too soft in general, but this allows to highlight the qualitied of the different types of sim elements.
The same as the video on the left, this one shows the different stages or layers of the simulation, this time side by side.
Still trying to show the sim from different angles but the length of the setup makes it a bit more difficult to do, so not as much close ups, also the side by side view can allow comparison, or an enquiry of for example the wat the elements interact and affect each other (like the fact that fascia should pull the muscles slightly together and the same later on with the skin on the tissue layer, although this one only visually, fascia actually uses properties and settings to achieve that).
Creature – Zeke the lion
I covered some work with a human character, now is the time to move on onto a creature, in this case a lion (animals are considered creatures in the industry) kindly provided by the Ziva team for free, I decided to use these resources, as they are fully modelled and animated, meaning I can just sim the full anatomy without worrying about mesh preparation and animation itself.
0. Set up
To start, I have reduced all elements I knew I will be working with, as I really didn’t need as much resolution on the bones and some of the more inner layers of muscles which wont even be visible, and I knew that the larger polycount the more chance of a crash or a bigger issue.
Also since there is multiple layers of muscles, I have divided the meshes into areas and layers, to make it easier to organise the work, the layers are not necessarily made based on the depth of the muscle within the creature but on the order in which they need to be simmed. There are muscles that are on top of one another and in turn attached to them instead of a bone or other ones that are overlapping only partially. Nonetheless there is a particular order in which they have to be done (the prep for that is visible in the outliner window on the screenshot below, that is the purpose of the groups).
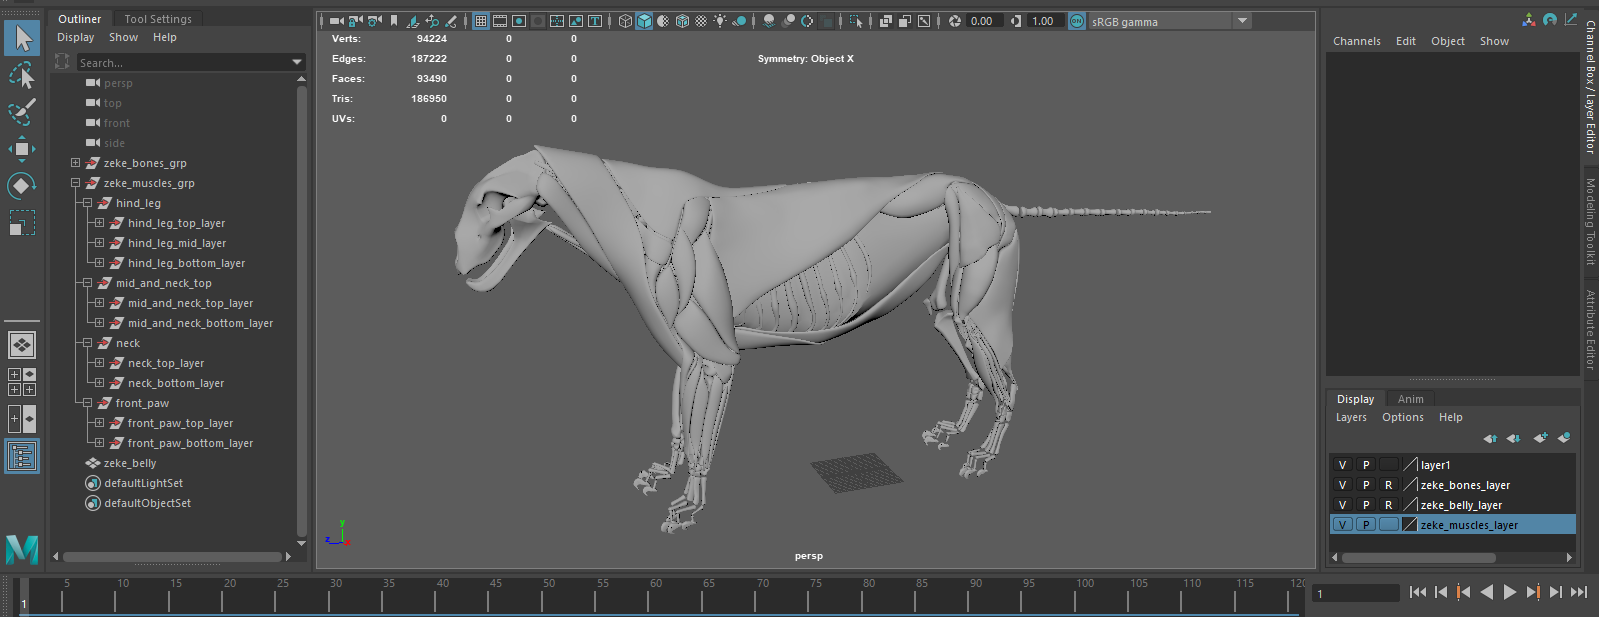
Also knowing the abilities of my computer I decided to sim this layer by layer, instead of the whole set up at once, this probably will give me a less accurate result as the layers of muscles wont be interacting with each other, but it should be easier to handle for my computer, so I am willing to compromise on it.
Below the visual representation of the layers mentioned above.

- Muscle Sim
Followed by videos of the actual simulation.
I have shown time lapses previously, so I have skipped that stage on this little project. Only the result and a tiny walkthrough of the scene and outliner shown below as this was mainly for practice anyways.
A couple points to talk about here:
Caching
I originally planned to make one layer, export it to an alembic, import it back and work on top of that, however, something in my system causes the cache export to break somewhere along the way, causing a sort of glitch, where one frame comes back to a different position, and then back to where it is supposed to be. This causes a weird jump, that stays in the playblast and possibly a render too (even though when I change playback speed all frames seem to be in order and working). Because of this (I have no idea what causes it or how to fix it), I couldn’t use the alembic cache export, so I decided to try a Ziva cache. I though that I can set one up for each layer, and maybe manage to optimise it this way. I did the first layer with that, and all seemed to be working, until I tried making a new cache for the second layer. Turns out that a cache is assigned to a solver and (from what I gather) you can have one per solver. So, I thought that this is not a problem, I can make a solver for each layer and have a cache for each like I planned….except, each object belongs to a solver, and you cannot crossover between solvers, meaning I wouldn’t be able to attach the first layer to the second and so forth, which in this case would not work. Then I though of maybe making the front legs one solver and the hind legs another one, but there is at least three muscles that actually go across the whole middle part of the animal, from the front paw to the hind one. So this was not an option either. I believe that dividing the sim into multiple solvers could work, but it would require some major planning and compromising. For this project I just simmed all together (my computer barely managed so for the final I will need a different solution I’m afraid).
Another thing is that having all in one solver and being able to adjust stuff as you go is great, and the ziva cache helped a lot, to allow me to be able to be able to do the full simulation, so maybe I should focus on optimising the simulation itself, not the caching. I know for a fact, that I was relatively free with the tet mesh settings, and I know that that can help reduce the weight of the sim, so, next time I should probably keep it to minimum and do the rest with the properties.
I will probably spend some time trying to figure out what causes the glitch in alembic export, otherwise I will try to figure out a way to divide the sim into solvers.
Line of action
I have to admit that I saw this as pretty straight forward, but on the beginning it wasn’t working nearly as good as I expected it to. I knew the basic concept, ‘ when the line gets shorter it triggers the excitation’ but I guess I never actually thought about that. On the beginning I thought It had to follow the direction of the muscle to work correctly, – it doesn’t, what matters is to exaggerate the shortening of the line. Eventually I didnt think of the muscle or the direction at all, instead I concentrated about the way in which I will get the most shrinkage of the line, in relation to the rest position. This gave me much better results.
During the test, I’ve been doing quick playblasts to see the real time outcome of the sim, thanks to that I have spotted some issues easier, and I could fix them without them affecting the overall sim down the line, as they were dealt with, early in the process.
As well as Identifying if the muscle tissue reaction and excitation are at the right level (quite subtle and hard to see when lagging or slowed down, even a little).
The playblasts are shown with the preroll, as I didnt plan to post them, they were just for me to see the work in 100% real time.
Below the final playblasts for the muscle stage on the Ziva’s Lion – Zeke.
At first I was worried that I was doing too many tests and wasting time, instead of working on the outcome, but now, comparing my understanding of the muscle sim from the beginning of this page until here, I see that it was a good idea.
There is one more test coming, before I move on to the final, but it shouldn’t be a very long one, this time testing everything I shall need, and actually producing a small outcome.
Membrane Simulation experimentation