Individual Project (advanced VFX…)
CFX Exploration and intro to CFX practice
I have been intrigued and interested in fantasy creatures for a while now, so with the possibility of a self directed personal project I have decided to look into CG creature creation workflows and the elements needed for such FX. Since I have a very limited knowledge about the subject, majority of this project will be based on research and online tutorials, through which I will try build up my understanding of the department, and at the end of the project I will aim for taking a creature design sketch through some of the areas of Creature FX workflow to ensure a practical understanding of the area as well.
Below I included some examples of the general idea that I want to work with.
00. What is CFX
CFX, also called technical animation, is an area of VFX workflows responsible for the simulation of very delicate elements, that would not be possible or reasonable to animate by hand, it also works with simulating many tiny element that, again would not be reasonable to do by hand. CFX mainly refers to creature FX (fur, hair, muscle, skin) or character FX (hair/styling, cloth, possibly also muscle and skin) which can work both with full CG concepts or digi-doubles, but there is many more areas technical animators can be asked to work with to solve some problems in an affordable for the company ways. This discipline also is responsible for any post simulation sculpt finalizations, to ensure the asset and animation are 100% correct with the vision and photorealistic requirements.
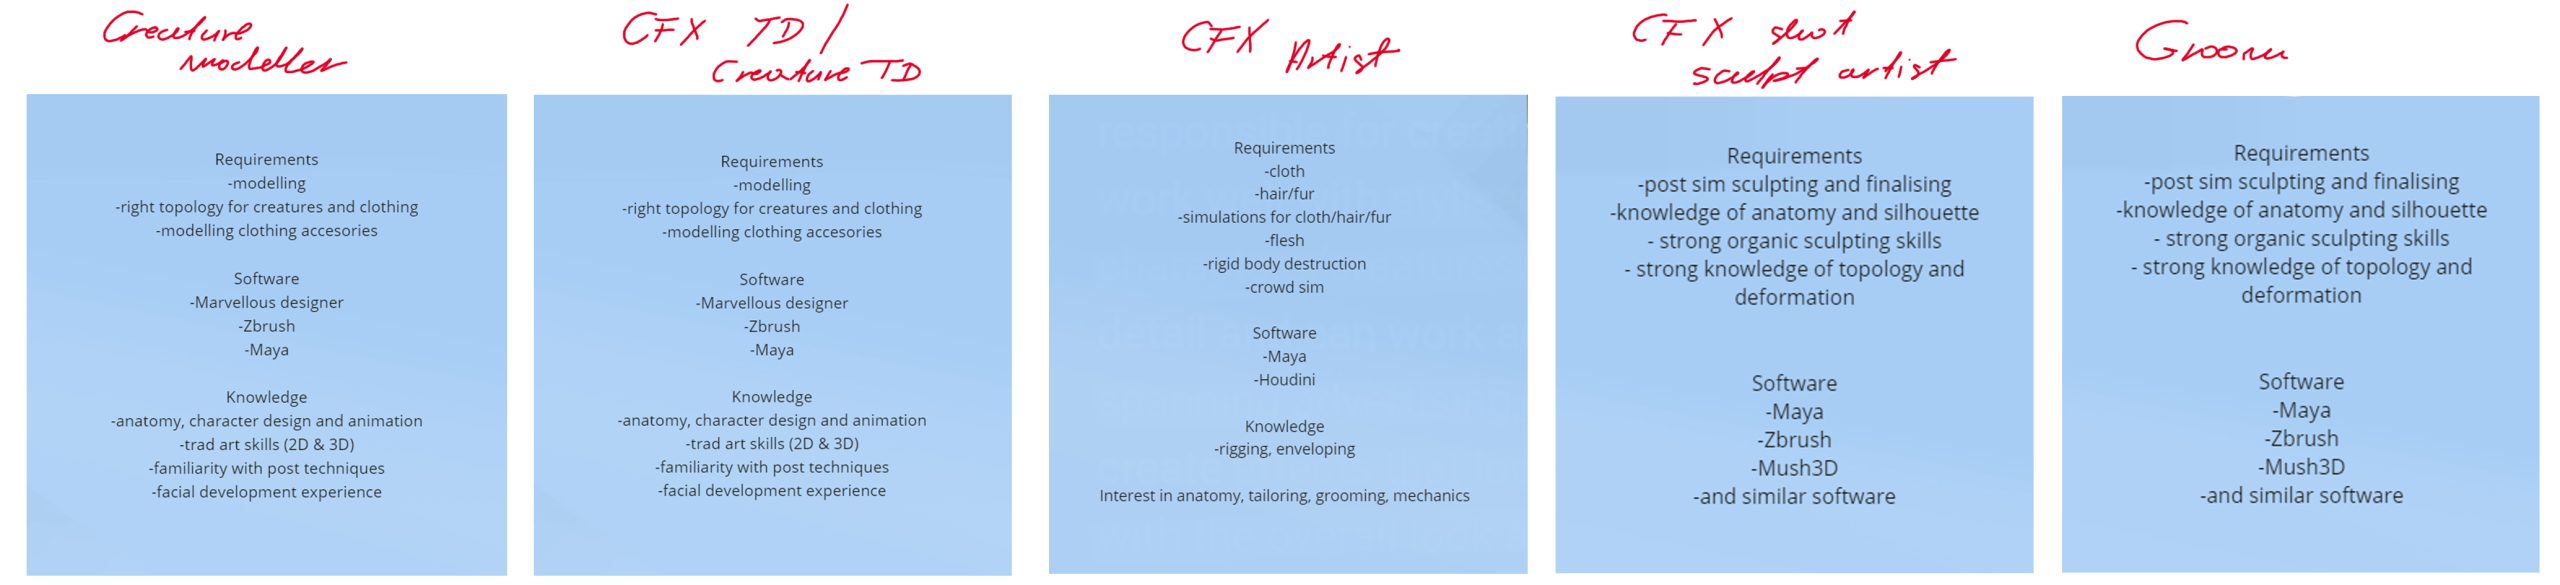
Furthermore I have looked at different job descriptions and requirements to build up an understanding as to what role I am the most interested in as well as to devise a plan of what I should learn (skills and softwares) in terms of being able to start looking into the working opportunities in the future (if after this project I really do decide that this area of the industry is for me). This research can be viewed at; https://miro.com/app/board/uXjVO7oparc=/?moveToViewport=-1963,-3092,25828,11300 in the top left are of the board.
Below I have included some examples and further explanations.
https://www.creature-fx.com/ – CFX artist blog and reels
https://www.screenskills.com/job-profiles/browse/visual-effects-vfx/technical/creature-technical-director-td/ – screen skills explanation of the job role of a Creature TD
https://www.framestore.com/news/course-creature-fx?language=en – Framestore course description
https://www.youtube.com/watch?v=X0pgWTvJCs0&list=RDCMUCjgqdaigk7VSDqqqkHkcNTg&index=2 – VFX Supervisor Explaning shots part 1 general FX
https://www.youtube.com/watch?v=CGlb6f1O3fk&list=RDCMUCjgqdaigk7VSDqqqkHkcNTg&index=1 – VFX supervisor Explaining shots part 3 – creatures
01. Research and Development
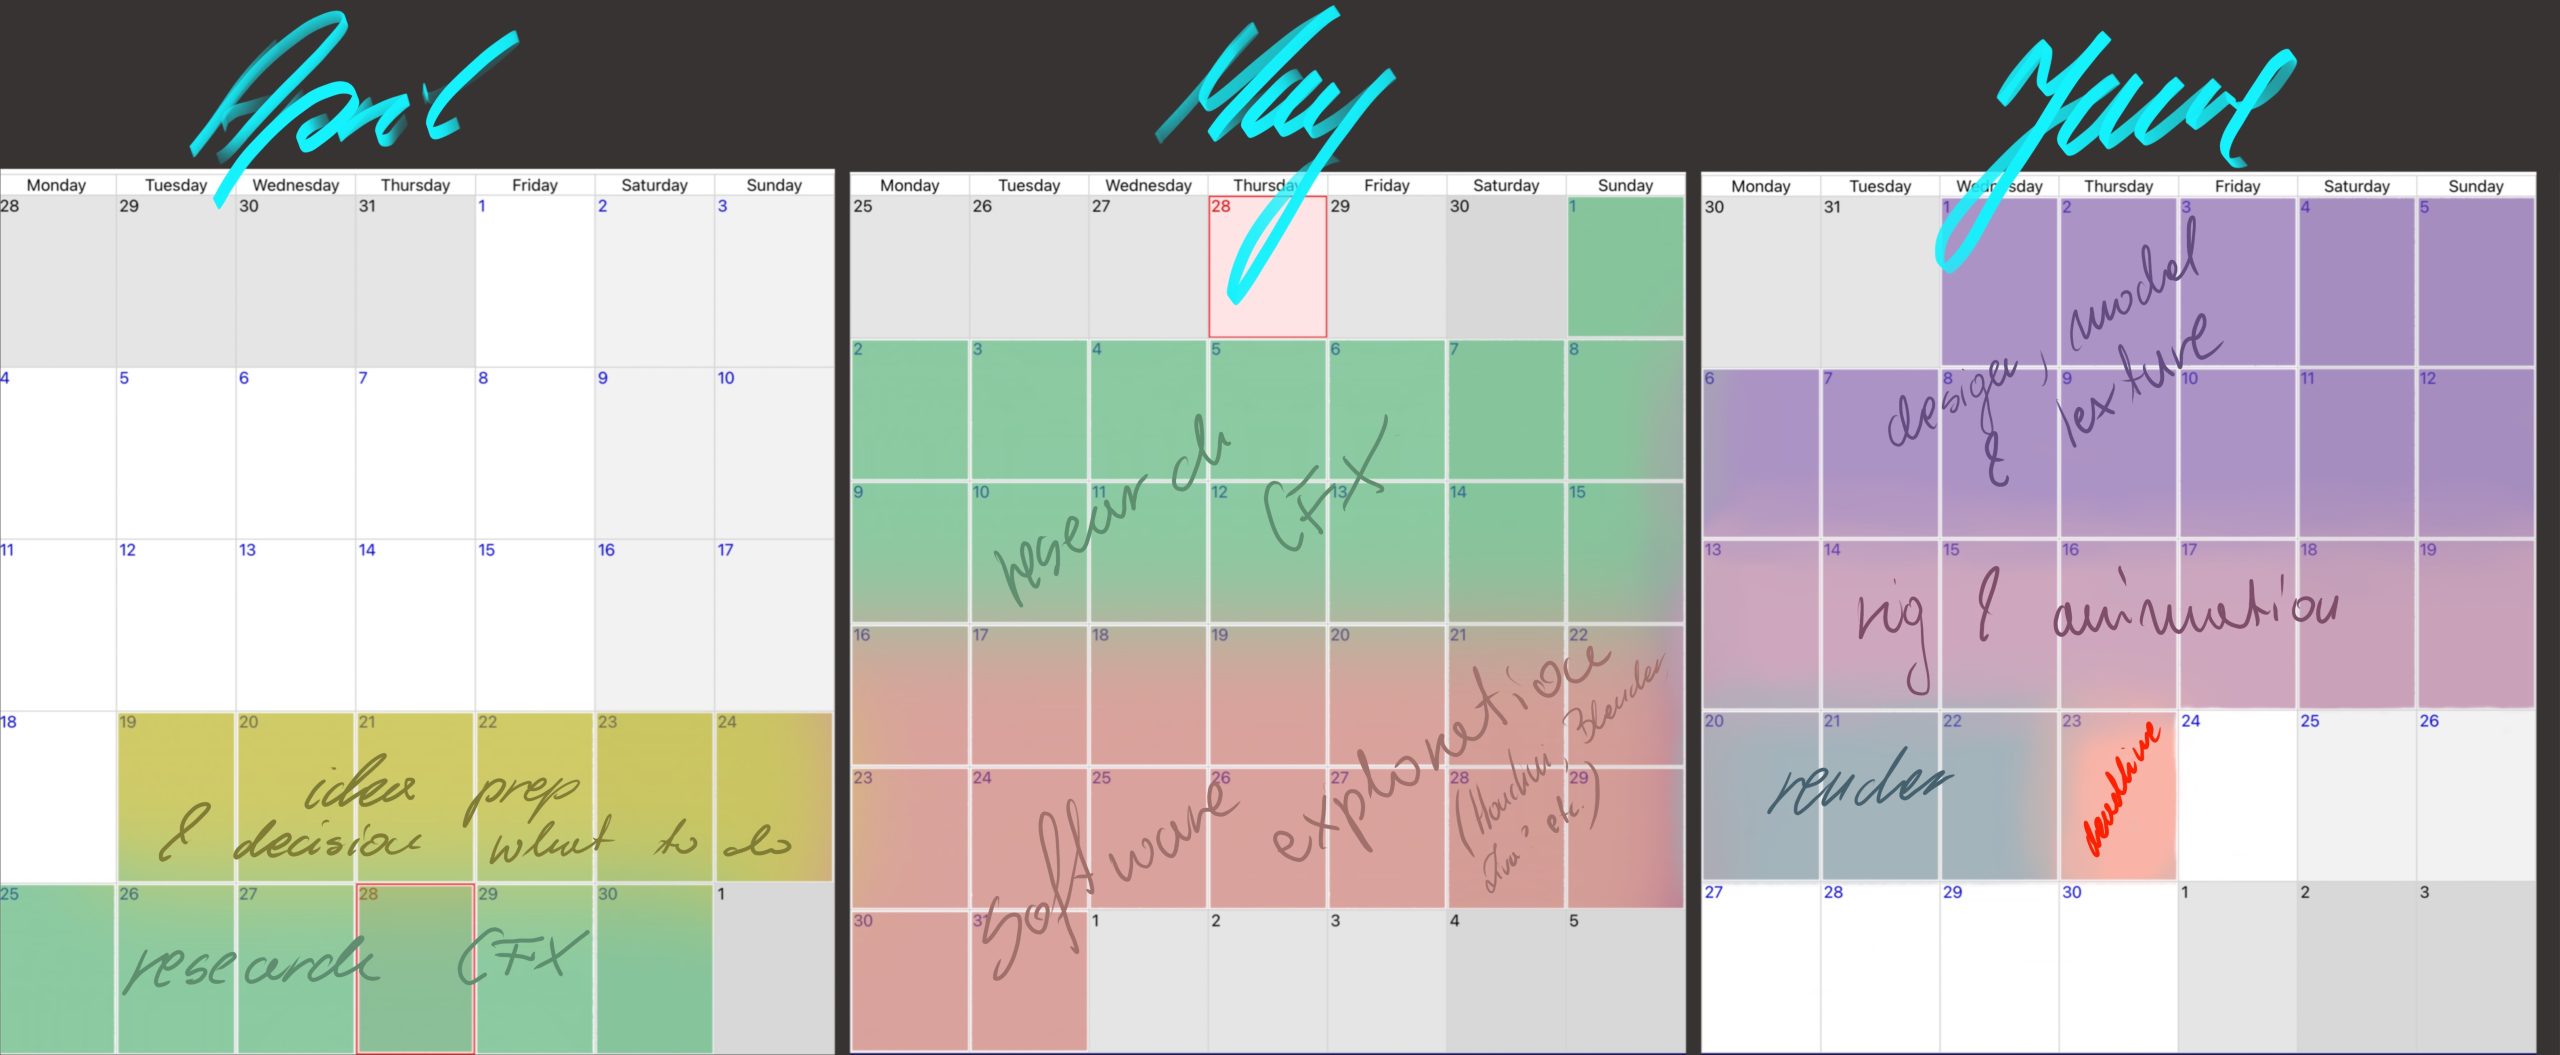
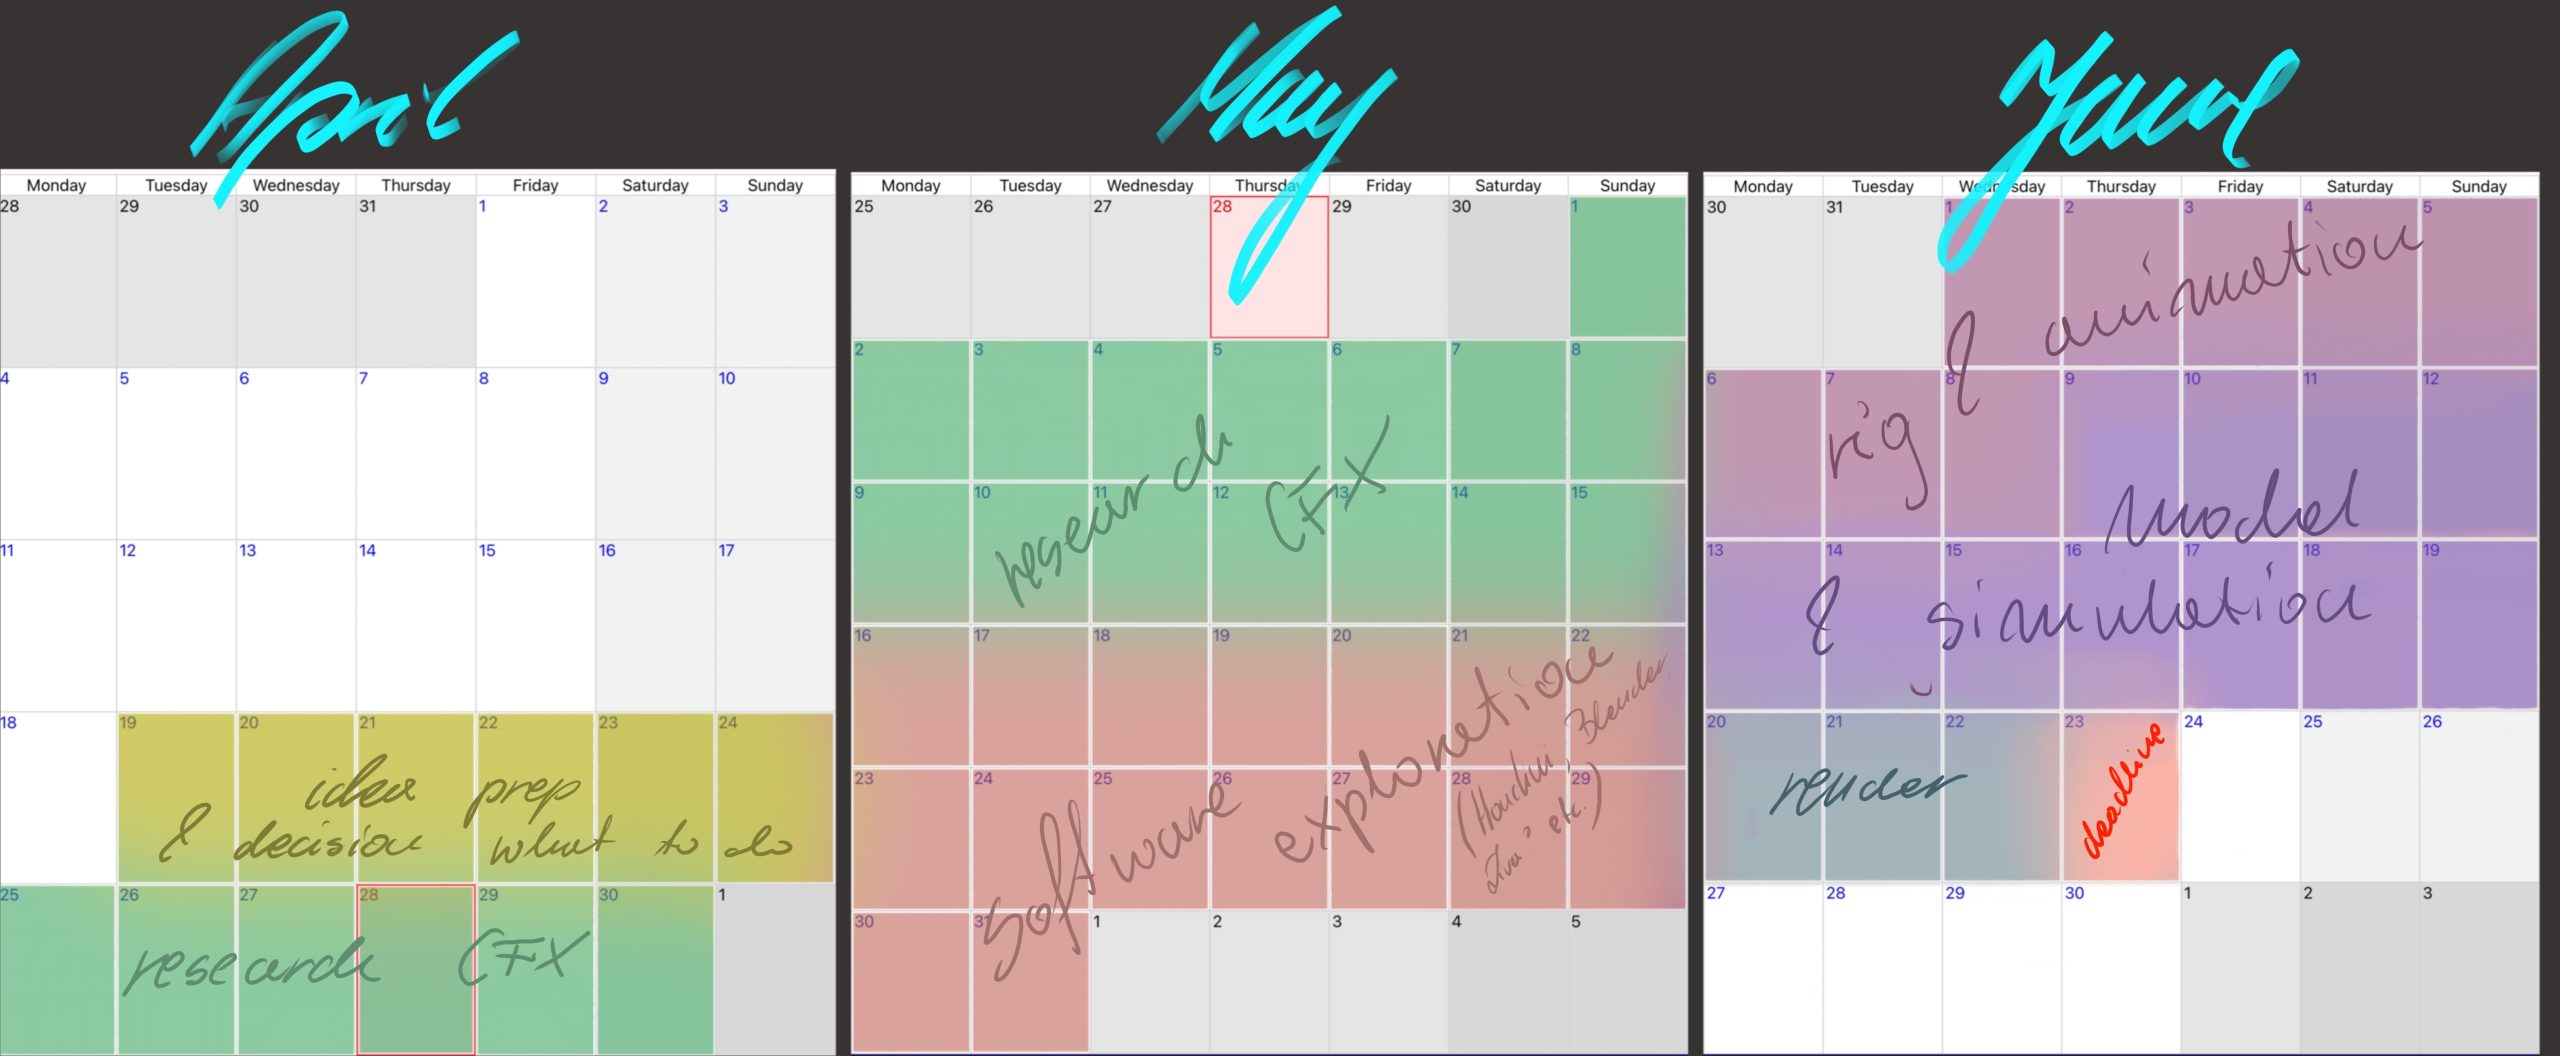
A little schedule for the time of the term containing the different areas I want to explore as well as the general plan for the outcome development.
The below link contains all the research I have done initially to understand what it is that I am working with and to gather all the information I thought I will need to narrow down my interest and pin point what I want to concentrate on.
https://miro.com/app/live-embed/uXjVO7oparc=/?moveToViewport=-1963,-3092,25828,11300
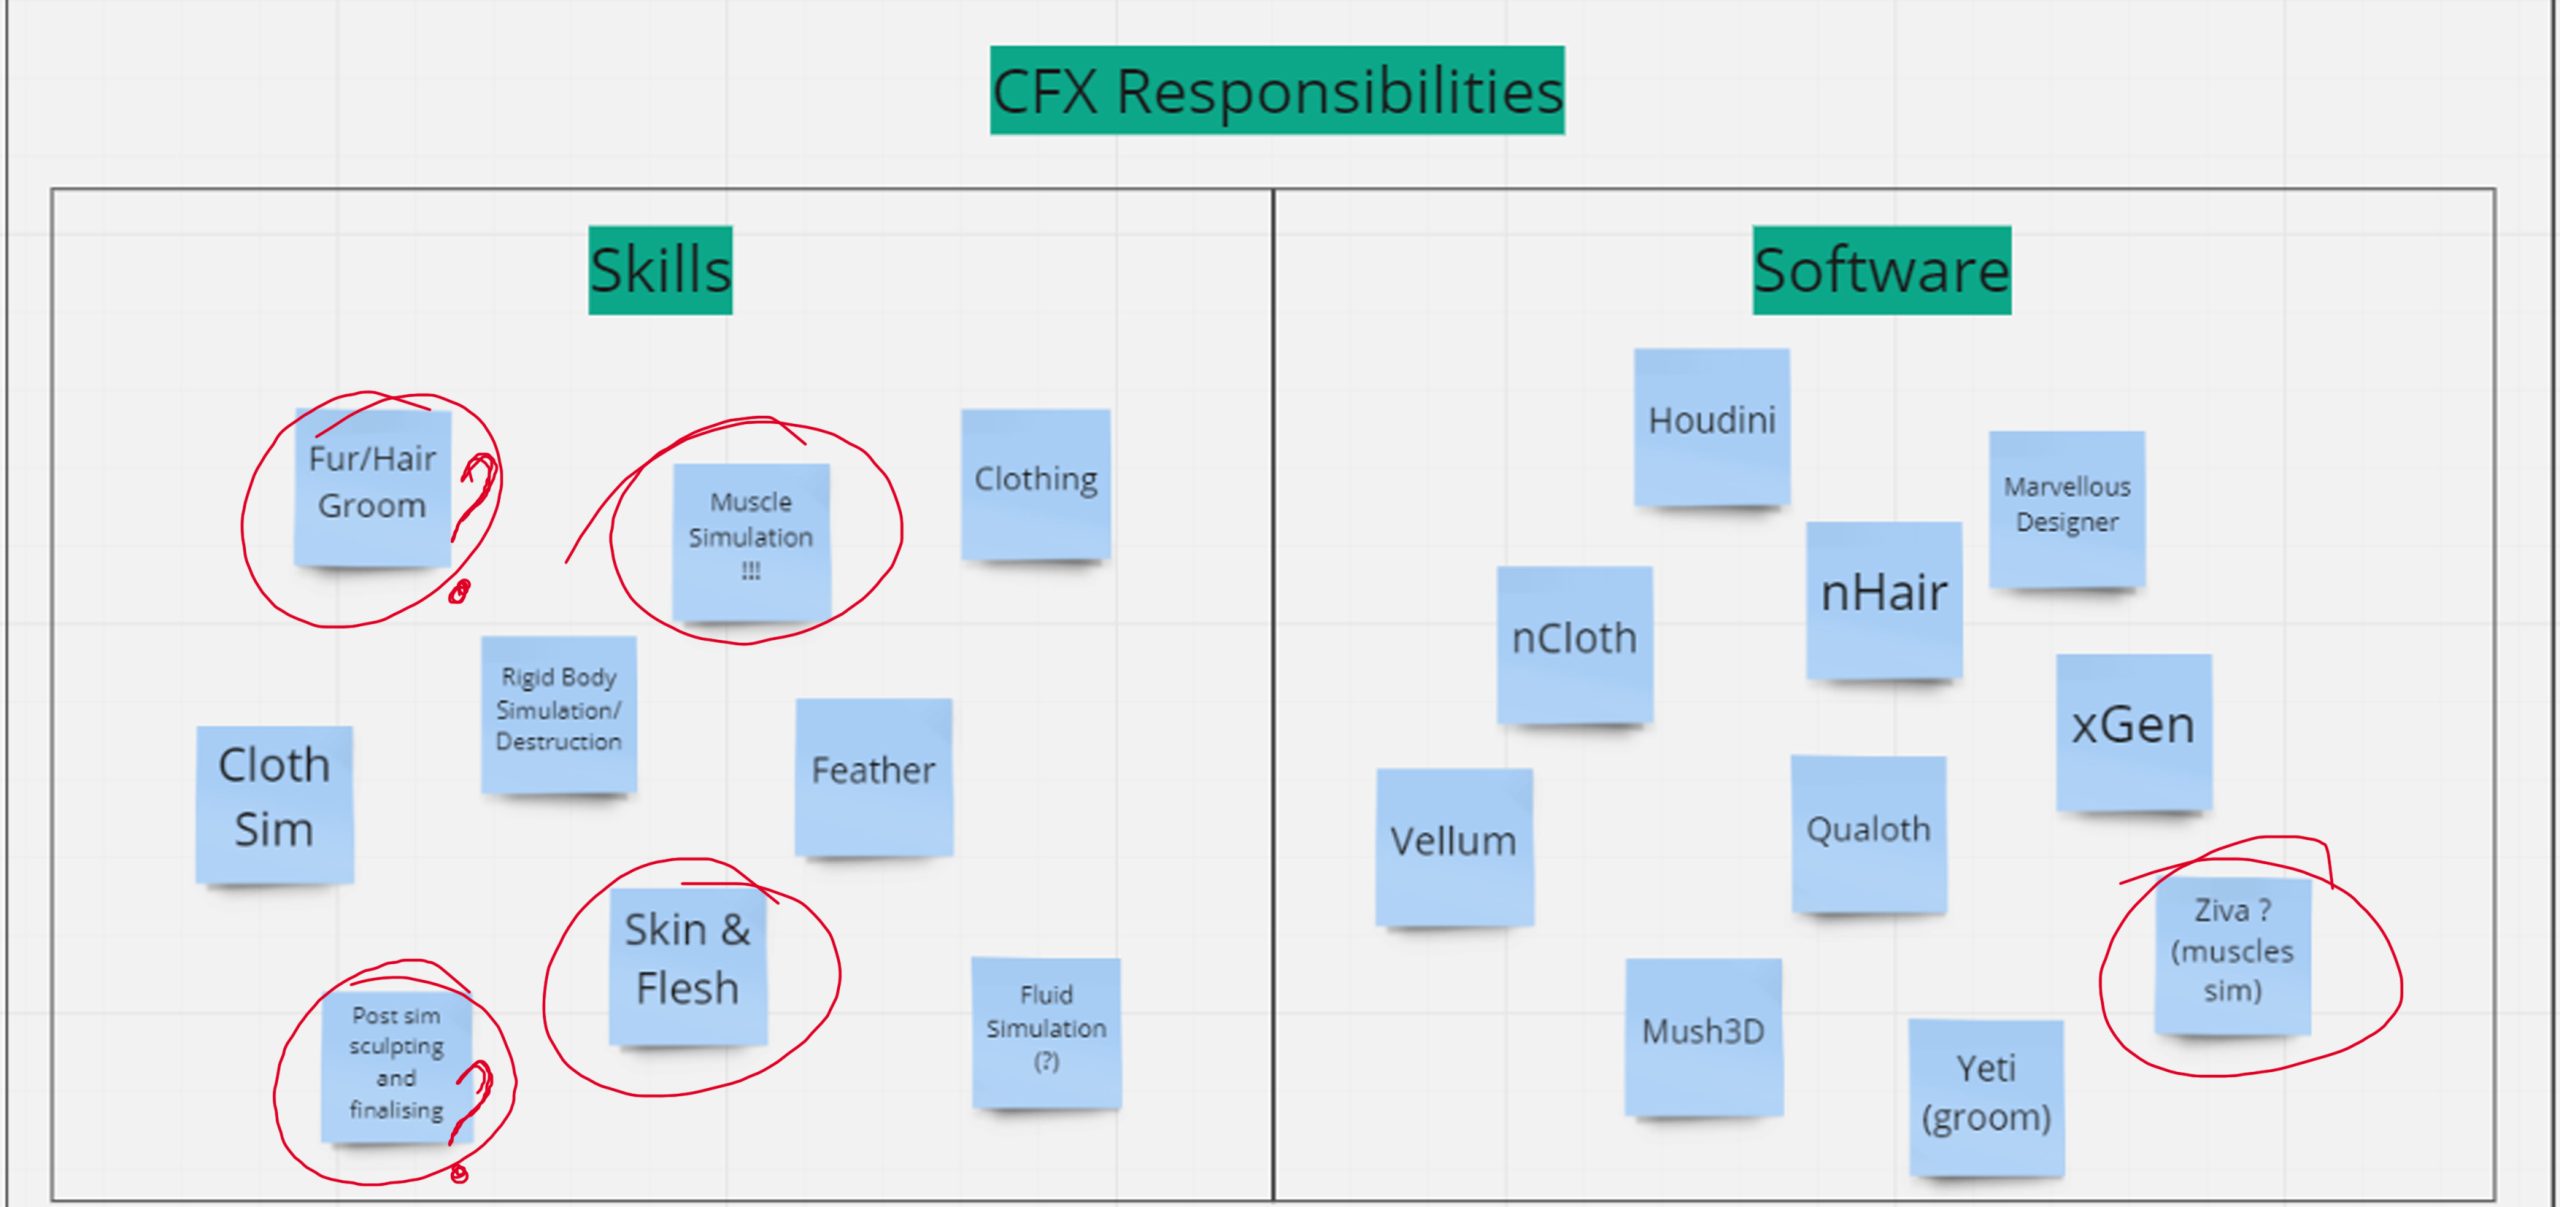
The top section of the board concentrates on the general responsibilities of the whole department, starting with job listings I have looked at to build up an idea of the actual day to day responsibilities of particular roles (it is annotated, on blue post it notes, with the most common requirements shared between the particular job role), followed by a few examples of muscle simulation below a generalized section listing the most common skills and softwares required. The rest of the section shows visual examples of some elements of the departments responsibilities – creature, character, groom and costume.
The bottom section (bottom two rows) are a collection of industry standard quality checks listing well known movies that work with cg characters or creature. This step can be helpful in realising and aiming for the quality of work that we should aim for matching , for it to be impressive in the portfolio later on.
Below I have screenshotted the summary of skills I did from each type of job listings I have looked at, which was meant to help me narrow down my focus and decide on a plan to work on developing the skills needed.
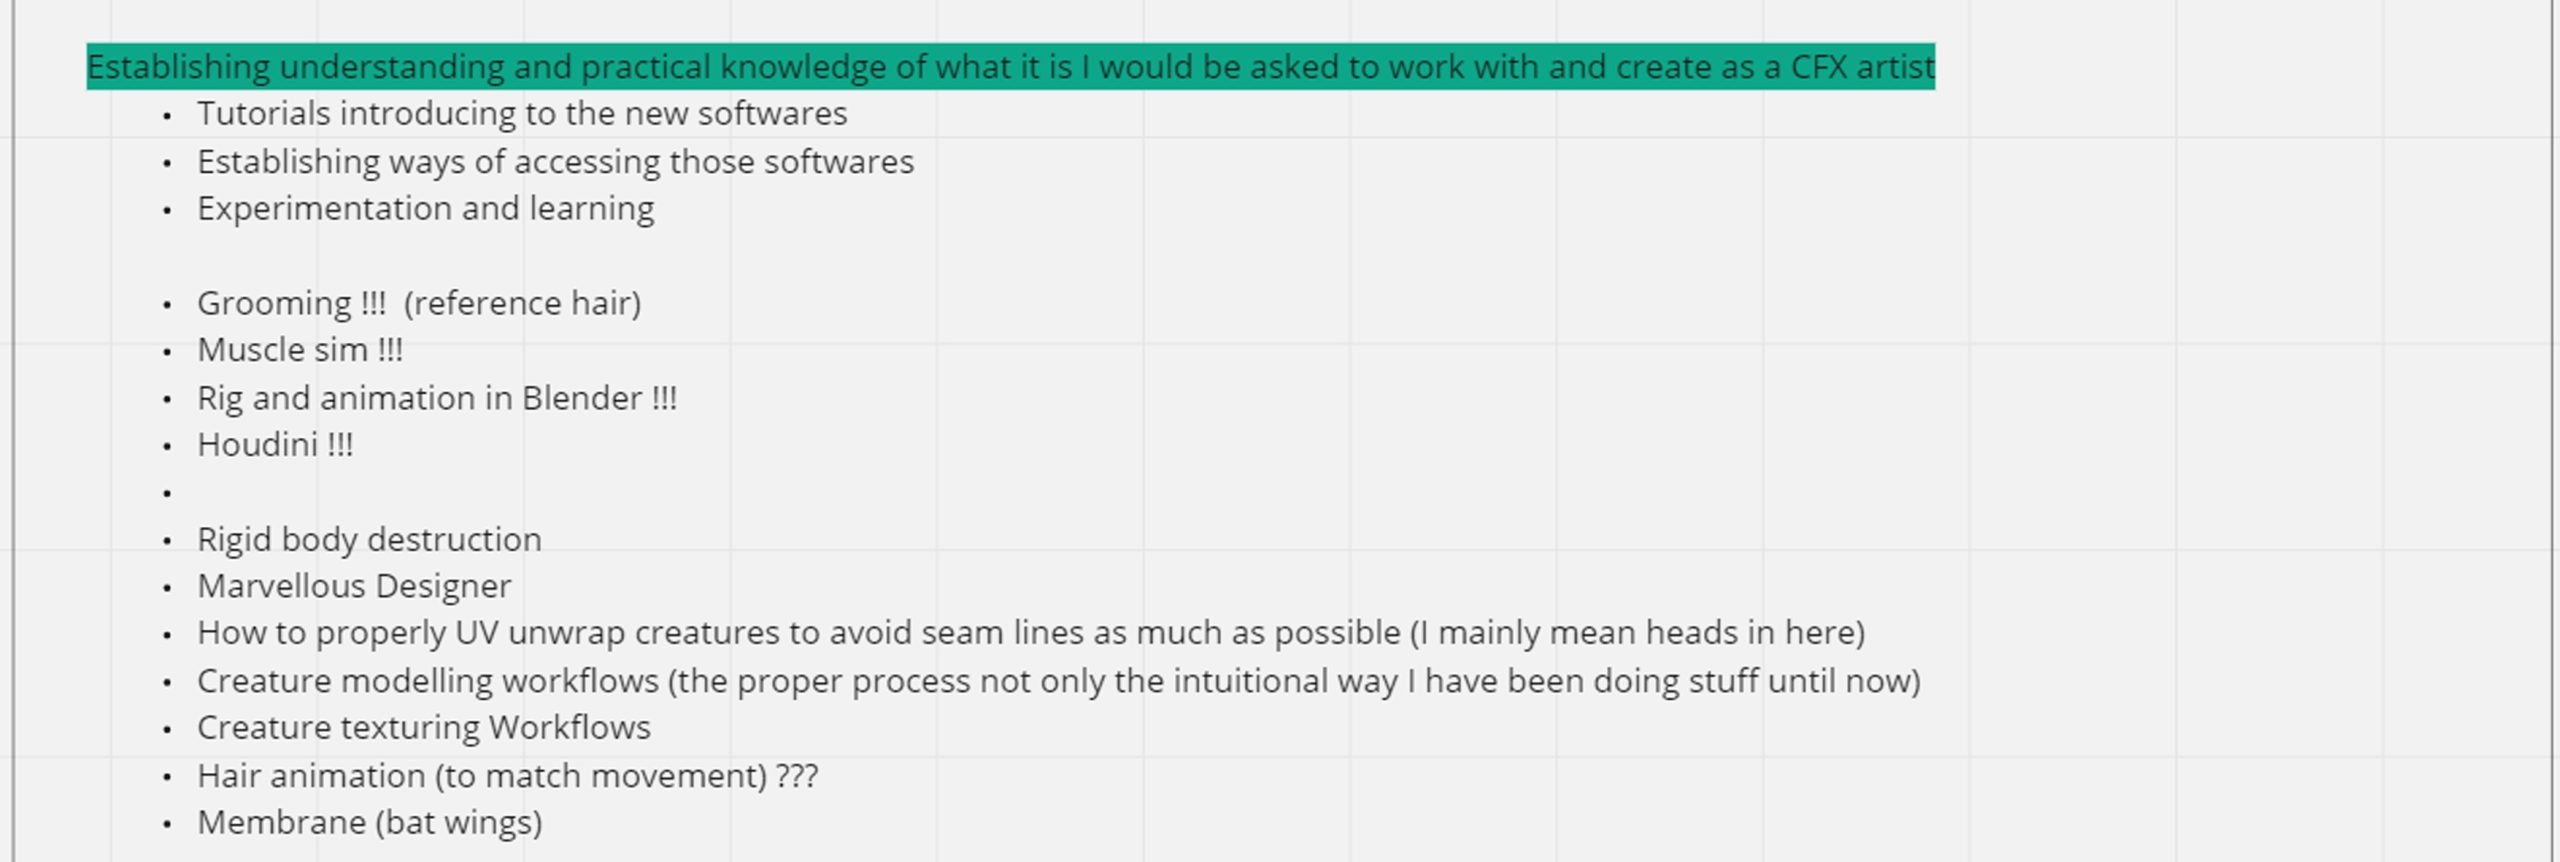
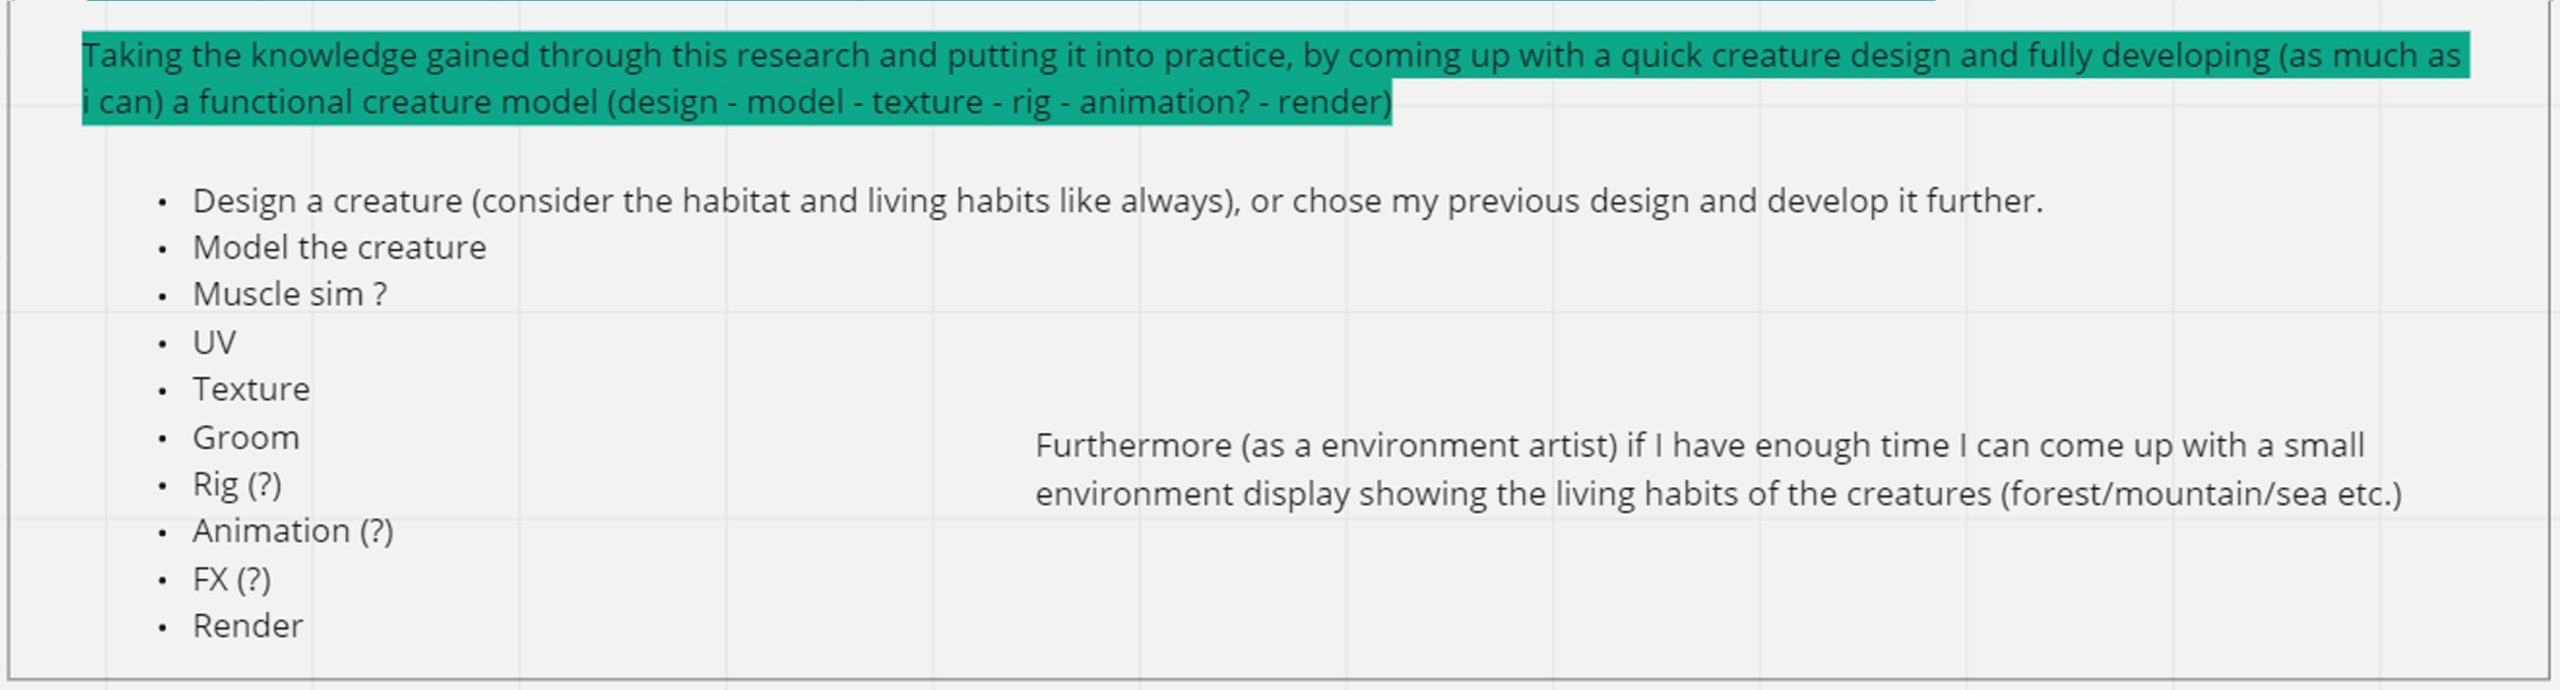
In the board I made I have also added a section of notes that came to my mind while thinking of what needs to be done for this project. In the end not all the elements on this list will be done but it felt like a good start in terms of deciding the steps as well as their chronology as this also helped me decide which elements should be done before others to ensure my full understanding of the stuff.
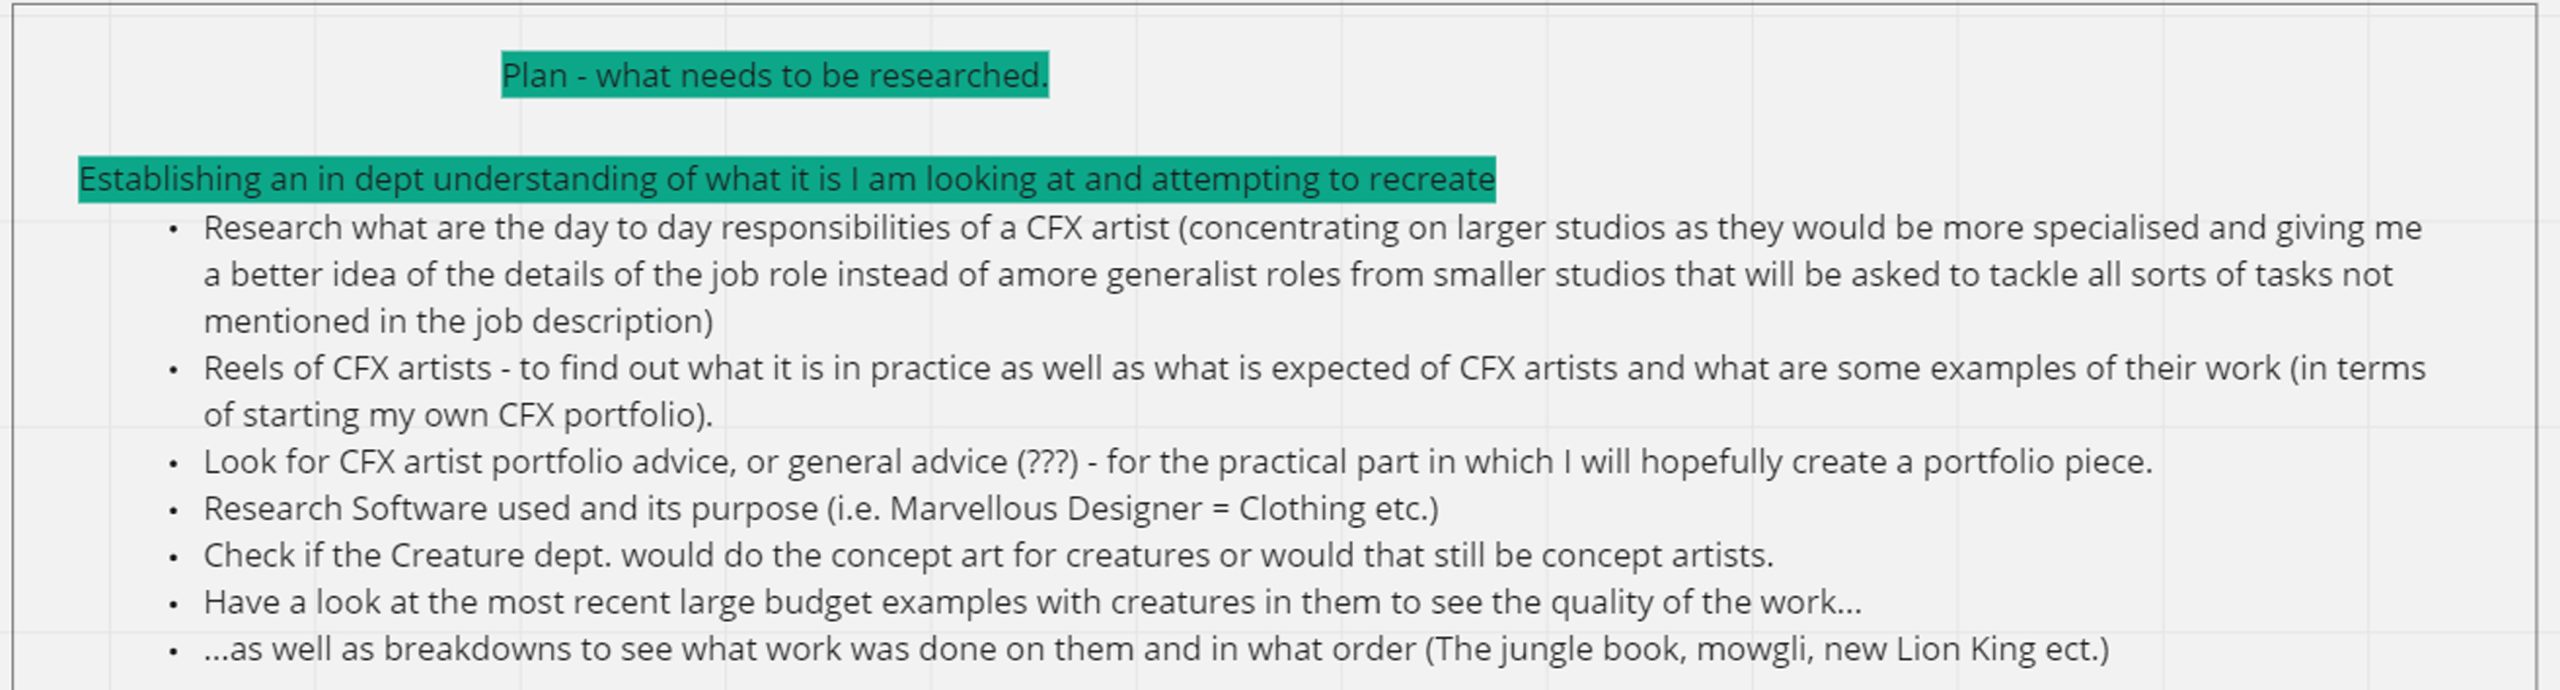
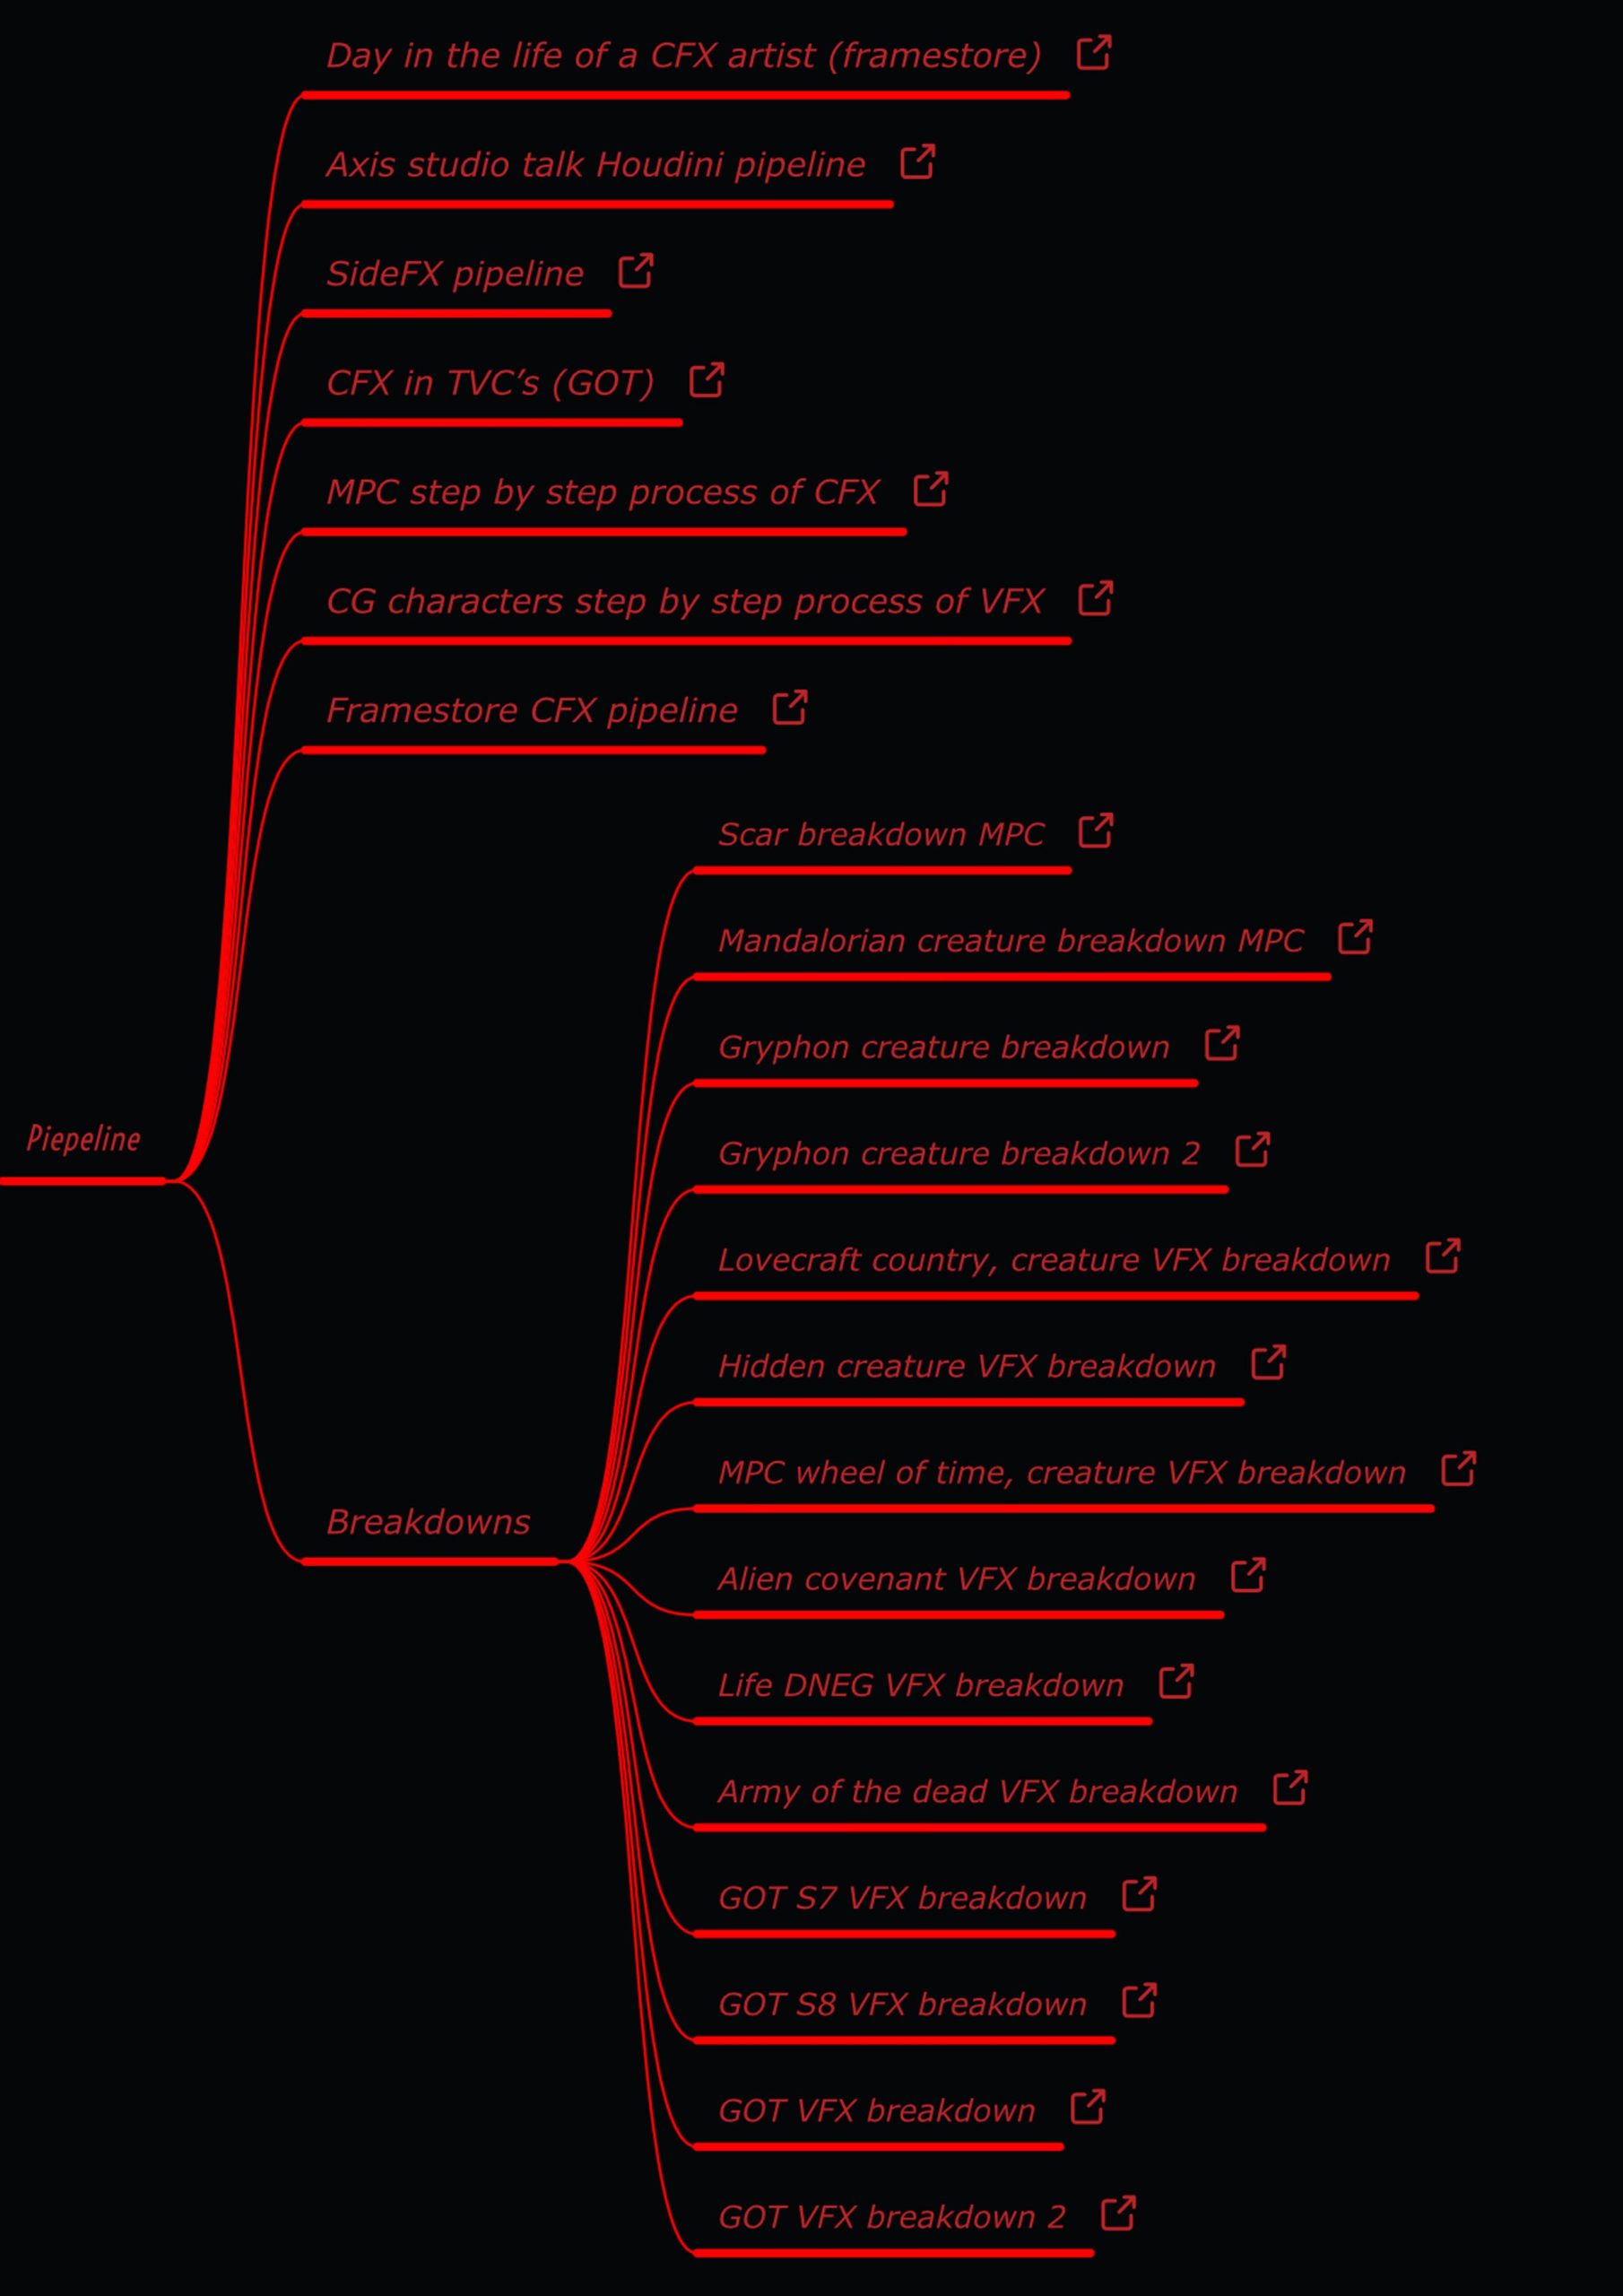
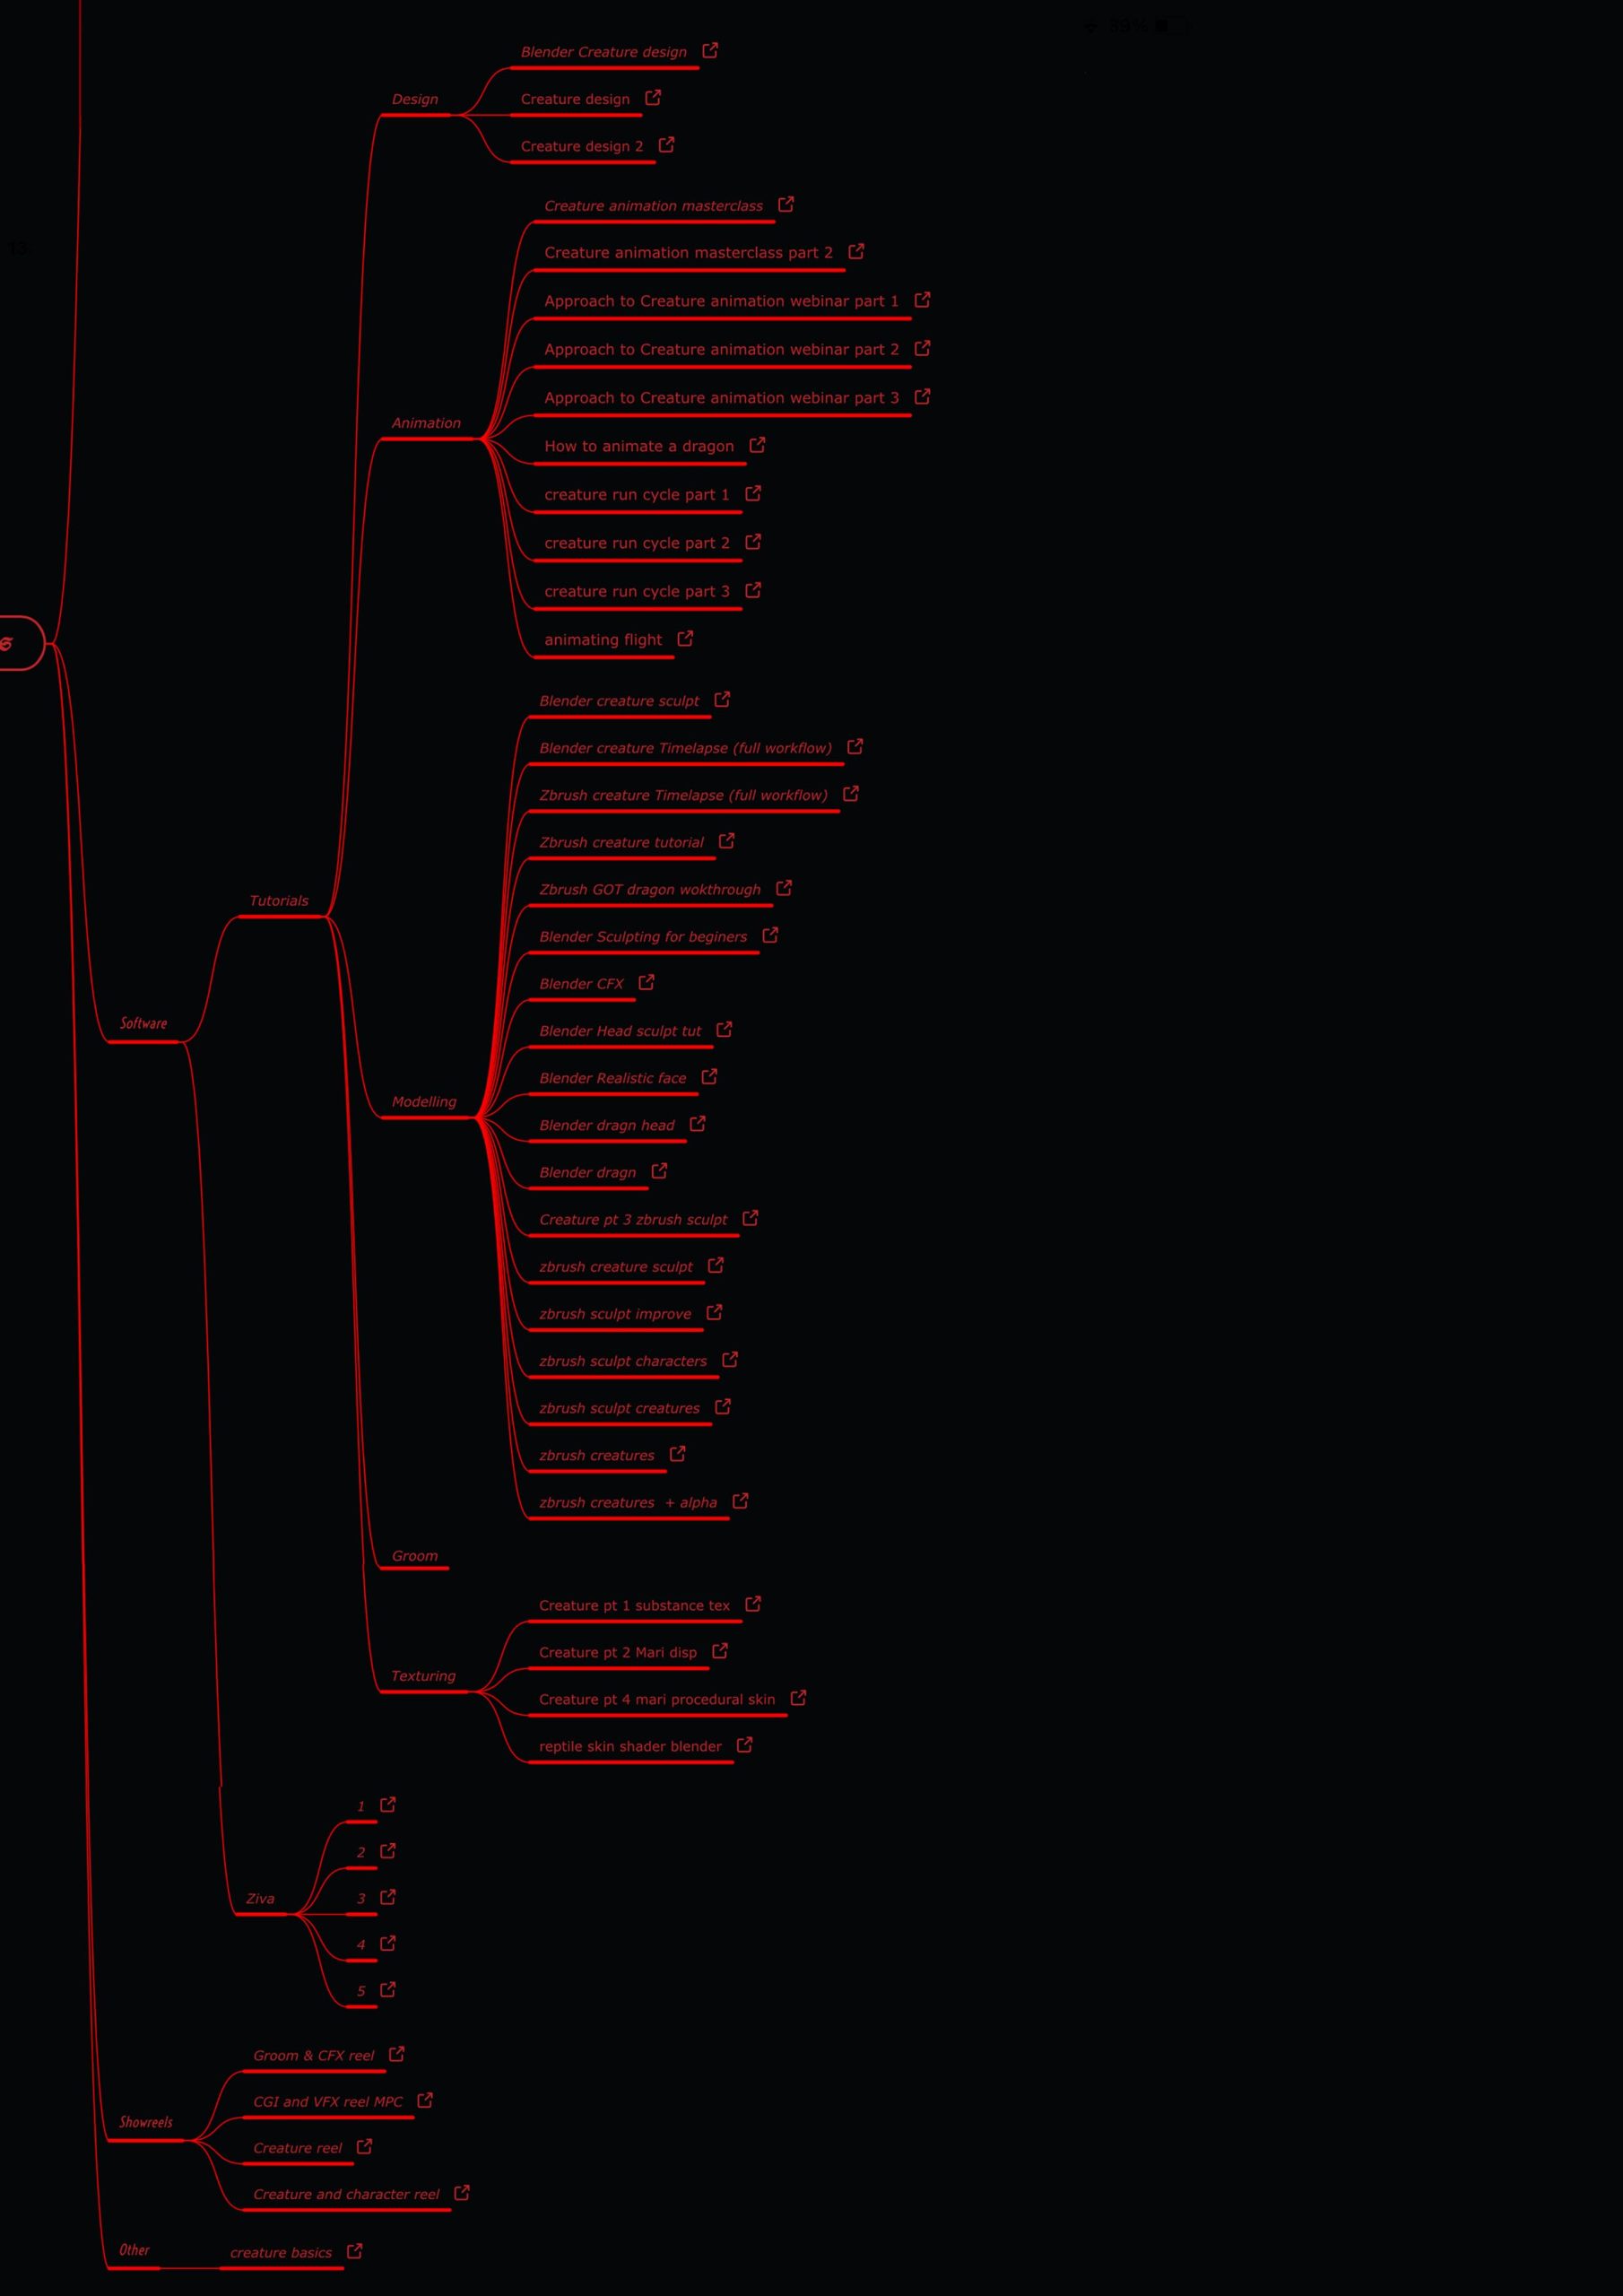
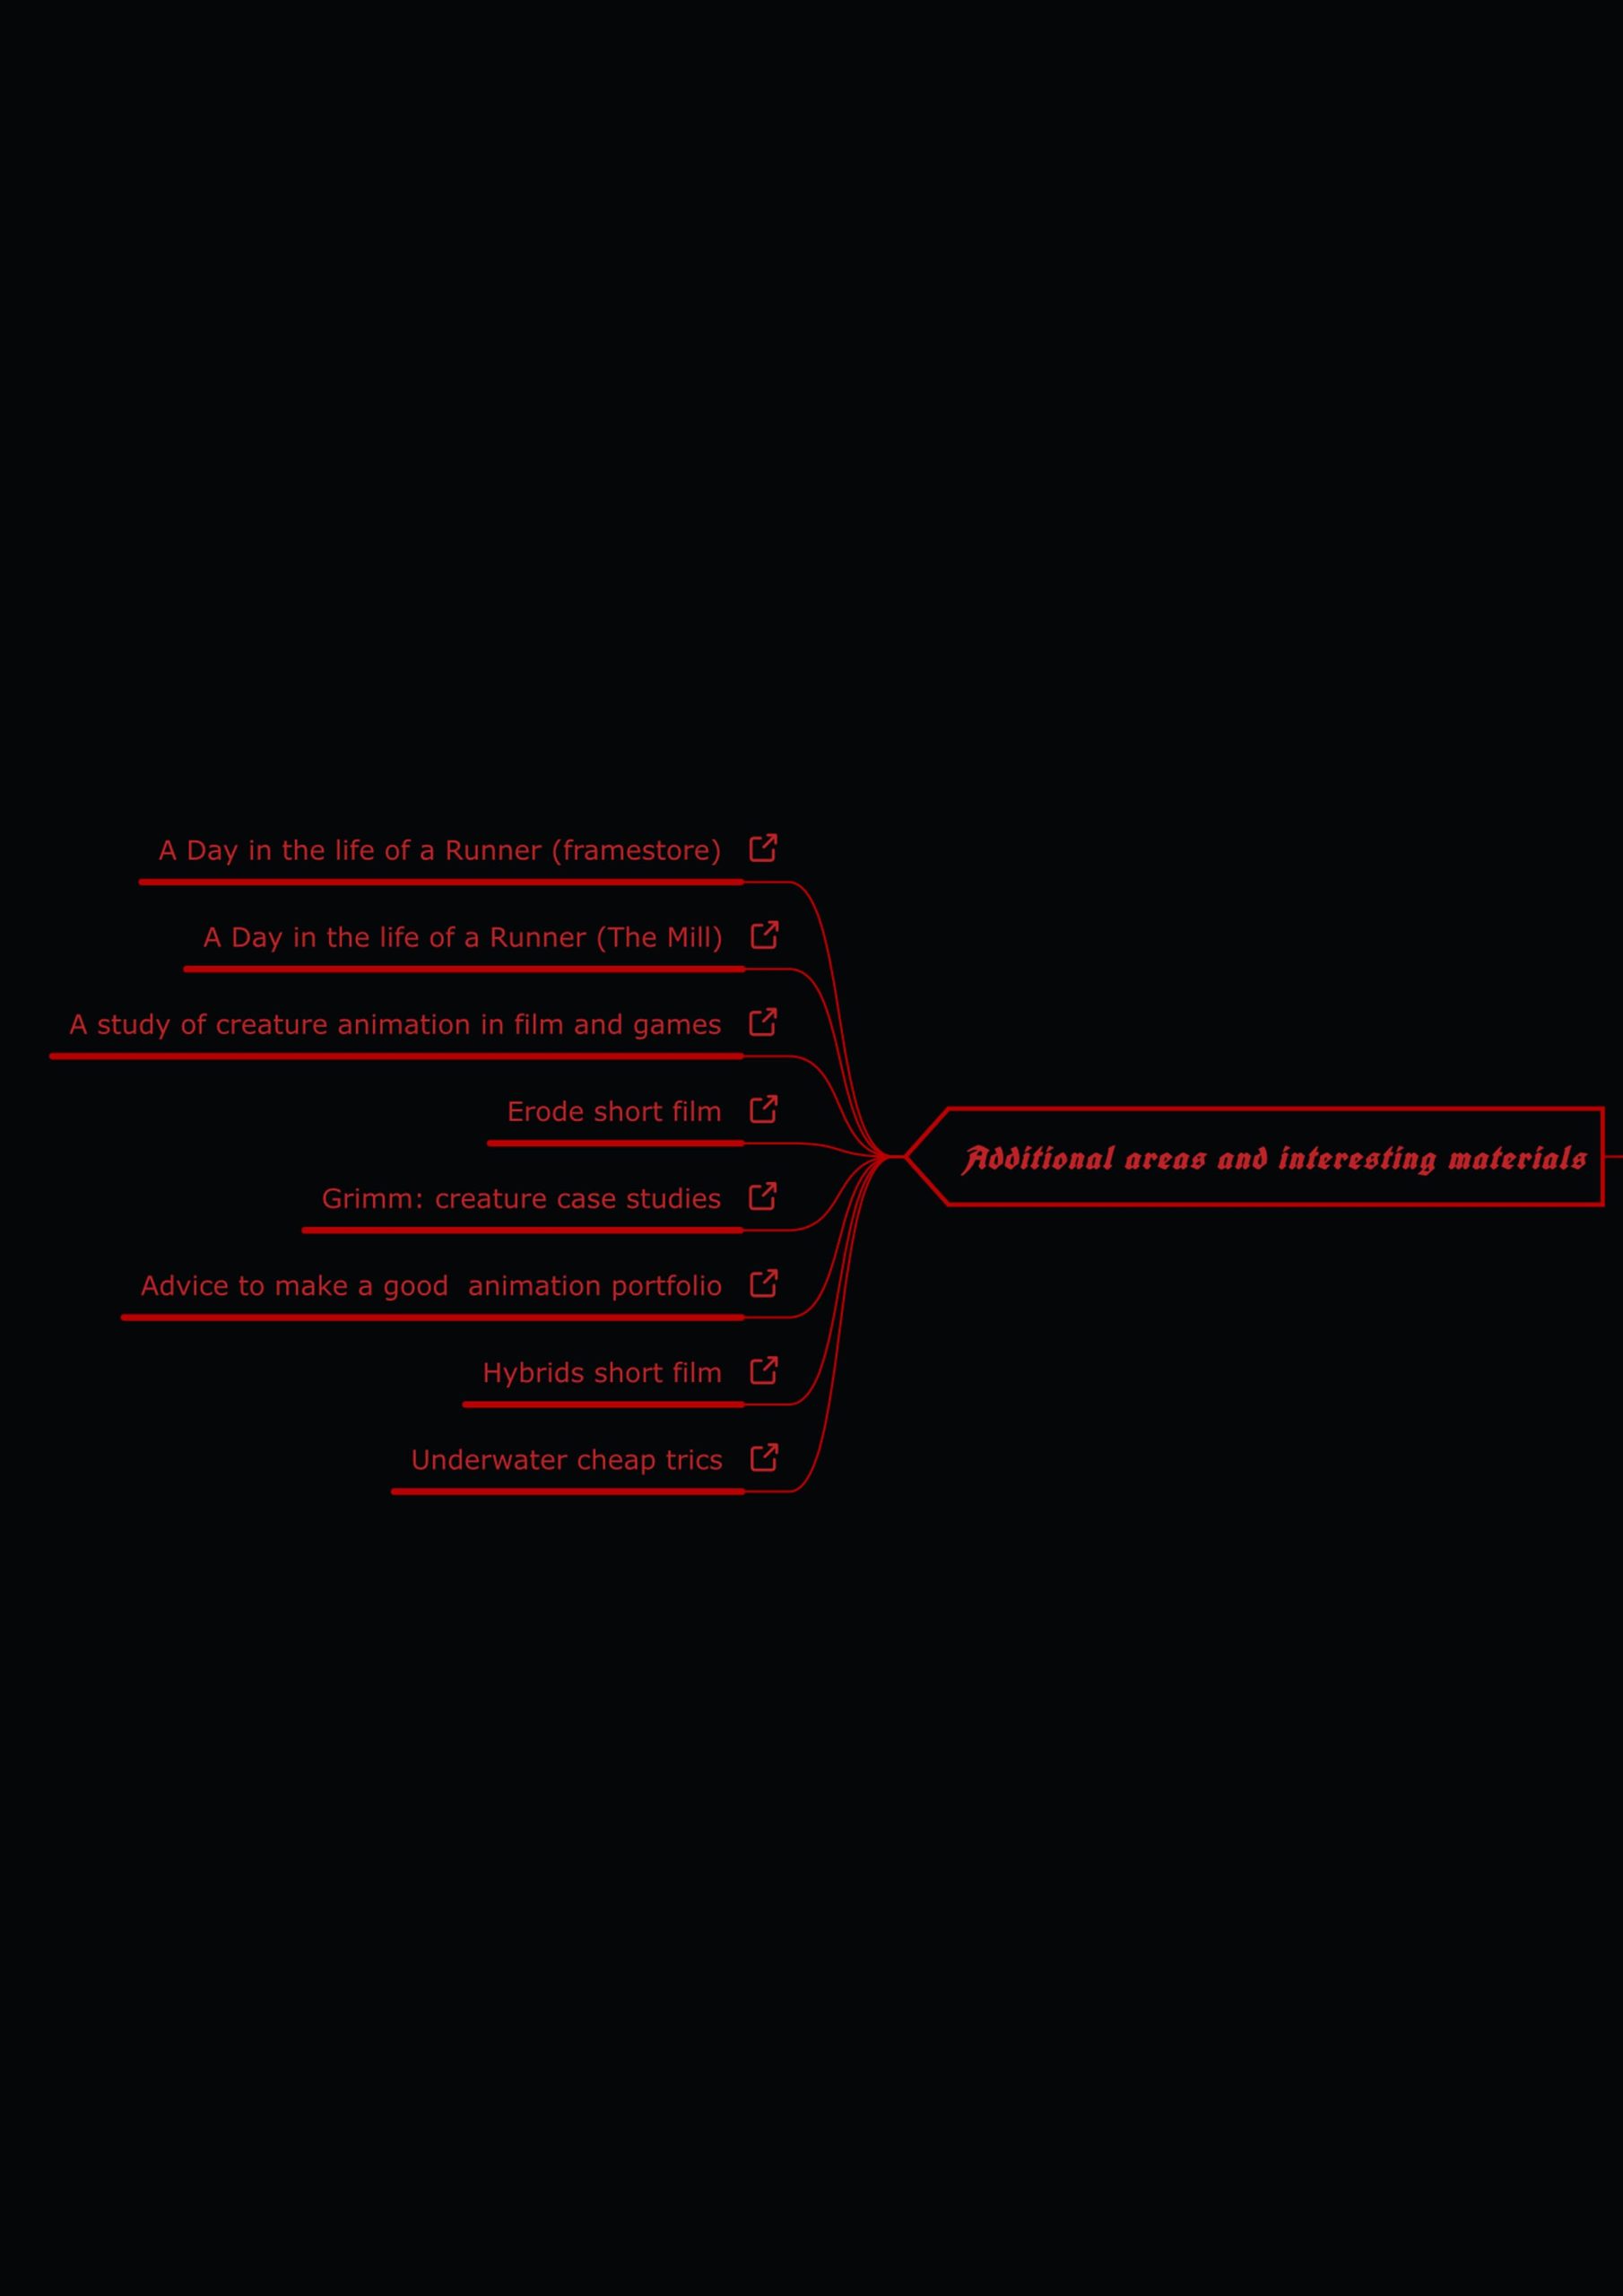
To start with I have wrote down a few section names to keep my research organized, and I have started checking what resources I can come up with, I have copied down every useful link to ensure I can come back to it if need to. Sadly the way I saved them cant be shared here, but I will supply some examples below.
I have begun with researching the general pipeline, process and workflows of anything related that I could find as this was one of the more important areas for me, I wanted to learn how an actual studio works, especially within the department I am considering. This was also meant to help me realize the chronology of the process and the order in which this is done. For the same reason I have started looking into breakdowns of CFX shots, which helped me greatly. Further I listed softwares I wanted to learn (choice based on job requirements I discussed earlier on) as well as I have considered my knowledge gaps in the softwares I know and looked for tutorials and breakdowns of creating elements within those softwares. Lastly I made a small section on the side collecting all interesting videos and articles I have found that I will want to come back to (but they wasn’t necessarily connected with my research, and probably wont be needed in this project).
Ziva Documentation research – functions
https://docs.zivadynamics.com/vfx/, https://docs.zivadynamics.com/vfx/foreword.html, https://docs.zivadynamics.com/vfx/terminology.html, https://docs.zivadynamics.com/vfx/topics.html, https://docs.zivadynamics.com/vfx/tutorial.html, https://docs.zivadynamics.com/vfx/nodes/zFiber.html, https://docs.zivadynamics.com/vfx/nodes/zBone.html, https://docs.zivadynamics.com/vfx/nodes/zSolver.html, https://docs.zivadynamics.com/vfx/nodes/zTet.html, https://docs.zivadynamics.com/vfx/nodes/zTissue.html, https://zivadynamics.com/resources/fixed-attachments, https://zivadynamics.com/resources/ziva-vfx-2-0-overview, https://zivadynamics.com/resources/ziva-tissues, https://zivadynamics.com/resources/automatic-muscle-firing, https://zivadynamics.com/resources/fat-skin-workflow,
Ziva Webinars
https://vimeo.com/334752234, https://vimeo.com/362867088, https://vimeo.com/282915568, https://vimeo.com/282915919, https://vimeo.com/273609271, https://vimeo.com/268873218, https://vimeo.com/268868342, https://vimeo.com/zivadynamics,
Additional information
https://zivadynamics.com/resources/welcome, https://discover.therookies.co/2020/08/02/a-beginners-guide-to-ziva-dynamics/, https://zivadynamics.com/case-study/ghostvfx-dino, https://youtu.be/-0MD1g_5dV4
At this point in the project I have noticed that my understanding of the general VFX workflow and in particular the CFX one have changed, and I realised that my schedule is incorrect and need some revising. Originally I planed the steps according to the way I work, and as a one man team I will continue working like that even though I found out that animators would often work on an unfinished model, while the modellers and texture artist did their work simultaneously to save time and resources (a model with a texture apparently puts extra strain on the hardware while animating as opposed to untextured one which is an interesting fact for me that I have never given any thought to). However in the case of CFX, the final images we see is not a simple sculpted mesh, but bits of different meshes simulated, which means that the process starts with a model of a skeleton that is rigged and animated first and then the final look is done through simulating muscle, fat and skin layers. Dues to this I have changed the chronology of the last month process. Furthermore I have kept the rig and animation section, but as now I understand more of the time needed for the work and the limitations (both of the time and my skills), I am considering skipping that stage and getting an animated skeleton model from online, so I can concentrate on what I really want to learn during this process instead of struggling with the elements I am not as interested in.
Below, Ziva Dynamics proposed process
https://zivadynamics.com/character-docs/general-setup
Practical Exploration
Ziva Dynamics
At this point I have decided to try my had at the muscle simulation and I have started with the download and installation of Ziva VFX. Here I have decided that I will not be modelling, rigging and animating, as I generally know how to do that and it would have only taken away the time I could otherwise spend on learning something new – in this case the Ziva muscles simulation process.
I have started with a quick search for a animated skeleton model, as Ziva workflow starts with a skeleton, on top of which we model and later simulate the muscles.
Model credits: “Dancing Skeleton” (https://skfb.ly/o6WNy) by Saqib Ali is licensed under Creative Commons Attribution (http://creativecommons.org/licenses/by/4.0/).
The model I have found was animated with a relatively long sequence in the form of a full body dance, and I decided to scrap the animation temporarily in favour of something smaller and simpler, to have more room for my first exploration and some inevitable issues and mistakes. For this purpose I had quickly animated a hand wave, to still work with animated bone structure, but have something a bit lighter.
Above, my simple animation of the mentioned mode (I deleted the original animation and reused the bone model)
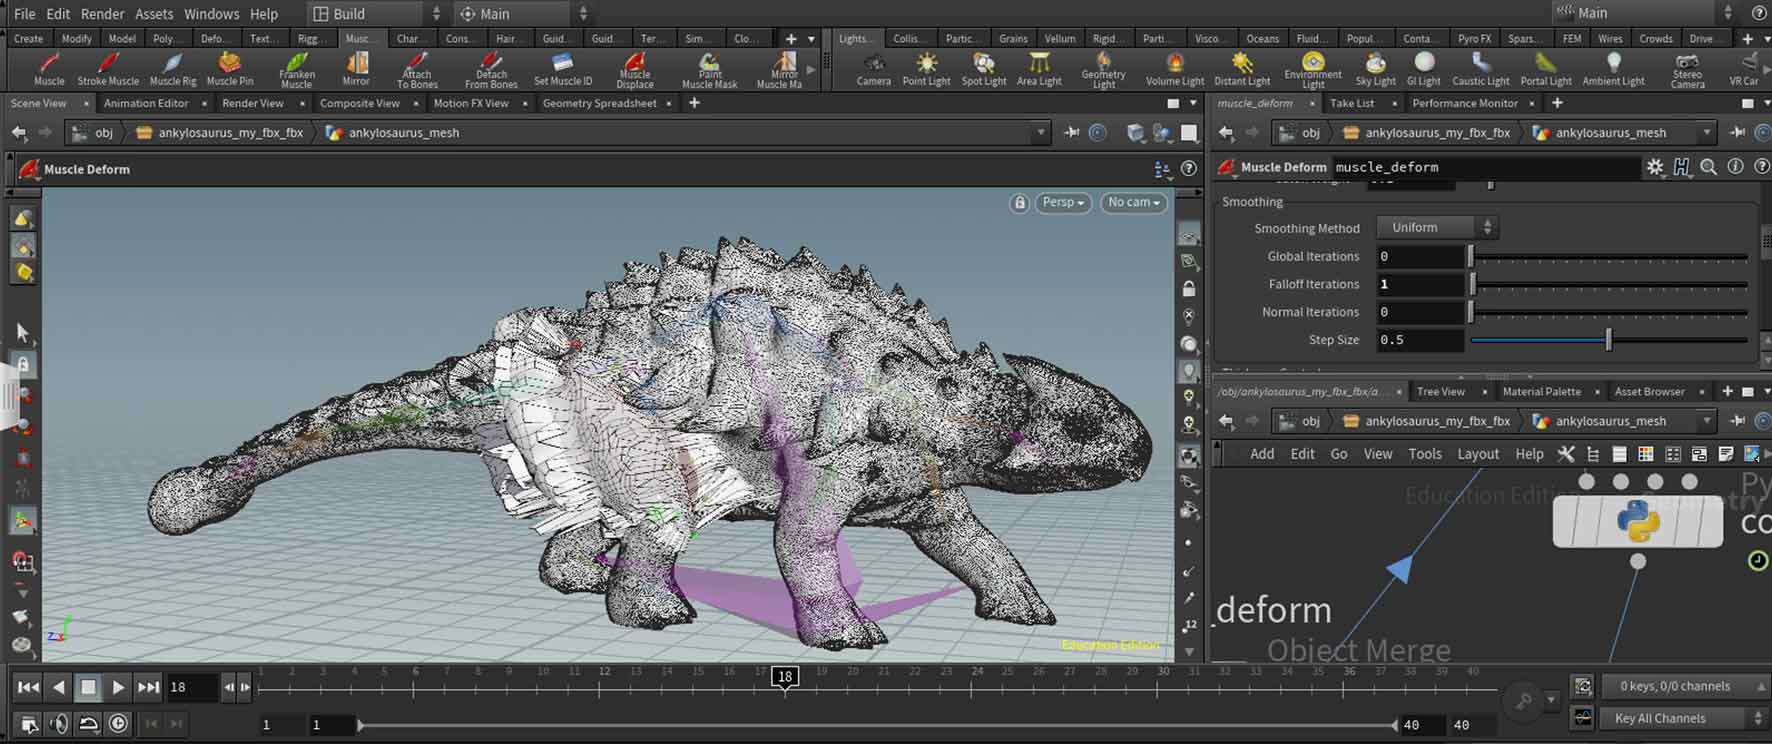
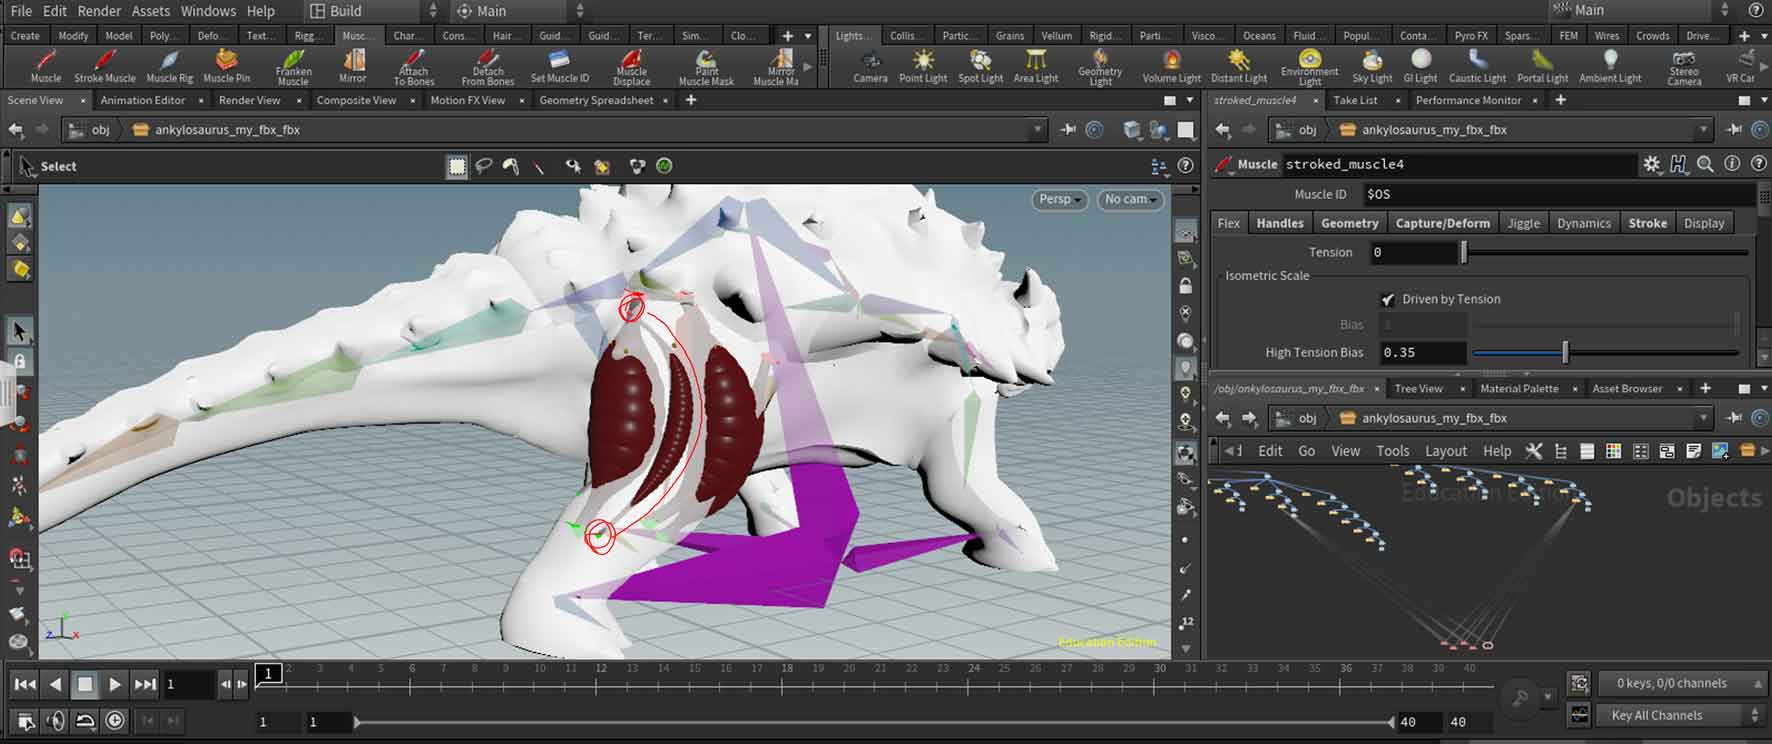
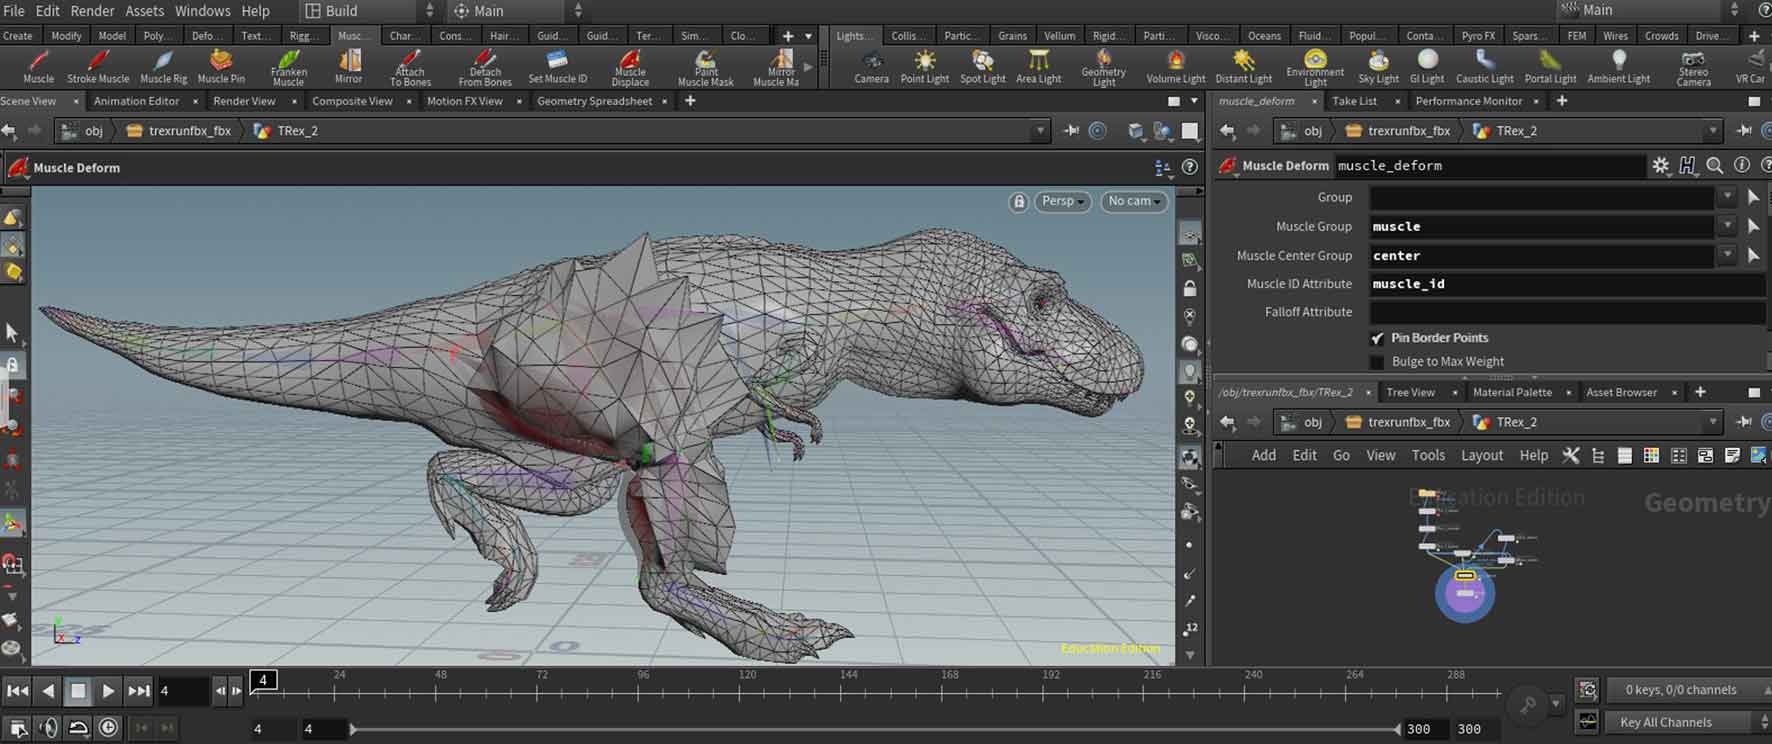
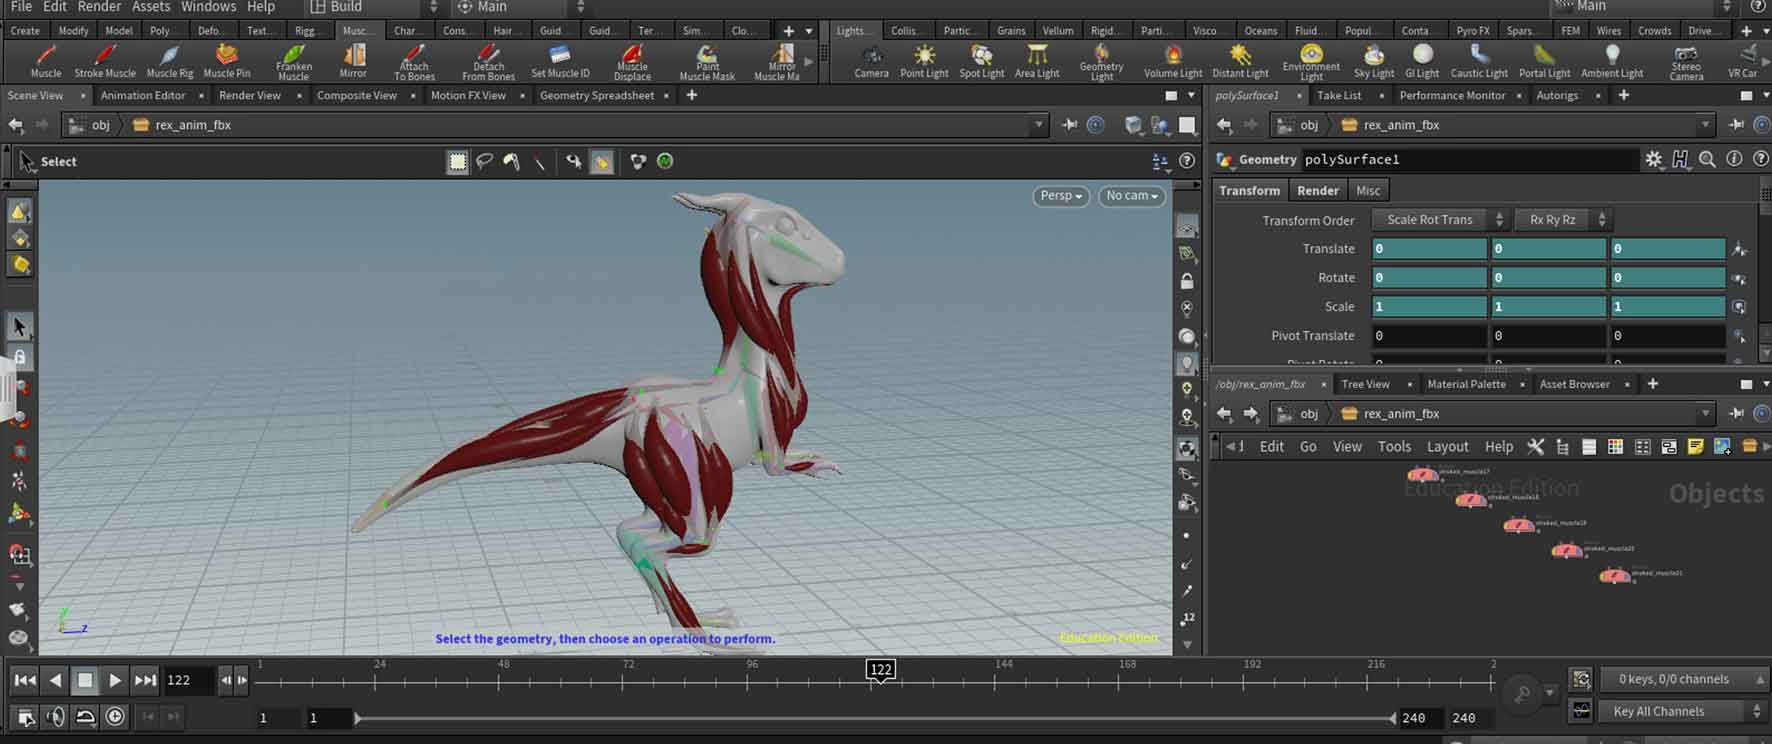
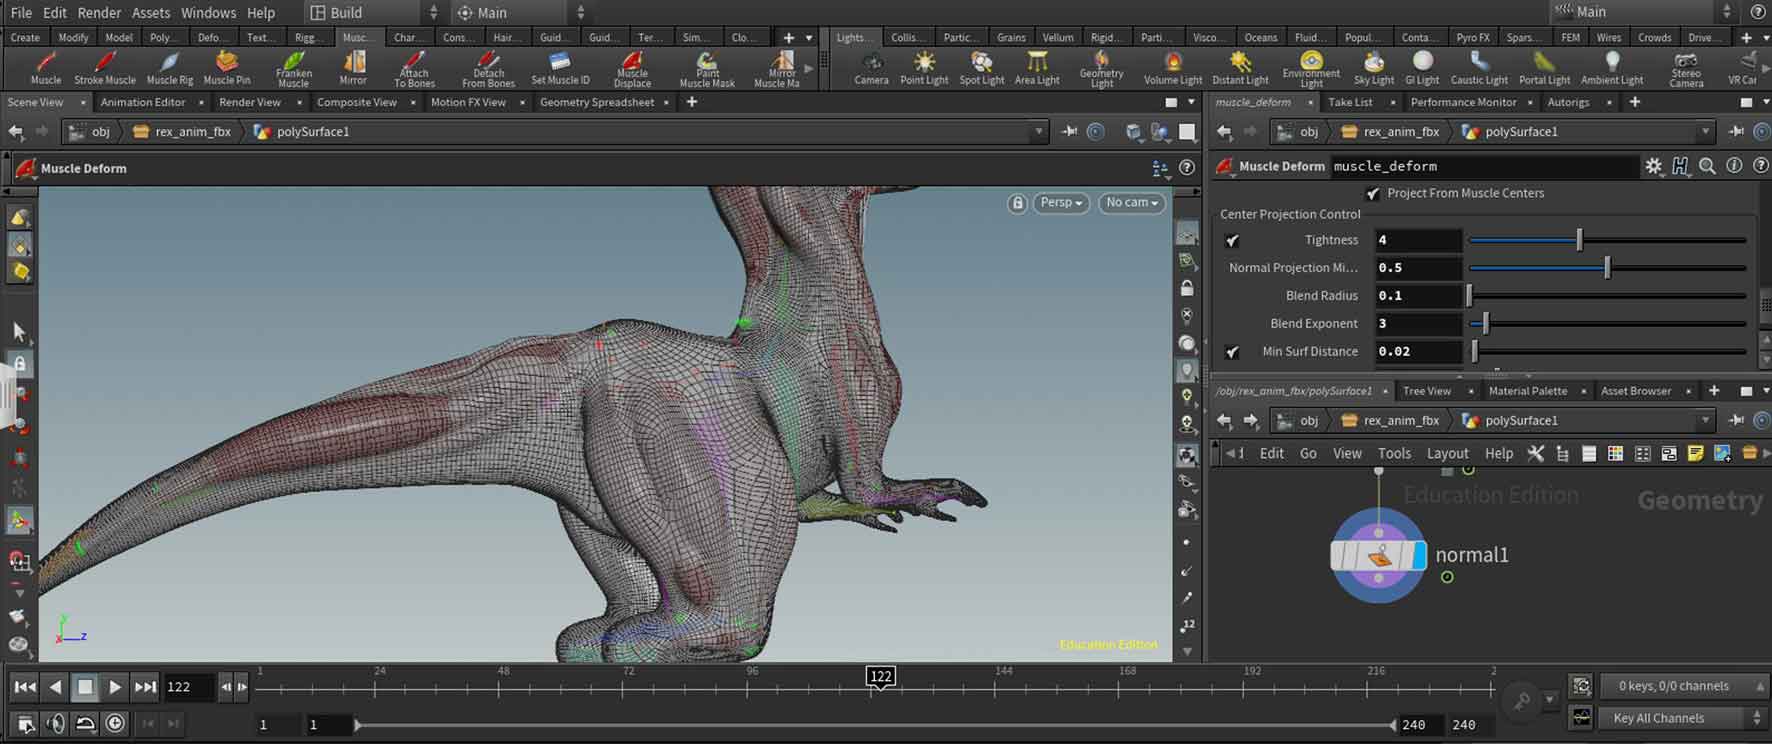
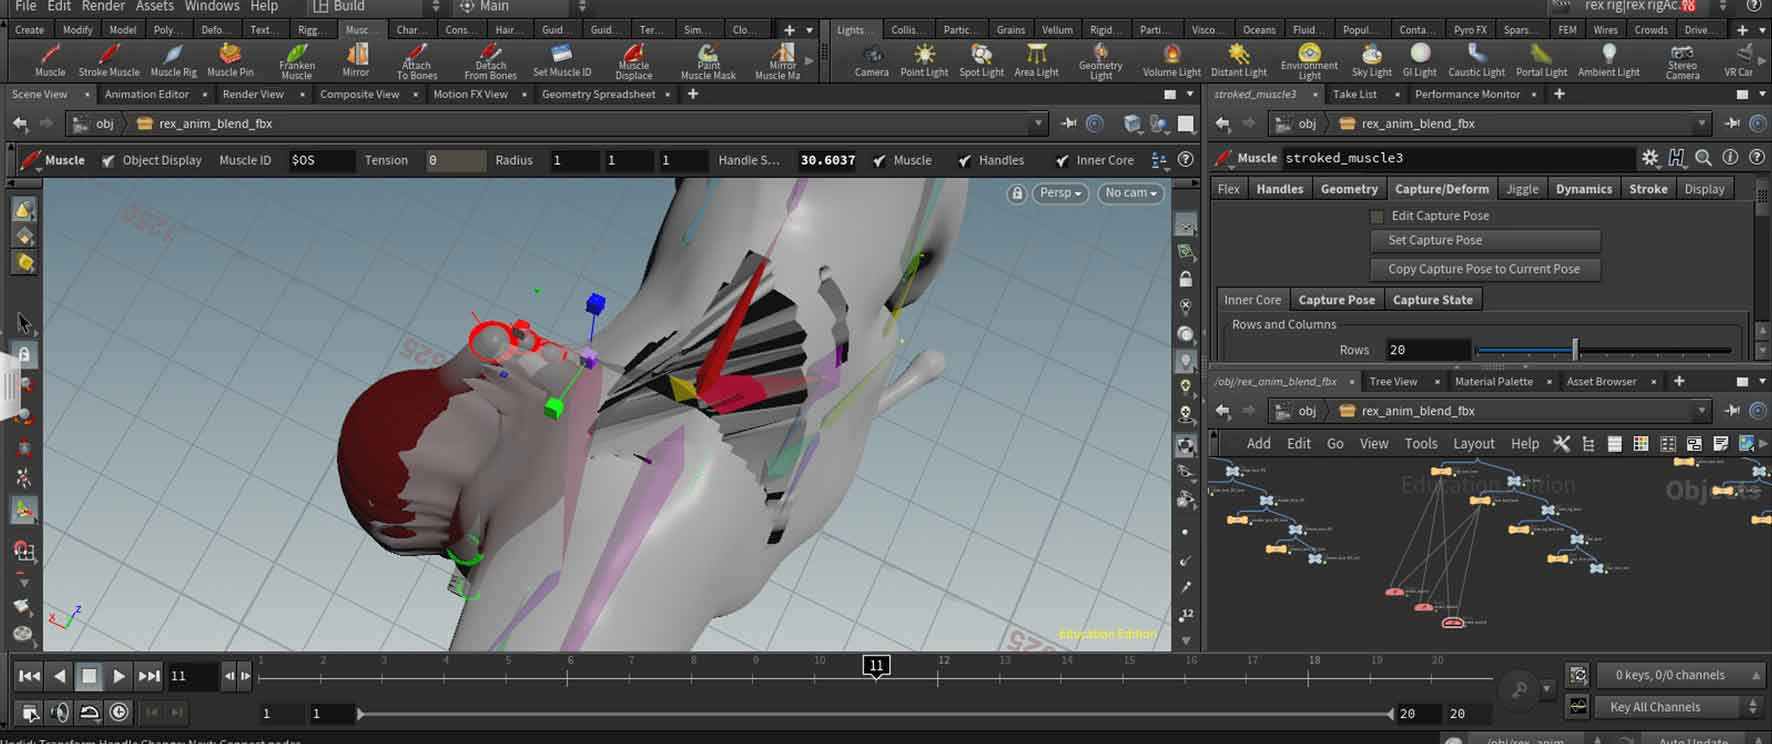
Then I have sculpted the muscle shapes, using normal Maya modelling and sculpting tools, to later set the bone parts of the model to ‘Bone’ objects and the muscles to ‘Tissue’ and later ‘Muscle Fibre’ objects. At this stage of the set up the muscle would fall according to gravity and it needed attachments (done by selecting parts of the model – in this case with vertex points – then shift selecting the bone object and clicking on ‘Attach to bone’ shelf tool).
In the above video – The muscles set up and following the movement of the bone.
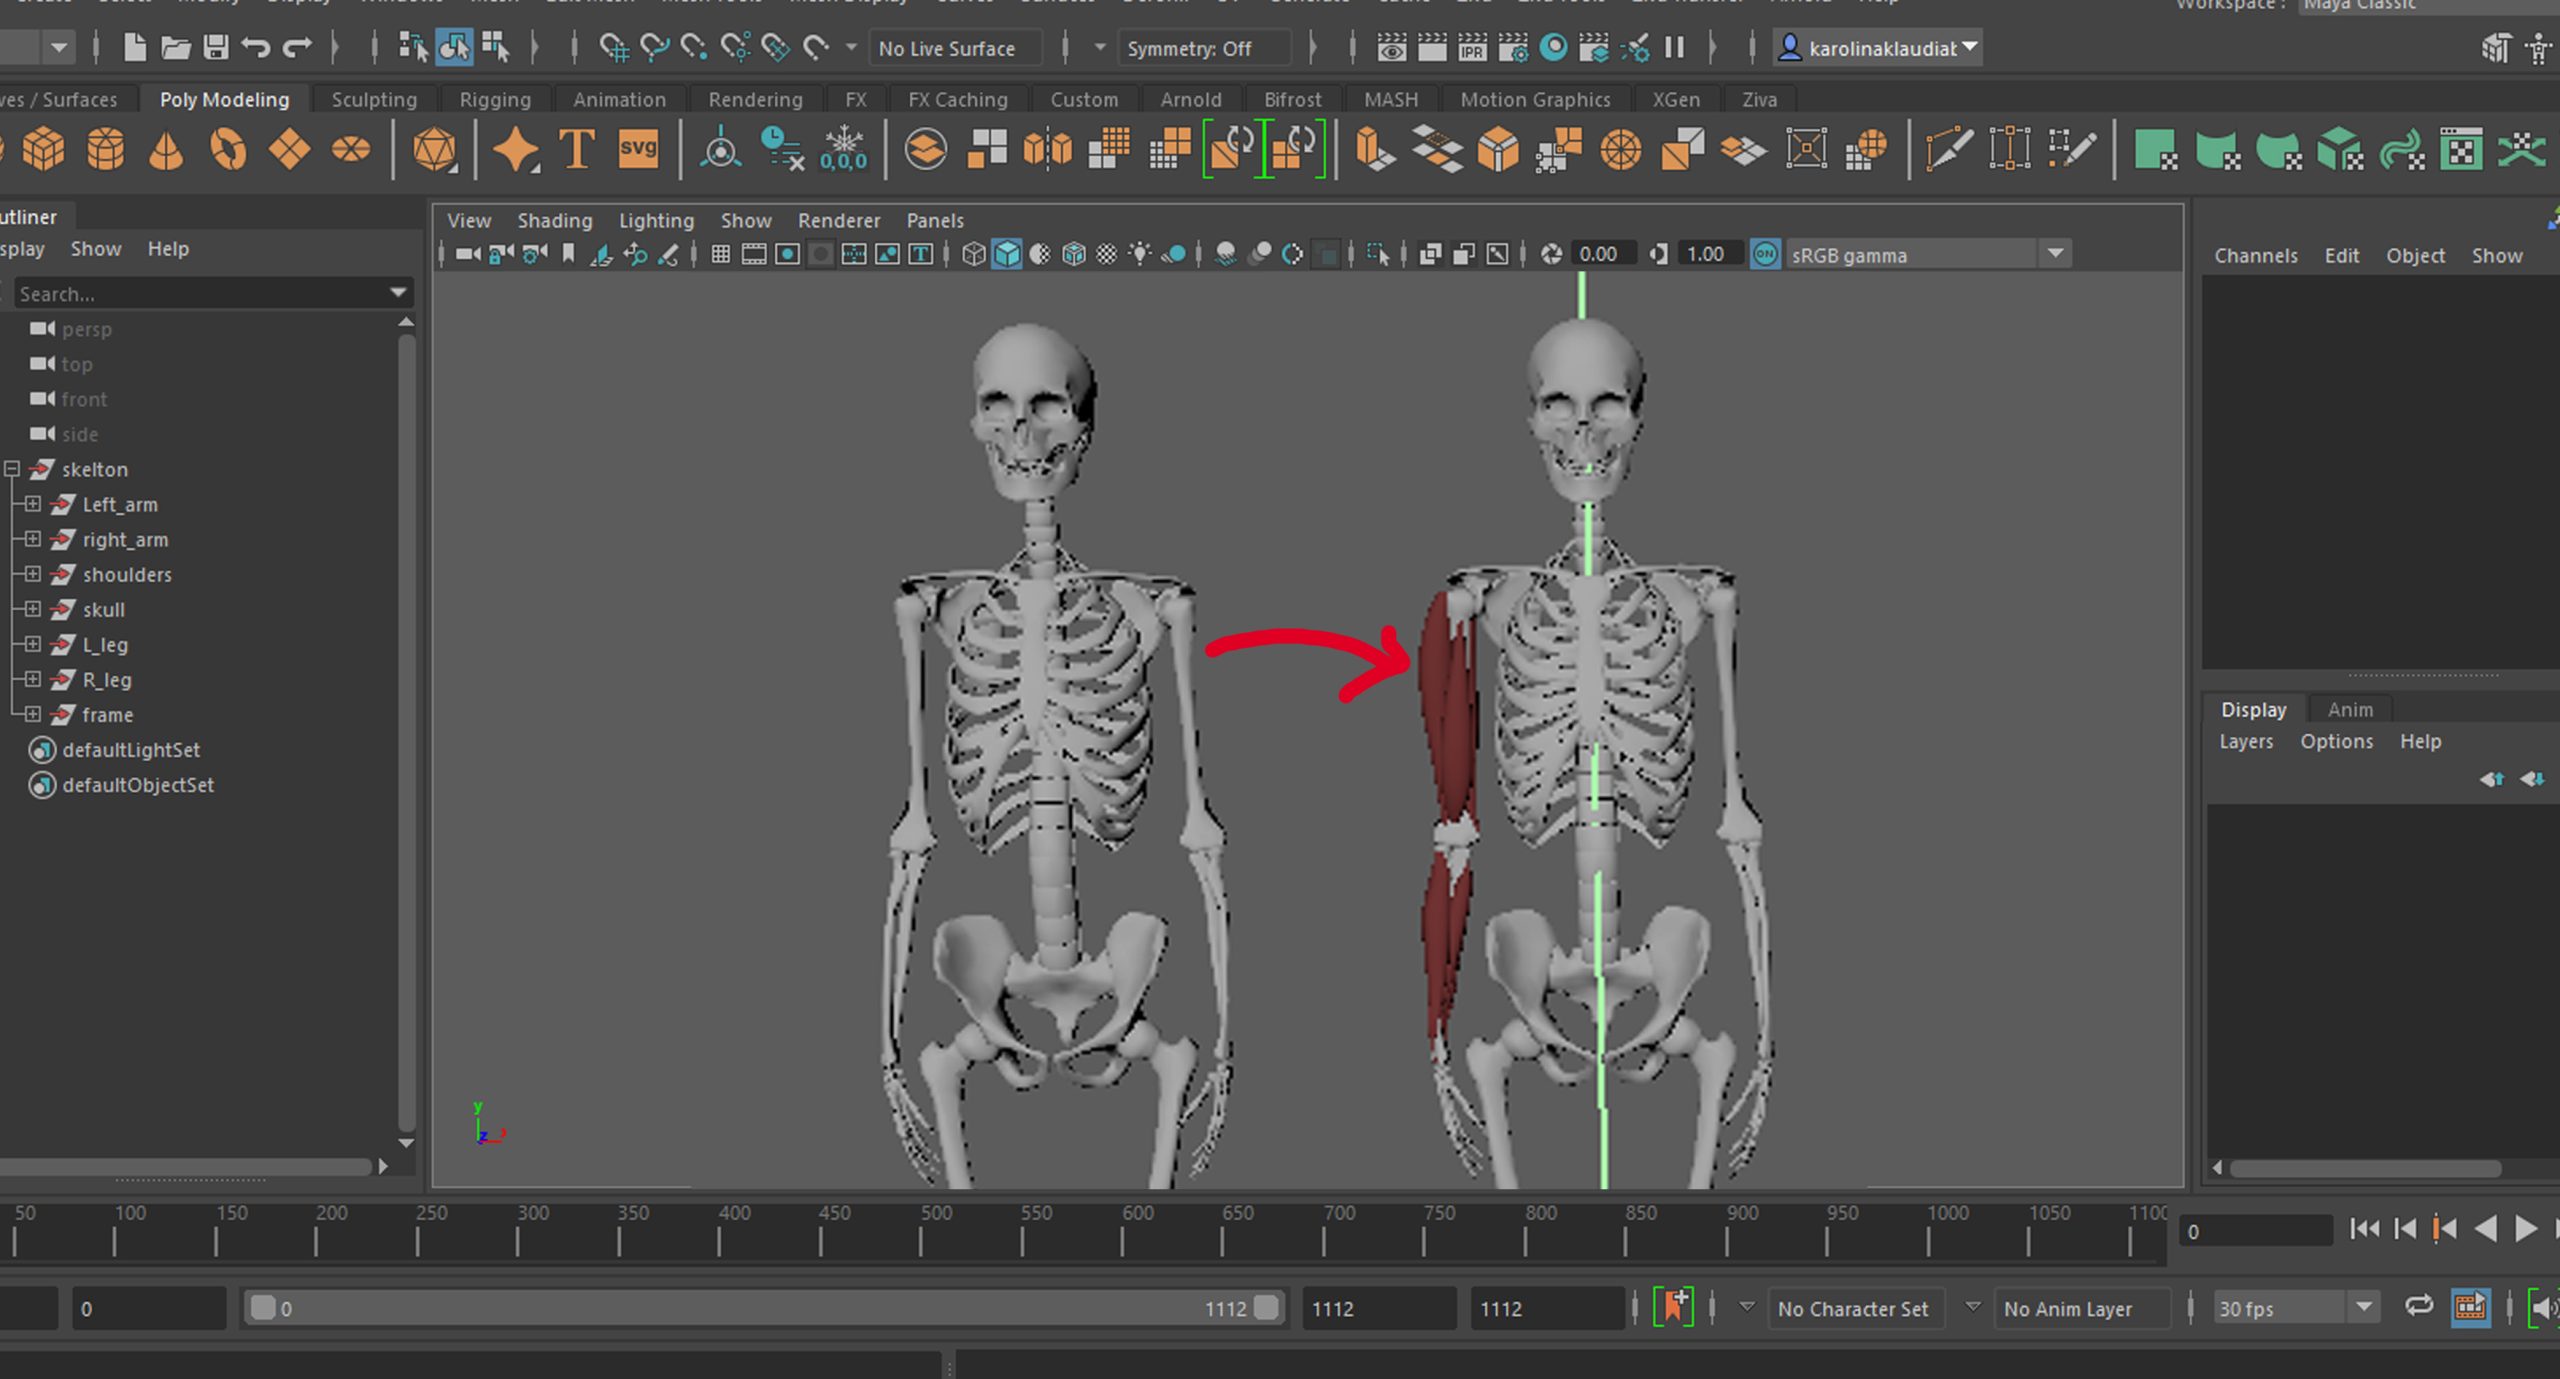
Above, a simple screenshot showing the original I was working on and then the muscles set up I have sculpted in preparation for the simulation. I did that by referencing some anatomical books and images, but at the end, I stopped trying to achieve accuracy, since I wanted to have as much time as I could actually exploring the simulation, I decided to leave the anatomical accuracy for a bit later stage, when I am creating something more that just a trail or test simulation.
In all the tutorials I found online, the gravity worked on the muscles (all tissue objects) a soon as it was applied to the object, this however was not the case with this set up, above there is a video of a tiny test I made to make sure there is no simulation happening (I thought there may be some very subtle one going on).
As you can see, the stretched sphere that imitates a muscle on the play blast above, does not move even a millimetre in any way, assuring me that there is no simulation happening. I did it this way to avoid the distraction from the animation of the hand, in the case above the muscle should freely droop to the floor, as there is no animation on that hand, only the attachments on a few top and bottom vertex points, and it would have been way easier to see even a small movement (or its lack, as in this case).
After the test mentioned on the left, I have tried to resolve the issue, both by exploring settings and searching the internet, but as of this stage, I was not able to find anything except of the fact that the muscles were most probably done correctly as I managed to animate some tension setting on them. This can be viewed in the screen recorded video above.
Here the muscles follow the mesh in a correct way, not simulating, but contracting the way they are supposed to do so. This made me think that the issue could have been caused by the general settings of the simulation.
The two videos above show the result of my closer look at the solver settings (the general simulation settings) which Resulted (finally) in an outcome a bit closer to what was my aim. during the test I spent around half an hour changing parameters at random and making a mental note of the results of those changes and how mixing them would make the simulation react. The outcome above was the closest I could get to the movement I saw being achieved automatically in the tutorials (unless they have skipped a step of setting the solver up). This didn’t seem the right way, but it worked so I tried to replicate this in the file of the hand wave animation… – nothing happened. So at this point I decided to take a break from this project and come back in a couple of days. That, was the last time Ziva was working for me.
After coming back to the project, the license would not load no matter which (online and suggestion from the error I was getting) solution I was trying. After a couple of days of trying that and contacting multiple people about the issue I was forced by the passing time to temporarily give up on Ziva and try to experiment in Houdini. So here my journey starts from the complete beginning.
Houdini
Since I have never worked properly with Houdini before, I had to get accustomed with it pretty quickly, to manage any type of work within it. But any issue I encountered, had to be research and solved relying on internet knowledge as I had no experience with it. To start with I had to figure out how to import models into it, which made me realise that this project will be quite fun…
And as I was watching tutorial again, I realised that muscle system in Houdini (at least the one I started working with as there is two that I know of) work in a quite different way than the ones in Ziva, I was back to square one, searching for the right animated models I could work with (the process I started learning was using muscles as a displacement of the skin for a fully modelled assets, so I didn’t need to start from a skeleton this time, also it cannot be cashed geometry or cashed alembic, as the Houdini’s muscles system uses the rig bones to anchor the muscles).
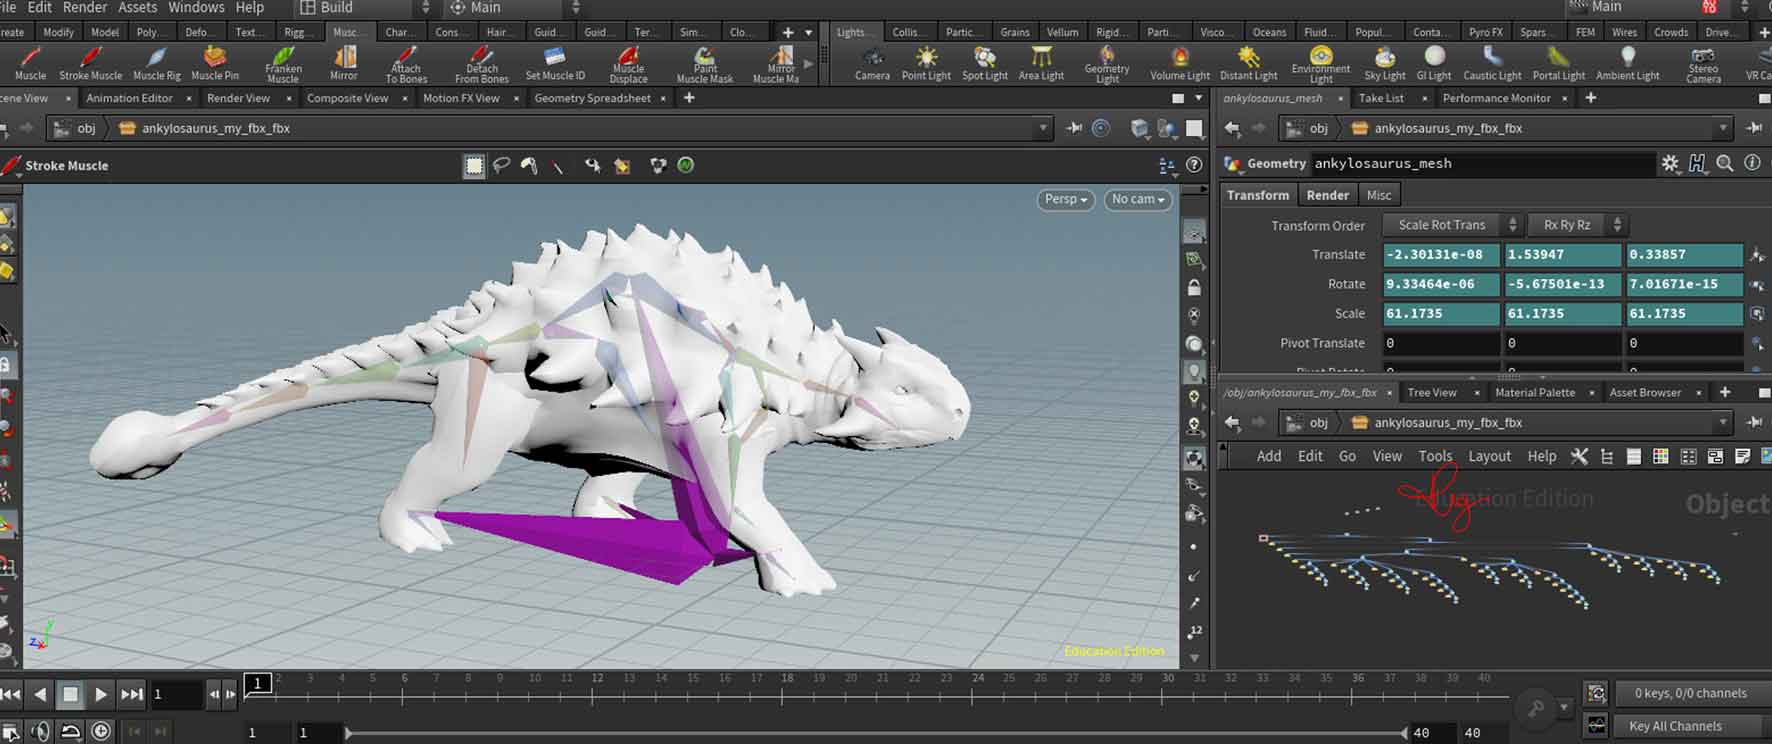
Model and animation credits: “Ankylosaurus Made Animal Revolt Battle Simulator” (https://skfb.ly/otT6Q) by ann55010970637 is licensed under Creative Commons Attribution (http://creativecommons.org/licenses/by/4.0/).
Below, the model I decided to use, with its respective rig and animation, already imported into the software (on the bottom right the rig network).
The bright side of this whole situation with Ziva is that (if everything works, which at the time of writting this I already know will not be the case) it appears to be easier, more straight forward and less time consuming than the one from Ziva Dynamics.
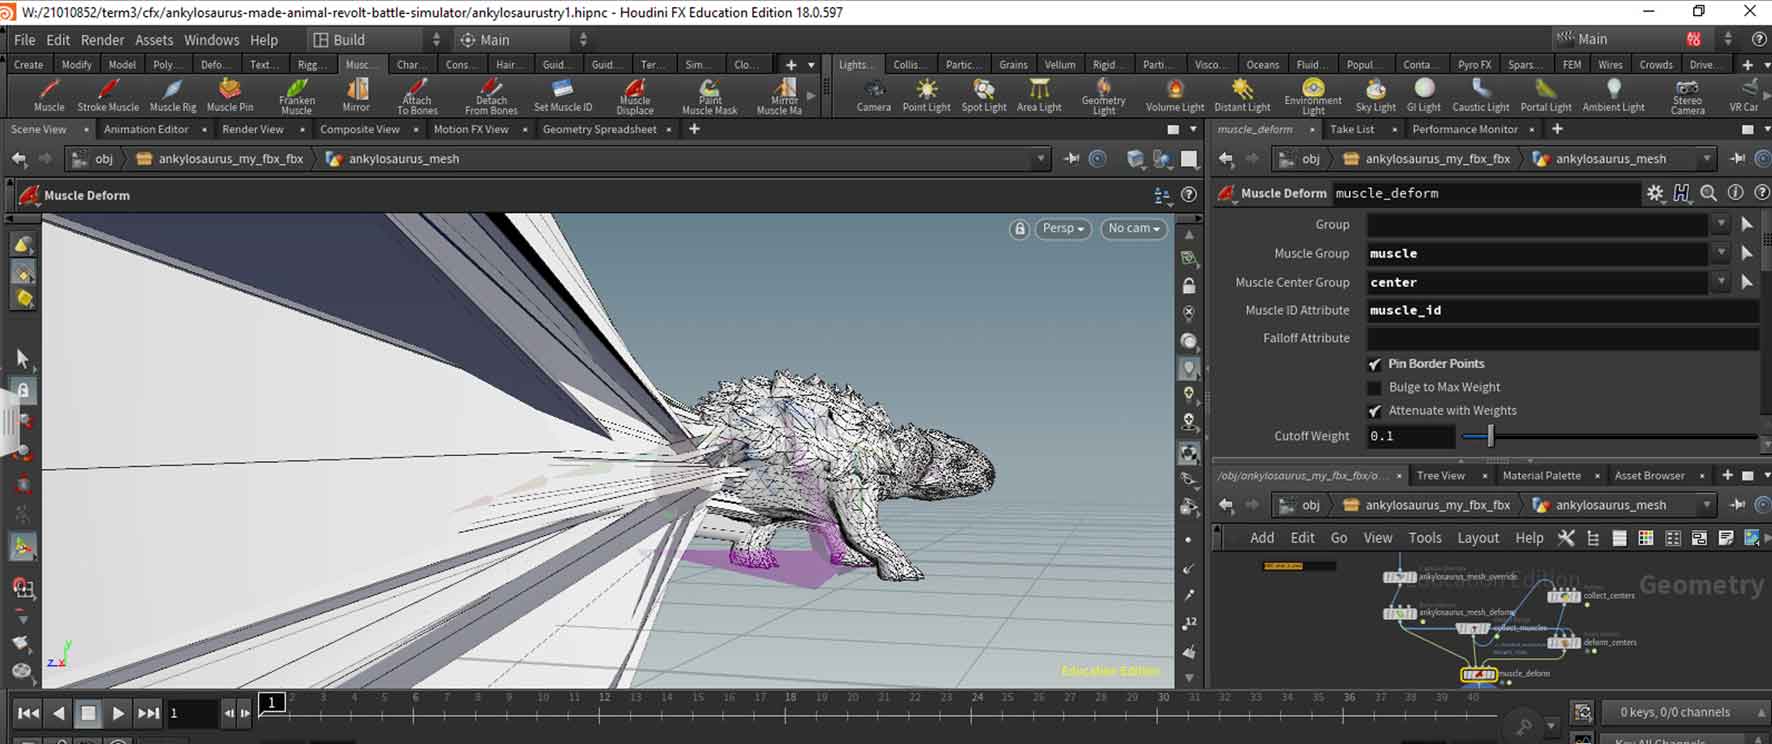
Making the bone I Houdini is as easy as dragging the mouse on the surface of the model and adjusting the created muscle object with sliders supplied.
Below a picture of a muscle, and the tool used to create it circled in the top left corner of the screen shot, with some parameters for the profile of the muscle on the top right part.
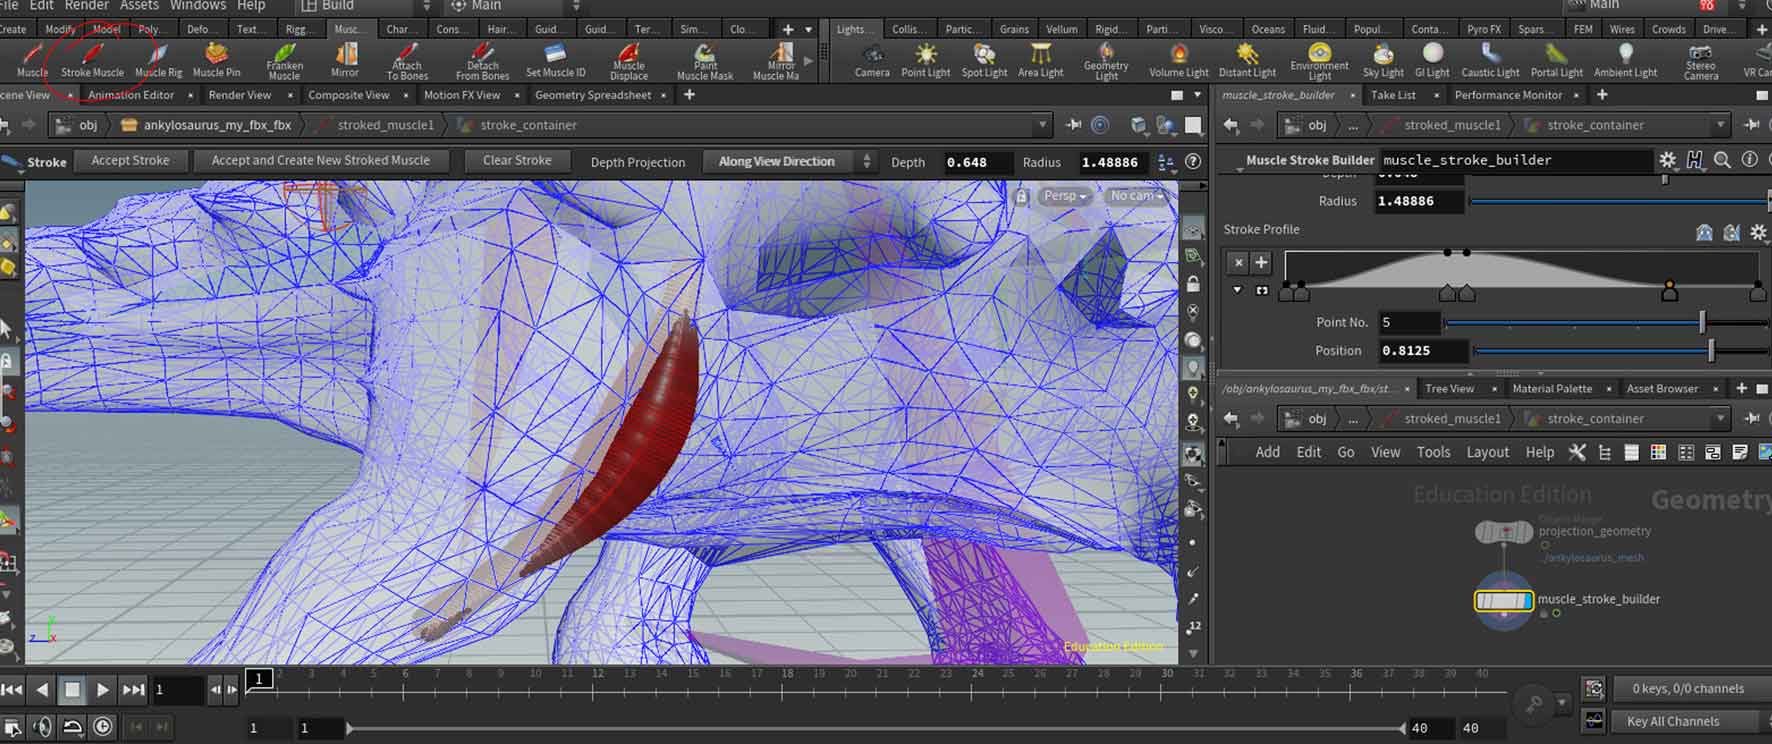
A ‘few’ more muscles created, I decided not to bother with trying to be correct at this stage, here I was just trying to learn how the system (and software) worked in general. This screen shot also provides a glimpse of the network (script) in which the bones were situated (important for the future).
At this stage the muscles, just exist, they do not follow, nor move in any other way, which is caused by the lack of connections that would attach it to anything. This is clearly visible in the network editor window as they are completely separate from anything, even each other.
Below a picture visualising that by showing the muscles being left behind and the animation advances on the timeline (the muscles were created on frame 0).
The muscles are the attached to the rig by one of two ways, one, in the viewport through using shelf tool (Attach to bone) and two, in the network editor, by manually attaching the neds together (head anchor >left< to a bone that marks the position of the top part of the muscle, and end anchor >right< attaching to a bone on the bottom side of the muscle). I could not get the first option to work, so I had to stick with the second one, which still worked perfectly well, only being a little less efficient. Below the result of this stage of the process, with the network not showing the nodes with incoming connections.
Please Ignore the everchanging muscle arrangement, if something wasn’t working I was trying new things over and over again as well as I forgot to save a couple of times before houdini crashed, but the principle is still exactly the same and the process is still valid.
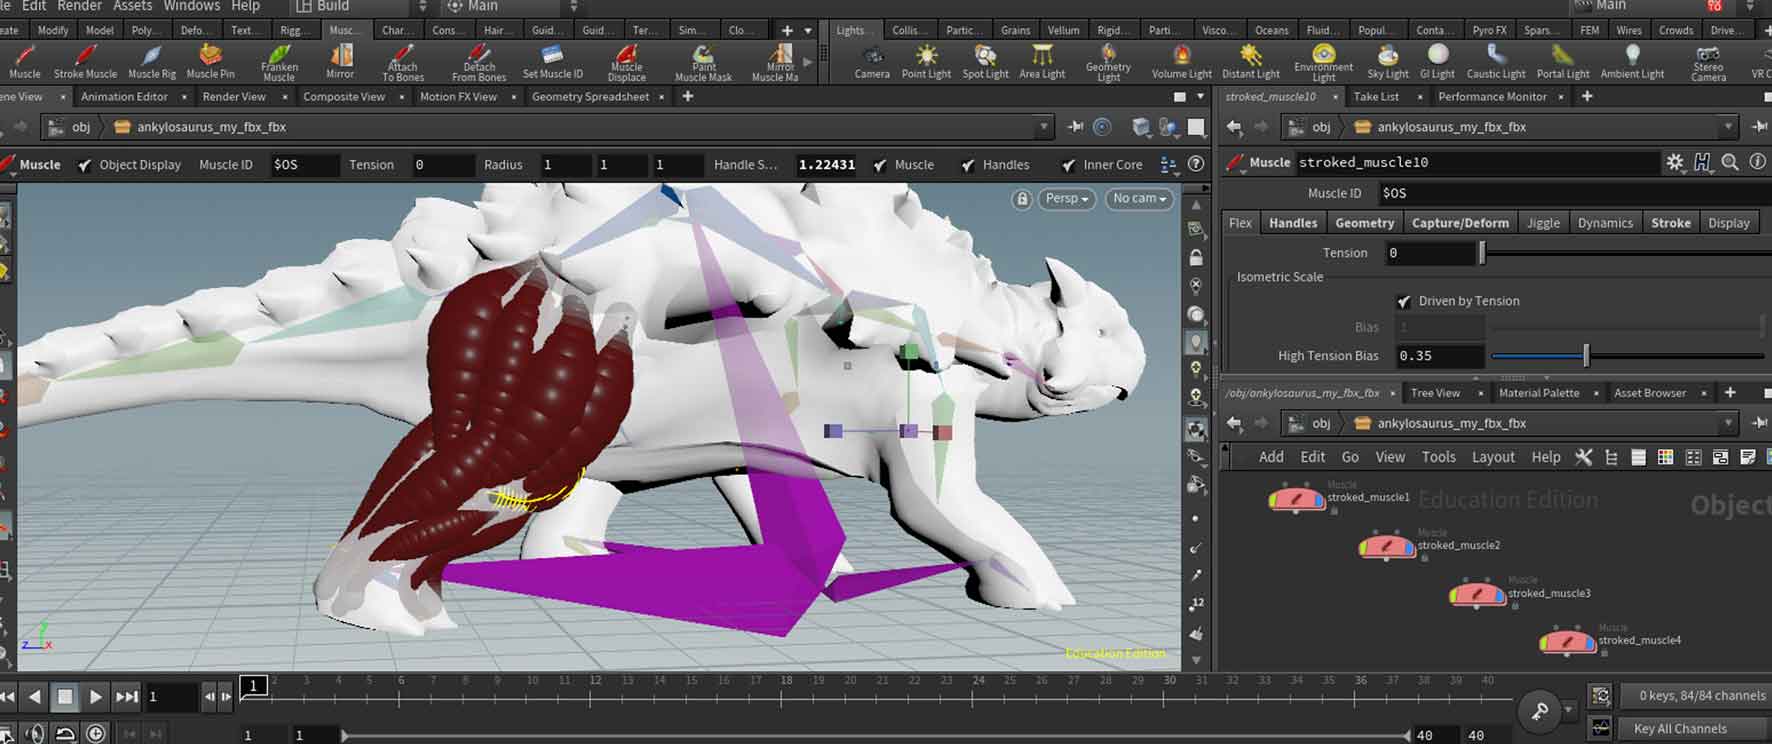
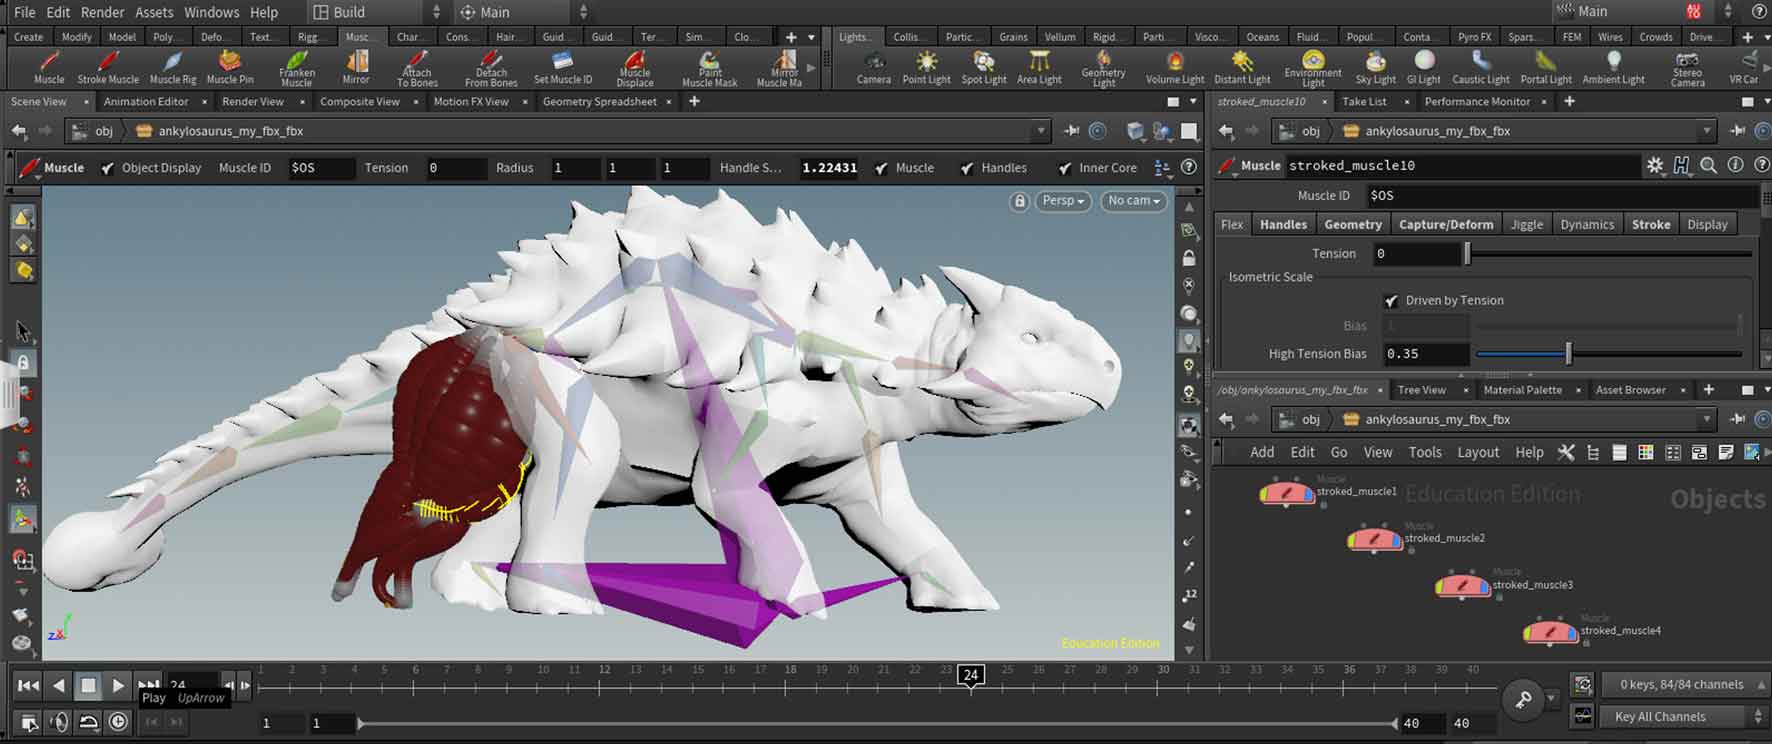
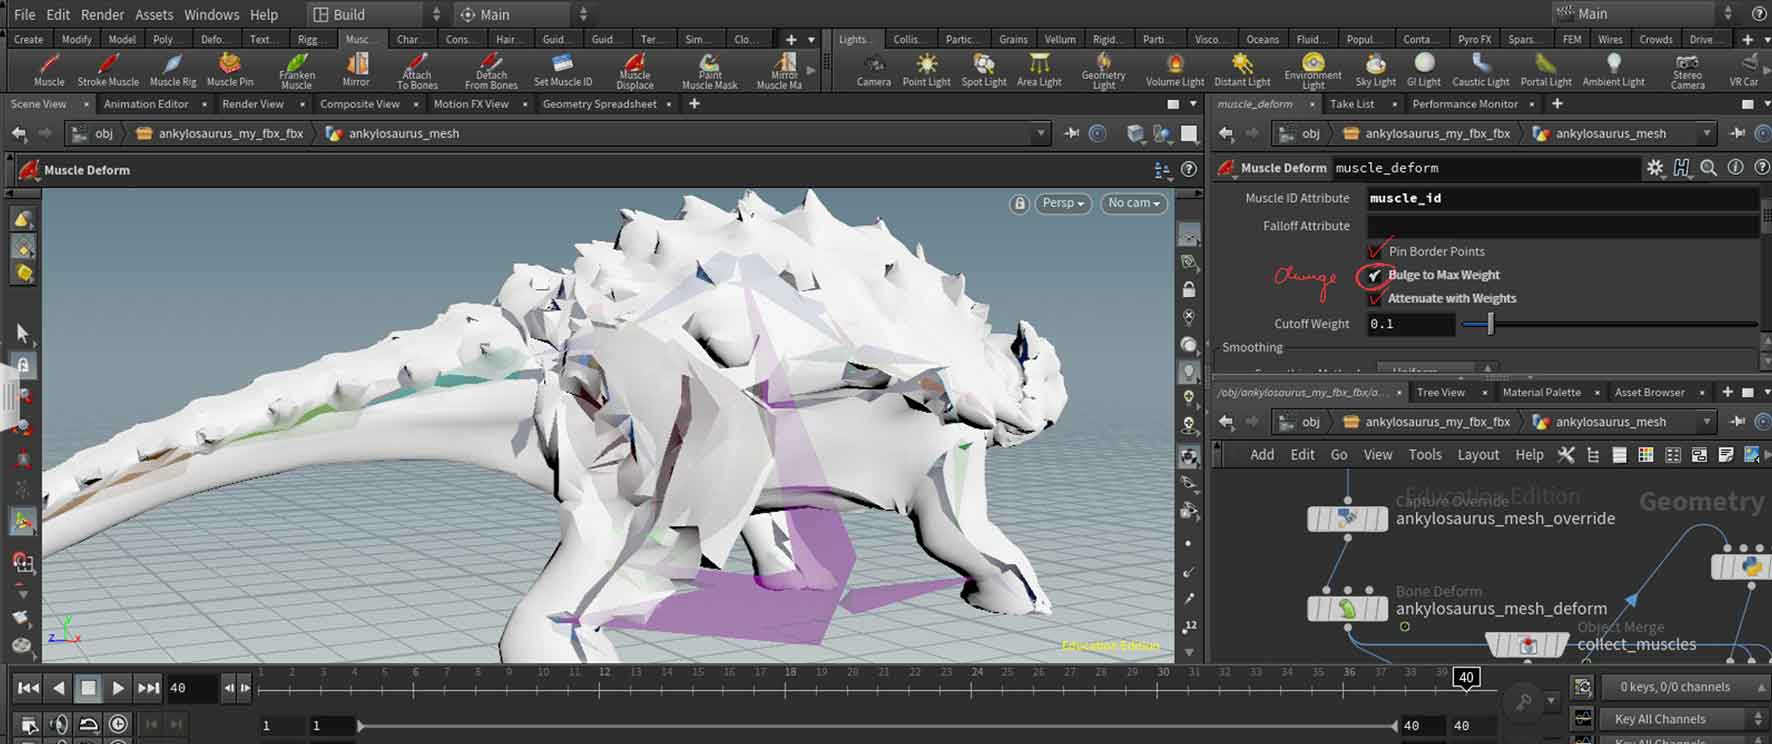
Next, we added some basic jiggle (secondary movement), and played around with its settings to try to achieve the best effect possible. Here, again, the tutorials showed everything being set to default and working, but mine was so subtle it was barely visible, so I tried adjusting it. Below the effect I managed.
After playing with the jiggle, I started to pay more attention to an issue I noticed even before (but I wanted to check if the jiggle actually works). There is a clearly visible weird jump on the beginning of the animation, It looks like an additional accidental keyframe was added there, but I went through everything that could have been keyframed checking that and I could find no fix for this. I decided to move on as this was meant as a test anyways, and I was hopping it was dues to the way the animation finished and the fact that the walk cycle did not align, when it started from the beginning due to looping.
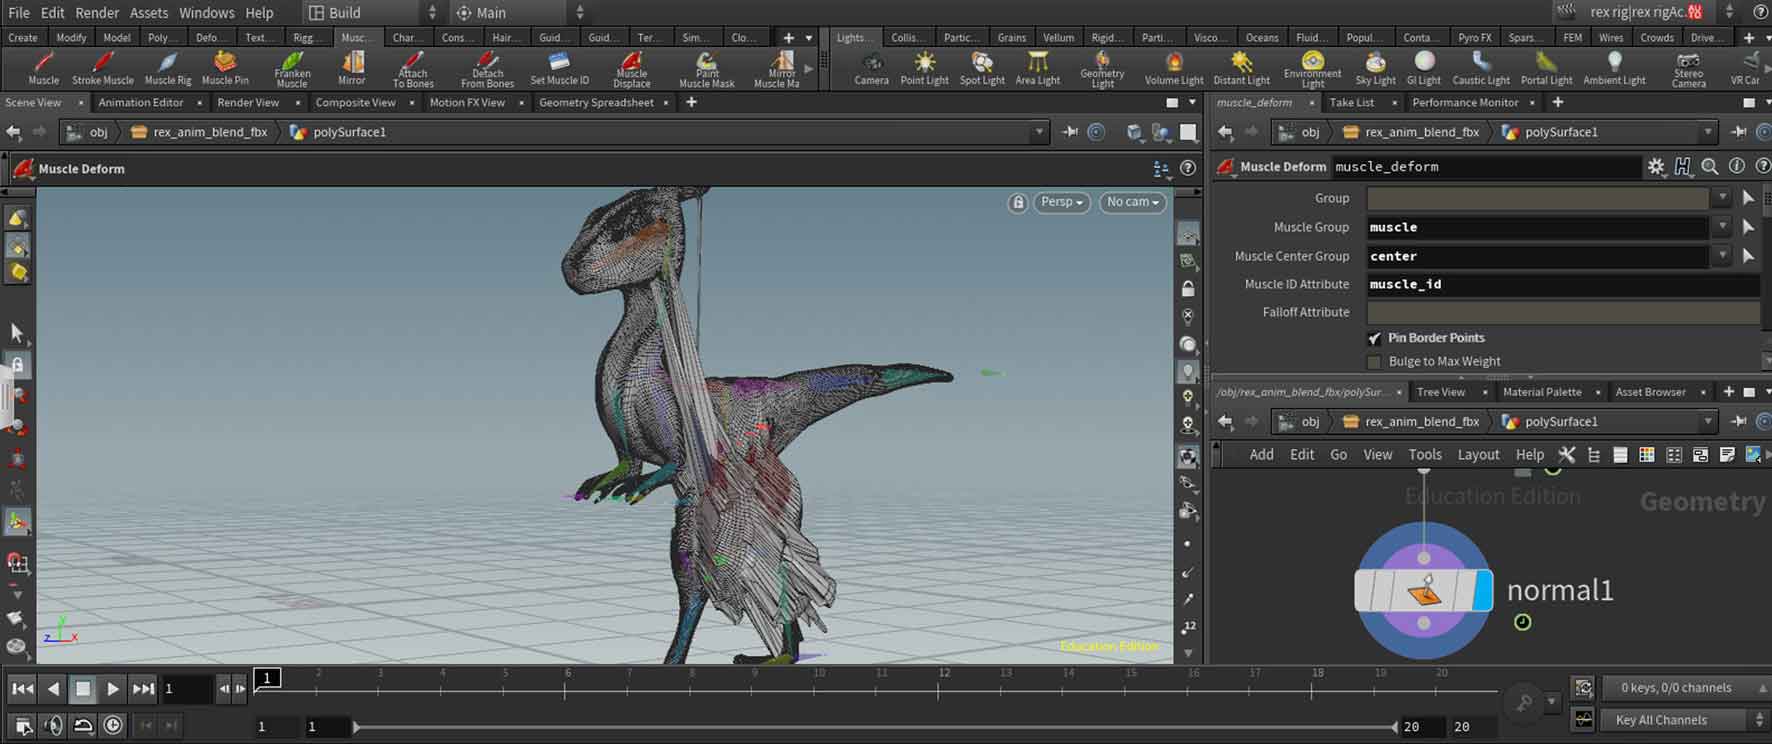
As mentioned before Houdini has two ways of creating muscle simulations, one of them (which I found after scrapping the skeleton from my adventure in Ziva) is meant to work with skeletons (I haven’t yet looked into it so for now that’s all I will say abut it) and one that adds the movement created by the muscles through applying a displacement that takes the muscle movement and projects it onto the surface of the model we were working on (the method we used).
So the next step was to add the displacement, which looked very easy and automated, but instead exploded a part of my model (below).
After which I started playing around with the settings of the displacement, to see if adjusting anything would fix the situation.
With some settings I managed to make it almost right, but when I then played the timeline, there was no secondary muscle movement whatsoever as well as there was little to no bulging out of the displaced geometry to match the muscles surfaces.
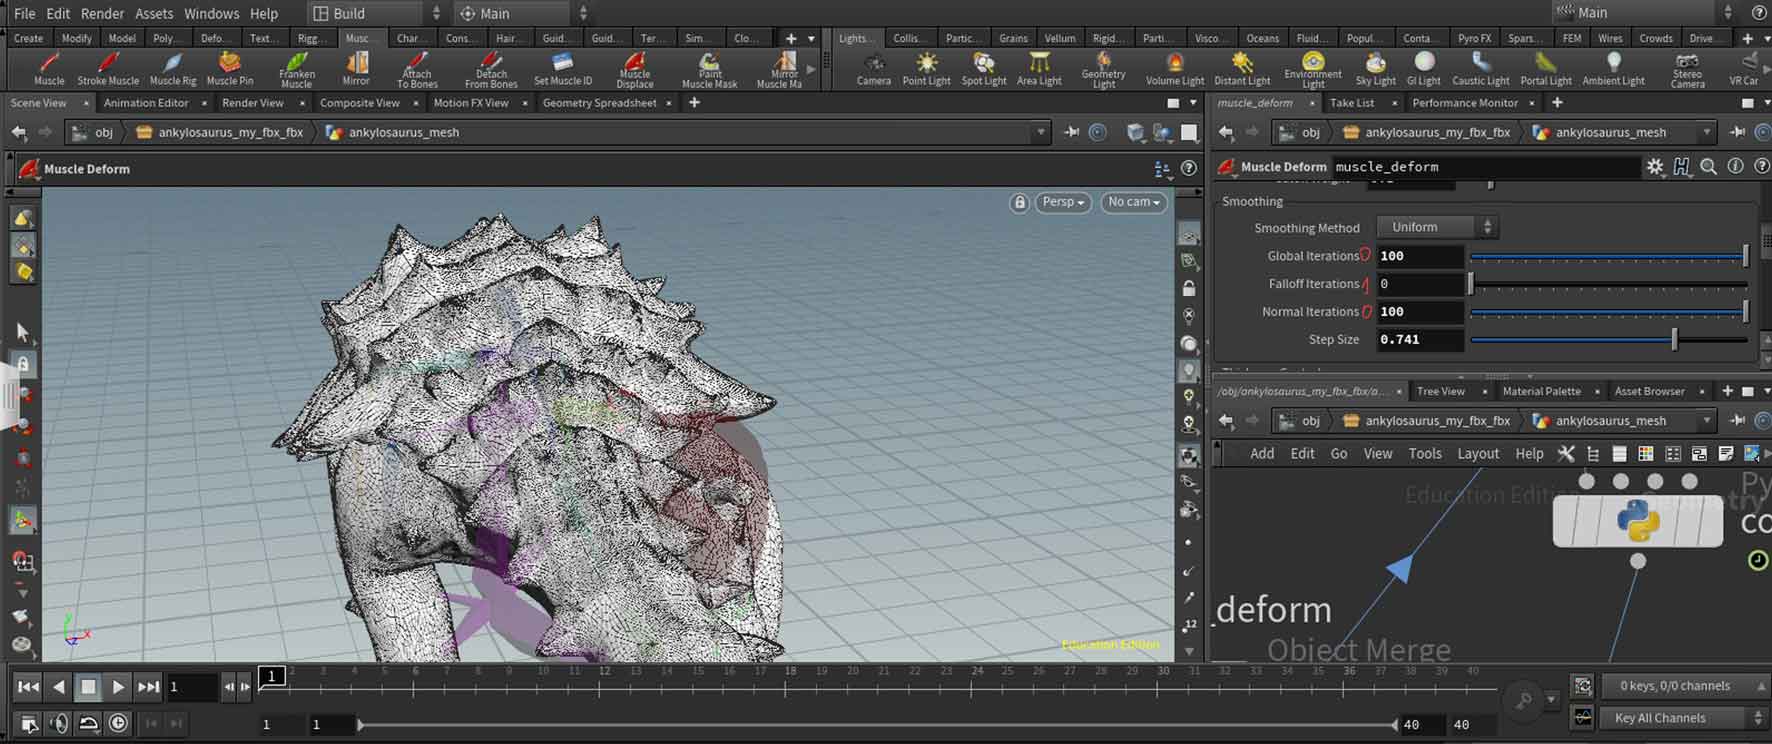
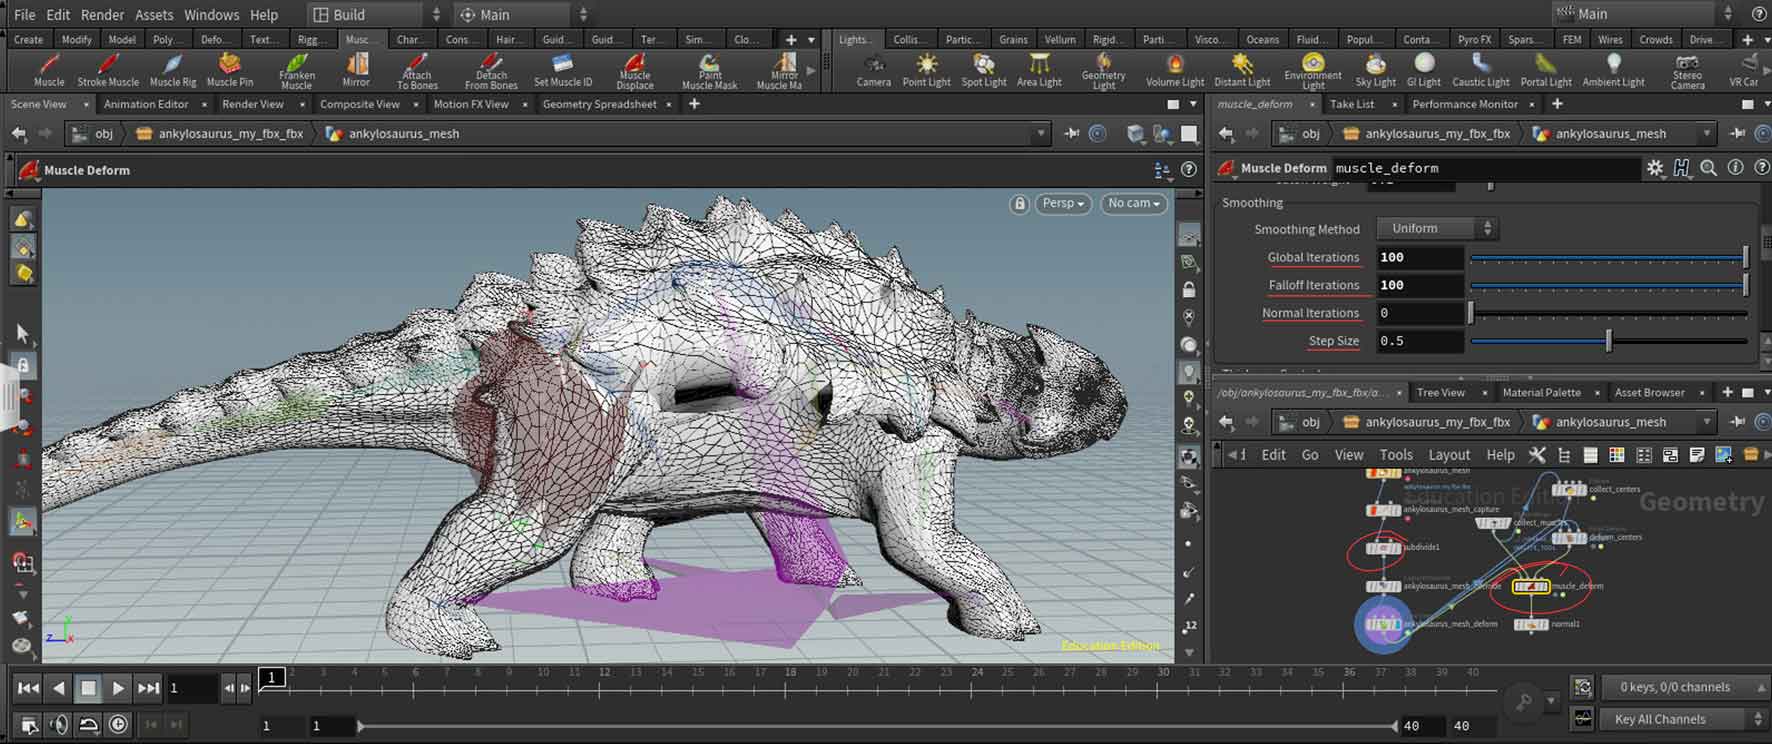
Then I started thinking that It looked like the topology of the model may be the issues here, First, it was relatively low poly (but this should only cause inaccuracies in the match between the muscles and mesh, not mesh going mad) and second, that maybe I should try a quadrangulated model instead of one with triangles. So to first try my too low poly theory, I tried adding a subdivide node to the script.

This decreased the weird effect (on default settings) but did not fix it, at which point I had a look at the density of the topology now, which I assume should be enough for the displacement, and I considered that the model itself may have issues that would cause that, at which point I took the model to Maya to retopologies and potentially fix.
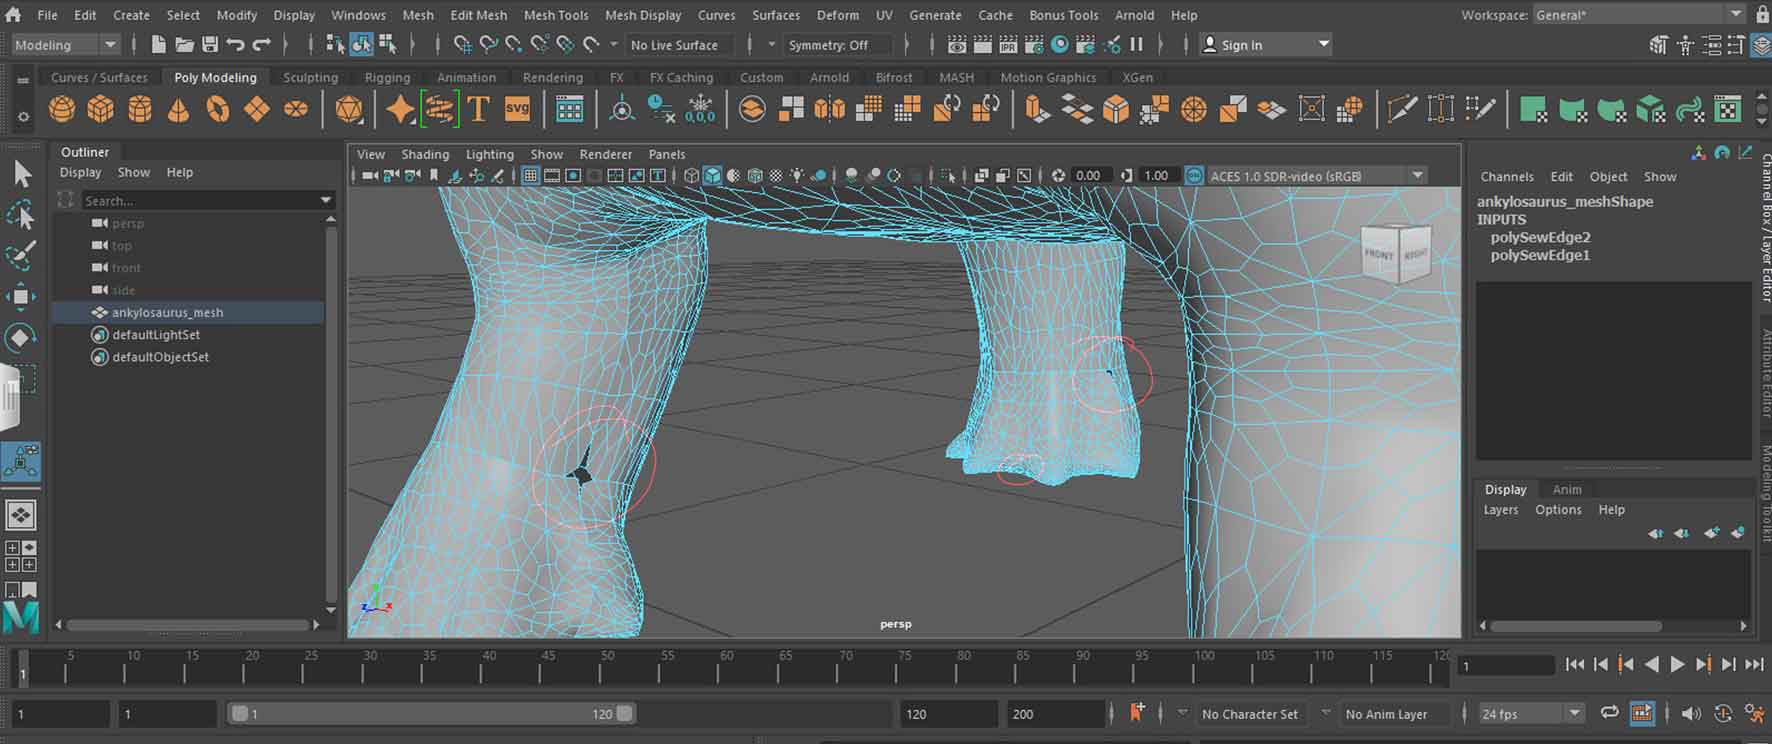
I wasn’t wrong in my assumptions (picture below) as it had multiple holes all over the model as well as the spikes were nowhere near water tightly attached to the mesh itself. I spend around an hour trying with different possibilities for fixing this, except of the manual one (I was on a tight schedule and decided I will give it a chance, but I wont waste time on it, instead I actually had three more models already prepared together with this one before I event started this)
After the trial in Maya, I did what I could and reimported the model into Houdini, but it showed no change, so I might have done something wrong. Here, though, I played the animation again, and I noticed that the displacement actually works (still not right, but at least I knew it wasn’t the case of me doing the whole thing wrong, but more possibly an issue with the mesh).
Both the picture and video below show the messed up displacement, actually changing and slightly following the movement of the muscles.
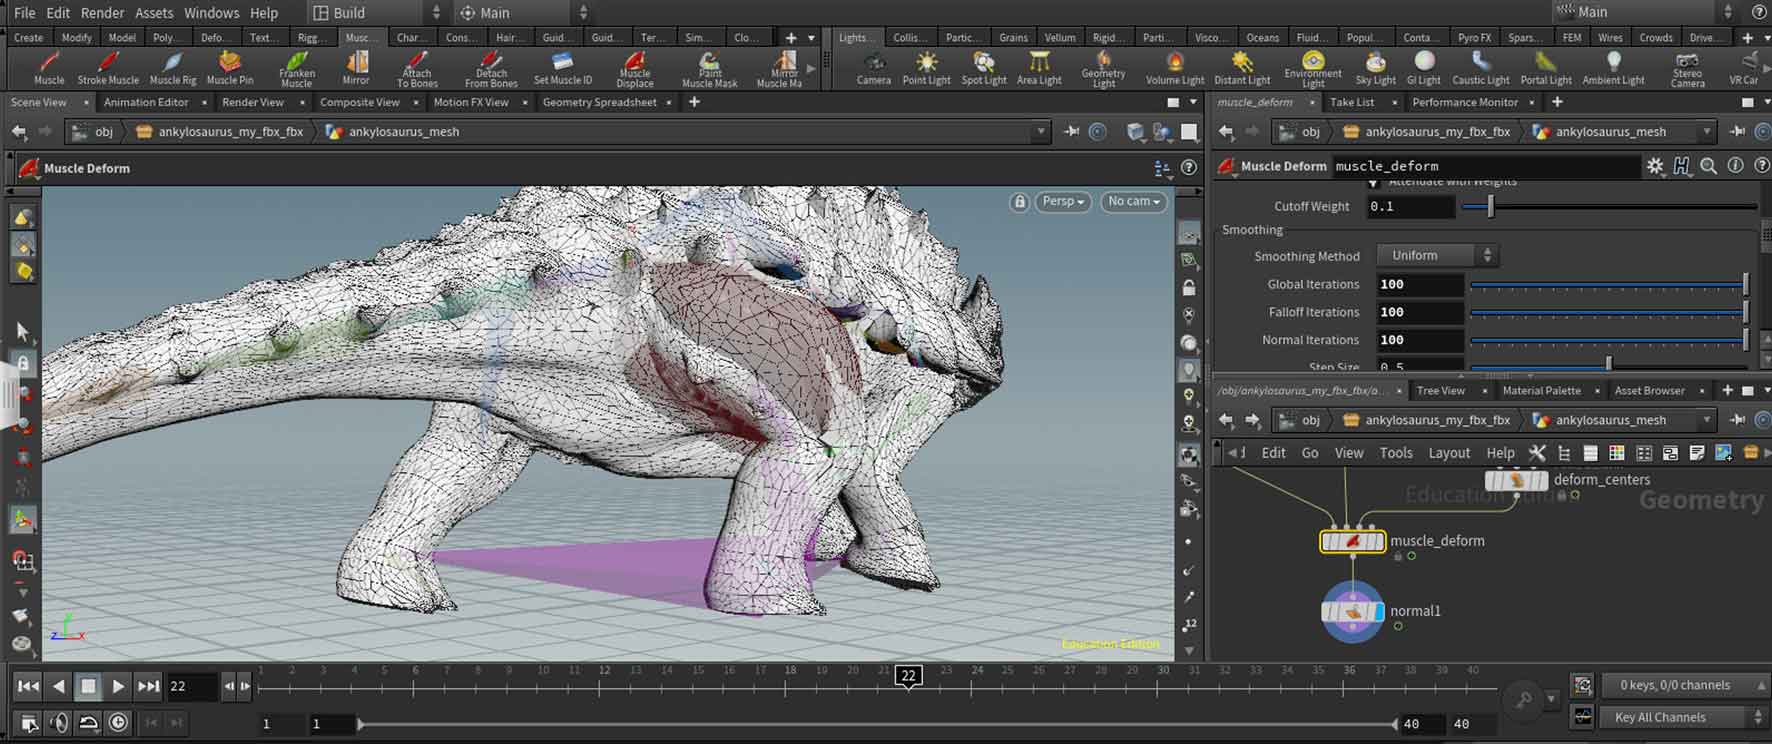
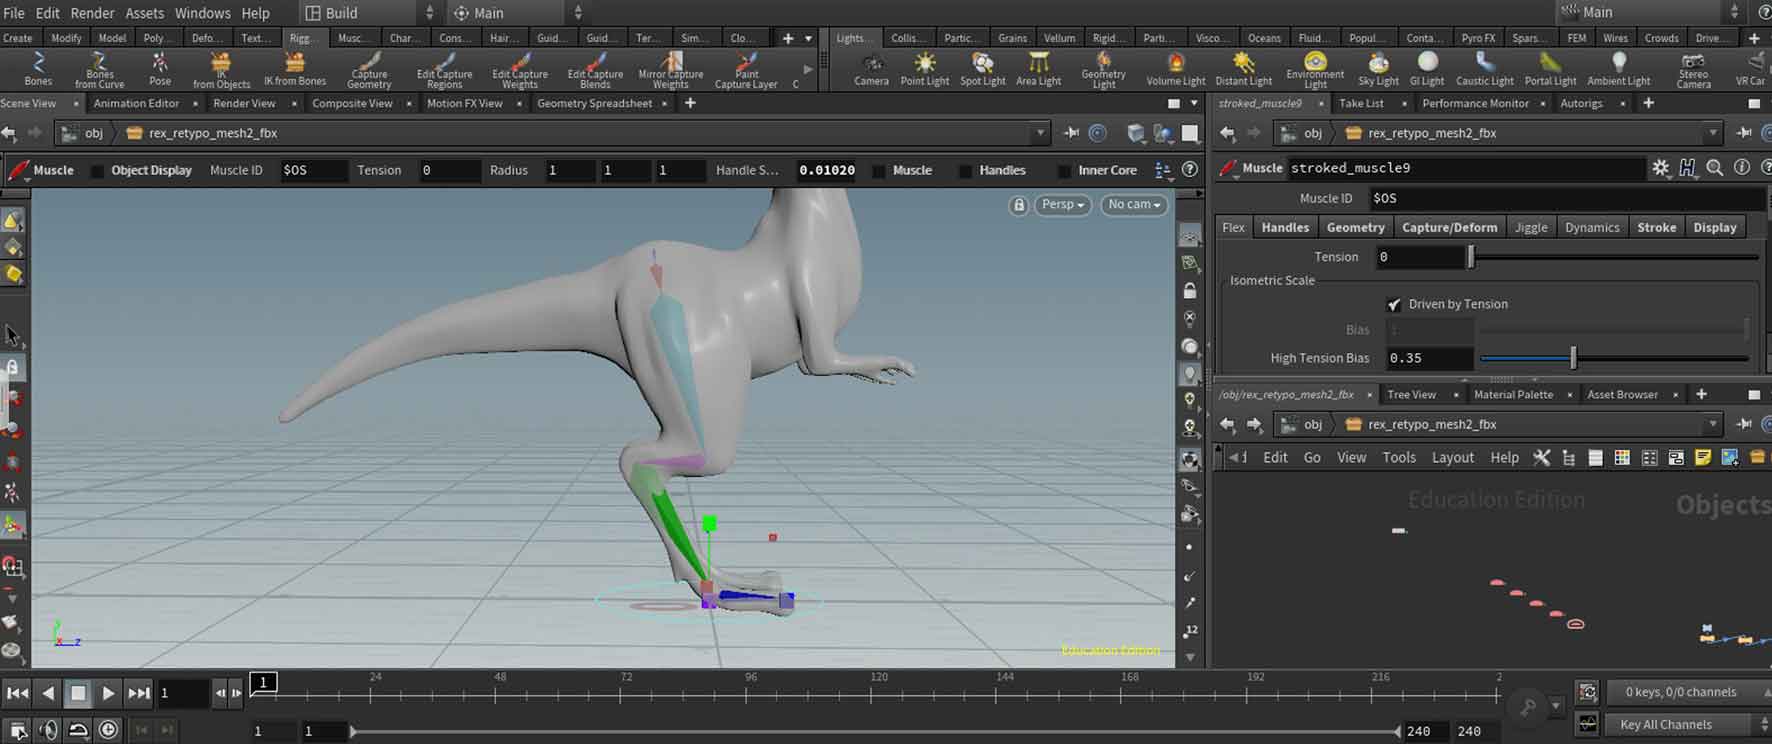
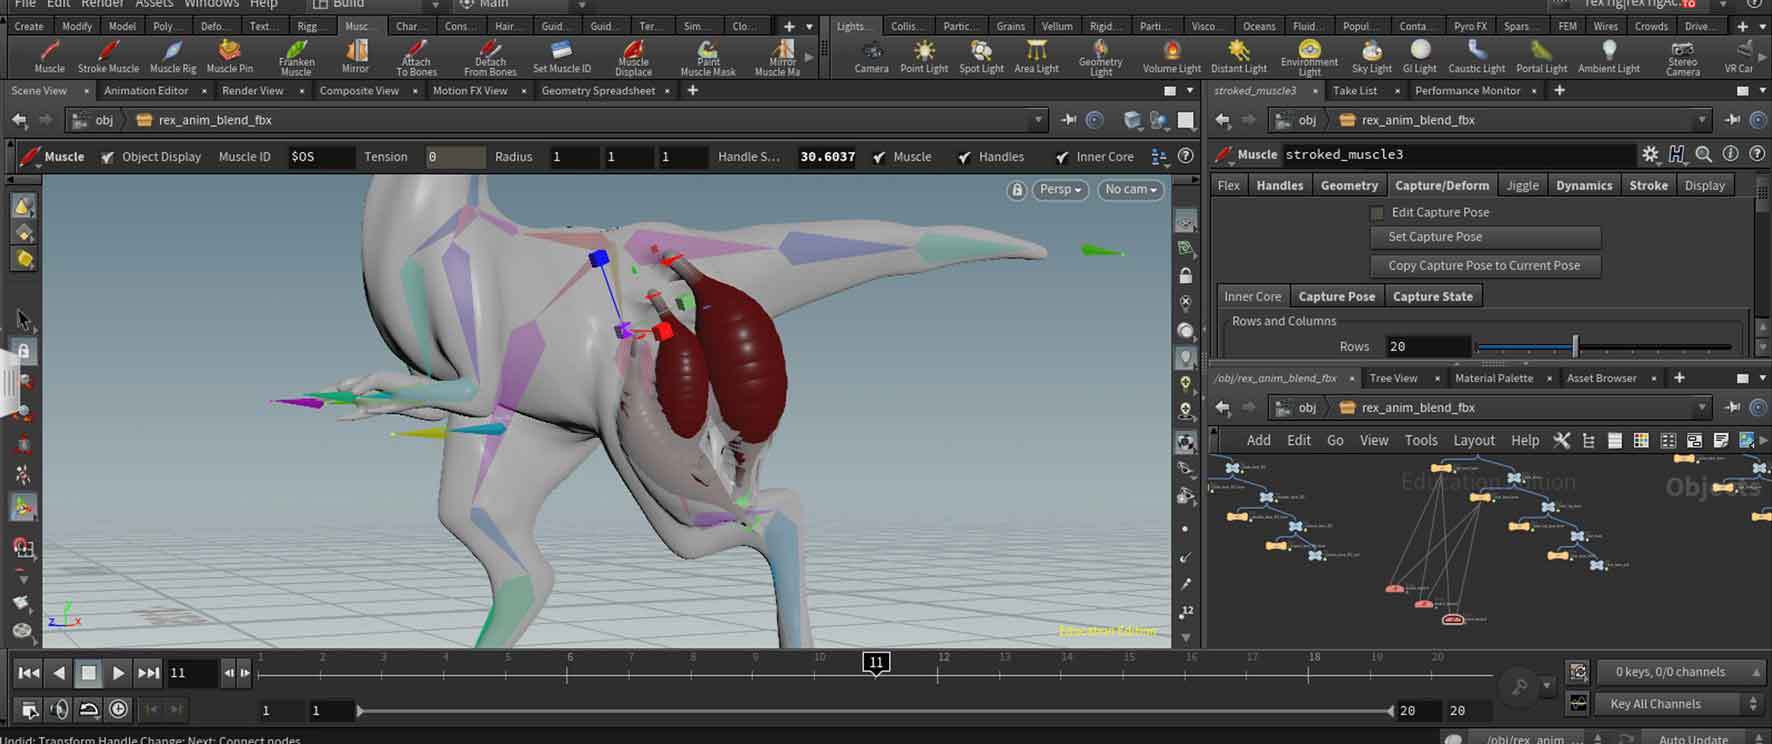
After this I decided to go though the settings again to see if I had missed something maybe, and I started playing with the tension slider, which allowed me to animate the tension of the muscles.
Here I have realised another mistake I made – When I was originally placing the muscles I didn’t pay attention to any anatomy, as I was just trying to figure out how all this works, this lead to weird outcomes it the form of muscles pushing through the ‘skin’ in places they shouldn’t have as well, in some cases, completely weird and incorrect movement, that I didn’t know why was wrong (but before I wasn’t focusing on that). Playing with tension made me realise as the tension makes the muscle straighten in the video above, I realised that muscles – in most cases – wouldn’t be curved that way without a proper reason related to their function and mechanics. Below I have marked the lines of two muscles (one working acceptably and one a bit problematic).
Another thing I thought could have caused the weirdness in the muscle movement could have been the fact that they are attached to two bones of the rig, and this rig, as shown below, wasn’t using a bone between the foot and tight. Which gave me another reason to decide to try another model.

My last try was to finish up following the tutorial to the end, and adding weights, I thought this could have caused the displacement not to work, but the paint weight tool was a mess, the brush should be a circle but it showed up stretched and distorted, the weights were appearing in places I didn’t even touch, and the tool was a nightmare to use as that stretched brush didn’t allow for any accuracy the tool is meant to have.
Also, painting weight didn’t do anything, places not painted were not exploding, that’s true, but the places painted (even with a value less that 1) still did their thing at which point I gave up on this model.

With the new model I will be skipping the steps described in detail with the first model I used, I went through them more or less all of them again, to get to the displacement stage.
Model and animation credits: “Stygimoloch” (https://skfb.ly/6X8B6) by DailyArt is licensed under Creative Commons Attribution-NonCommercial (http://creativecommons.org/licenses/by-nc/4.0/).
Up to the displacement everything was working like a dream, I even didn’t have the jump issue in the muscle animation which assures me that it wasn’t something I did but the issue with that previous model or animation.
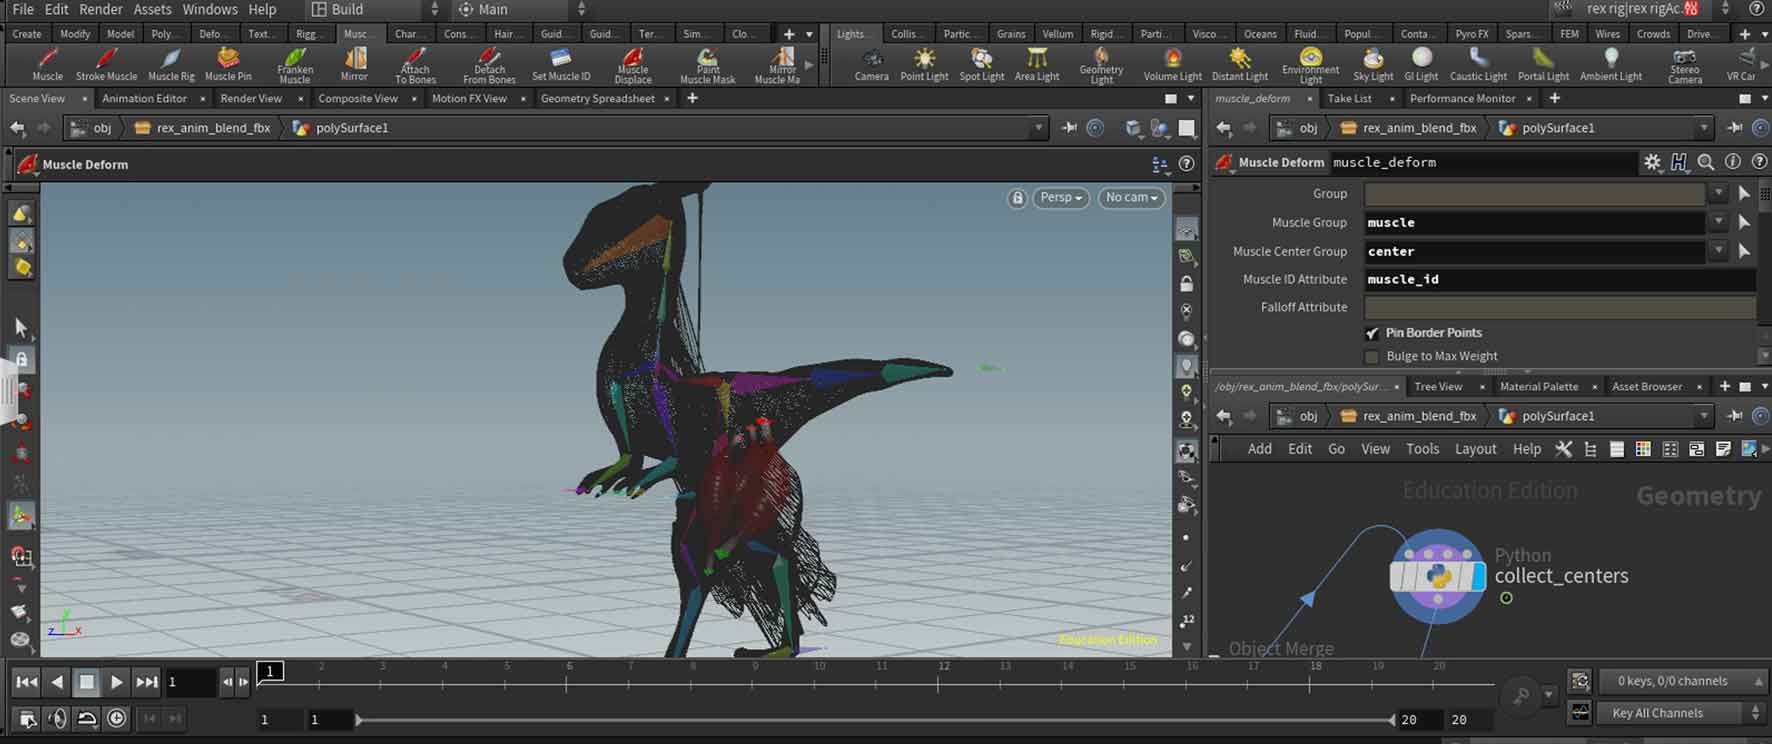
Here however, the stairs started…. The displacement didn’t do anything to the model (on default settings), so I looked into the setting and changed a bunch of them to see what will happen…. completely nothing!!!
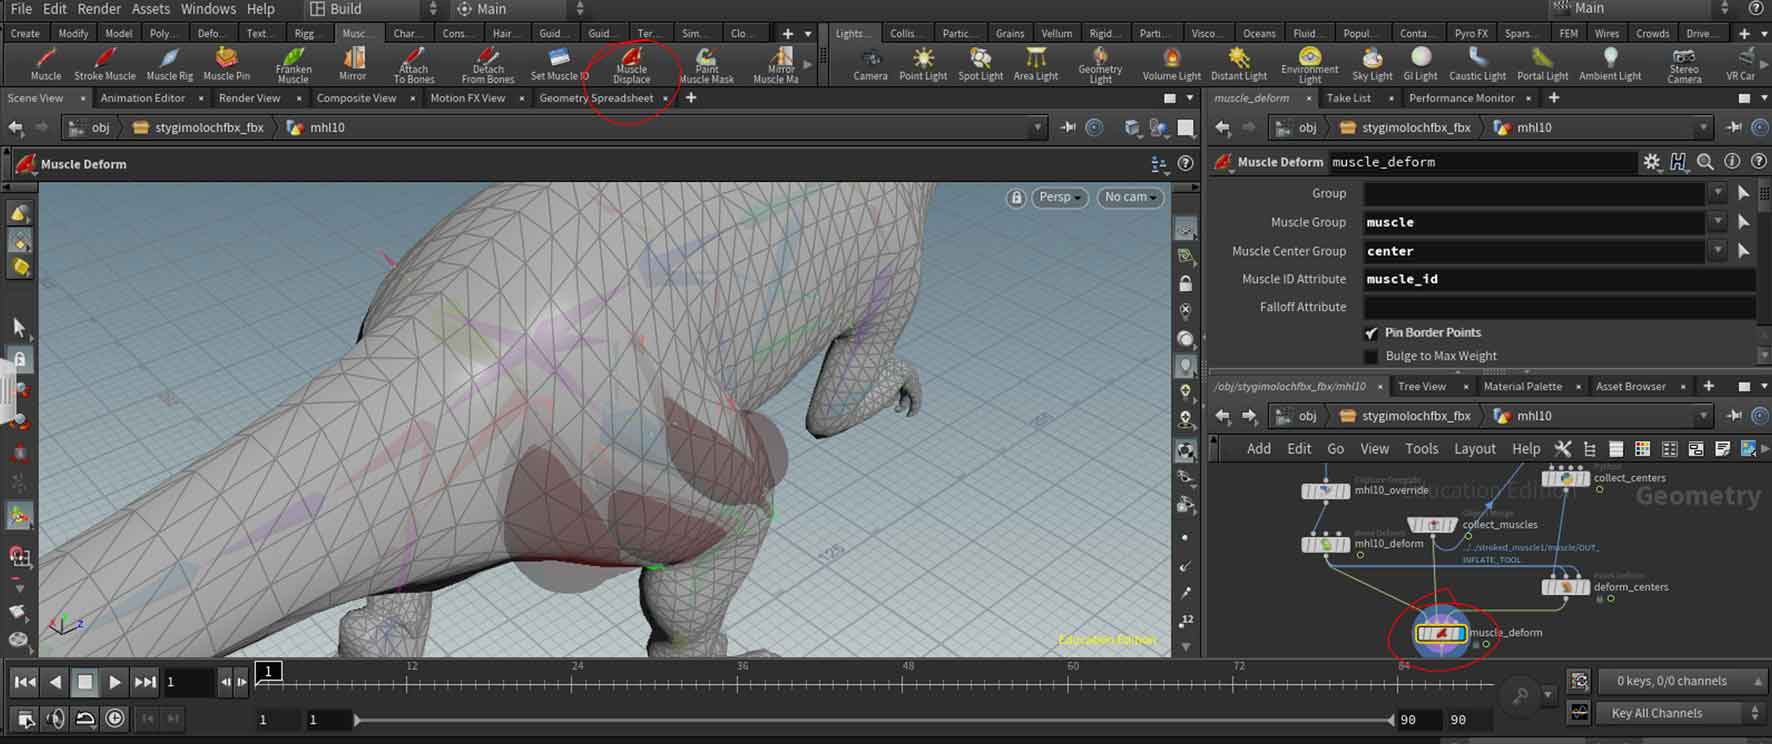
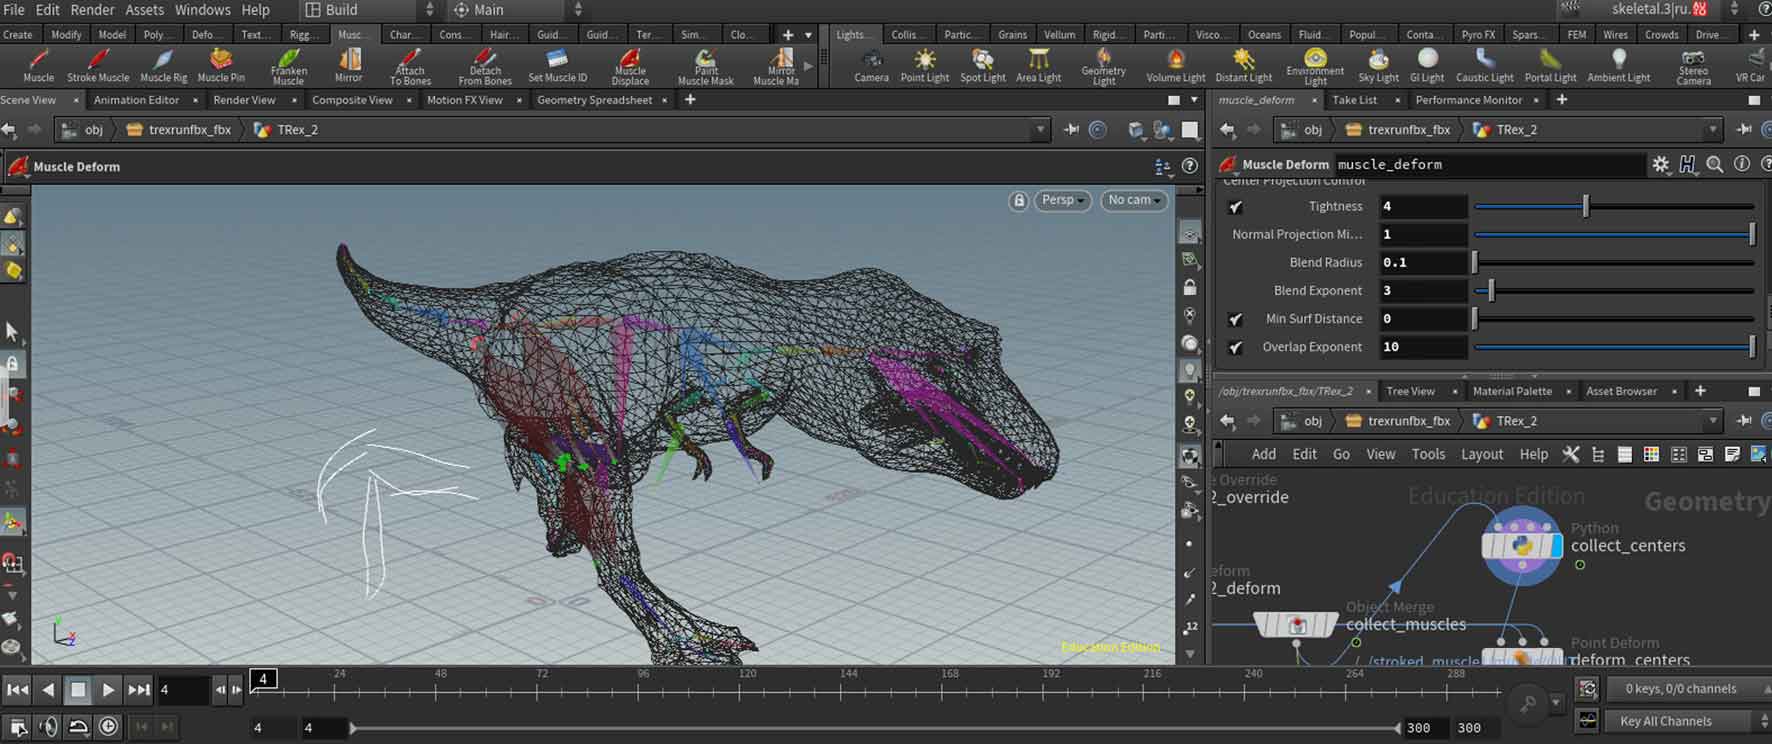
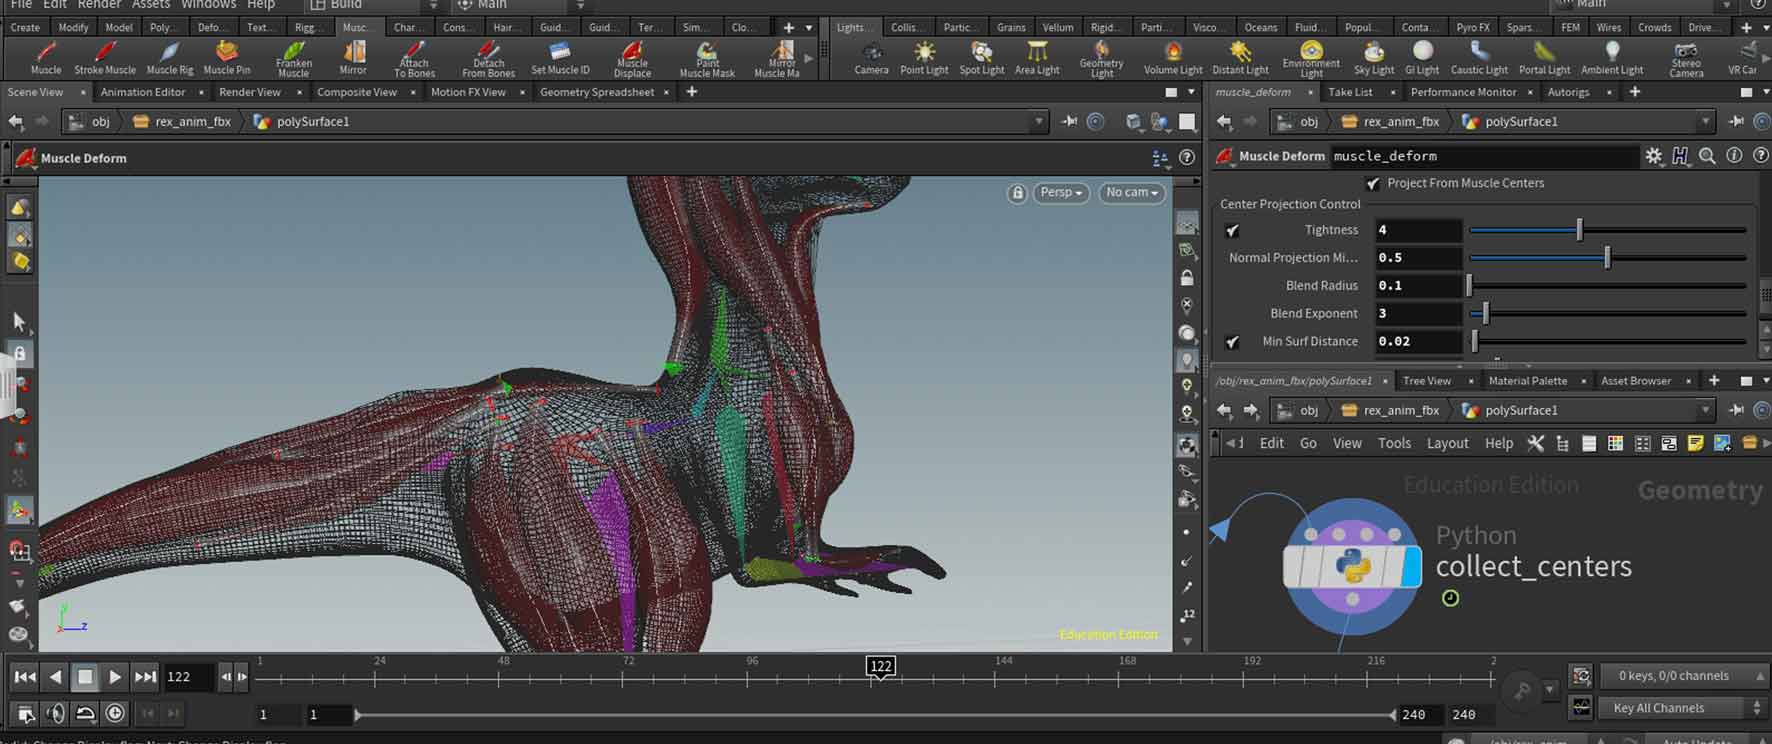
At this moment I decided to go through each node in the script separately to see if something pops out to me. When I had a look at the ‘collect centres’ (the white lines on the picture below) part of the script, I saw that the centres are nowhere near where the should have bean… – meaning the centre of the muscles. So I thought this was the issue, especially that I have learned previously that they should be on the inside of the mesh for the displacement to work correctly. I tried to reposition them by had, but this again had not changed anything in the overall behaviour of the script.
Here, pretty desperate by now after a complete disaster of two different models, I decided to revisit the way I imported the models into Houdini… Again… no matter what I did – no change.
This time I saw nothing else I could try and I was running out of time so I decided to try another model, without trying to salvage this one (even though it was my favourite out out of the four).
Model and animation credits: “Tyrannosaurus Rex” (https://skfb.ly/6X89s) by DailyArt is licensed under Creative Commons Attribution-NonCommercial (http://creativecommons.org/licenses/by-nc/4.0/).
Again, I went through the muscle creation stage, I attached them, checked if they followed and added a basic jiggle (the jiggle seemed more subtle than usually but ignored it and hoped that it would still work). When it came to the displacement, it didn’t work again, at which stage I just quickly checked the centres and gave up on it…
Here I started thinking that it was me doing something wrong (even though at the beginning I checked like ten times if I was following the tutorial correctly, and I was) or that there was something Houdini didn’t like about the models, as one thing that was all the same for them was that hey were all from the internet, as well as they were all triangulated (but this I knew was ok because I worked with triangulated mesh in Houdini before, and I saw others do so too), so I finally decided to go with my original model from the past, and just see if I get the same results.
The below video was the result of adjusting many settings on the muscle deform node, and was the best result I had managed with this model.
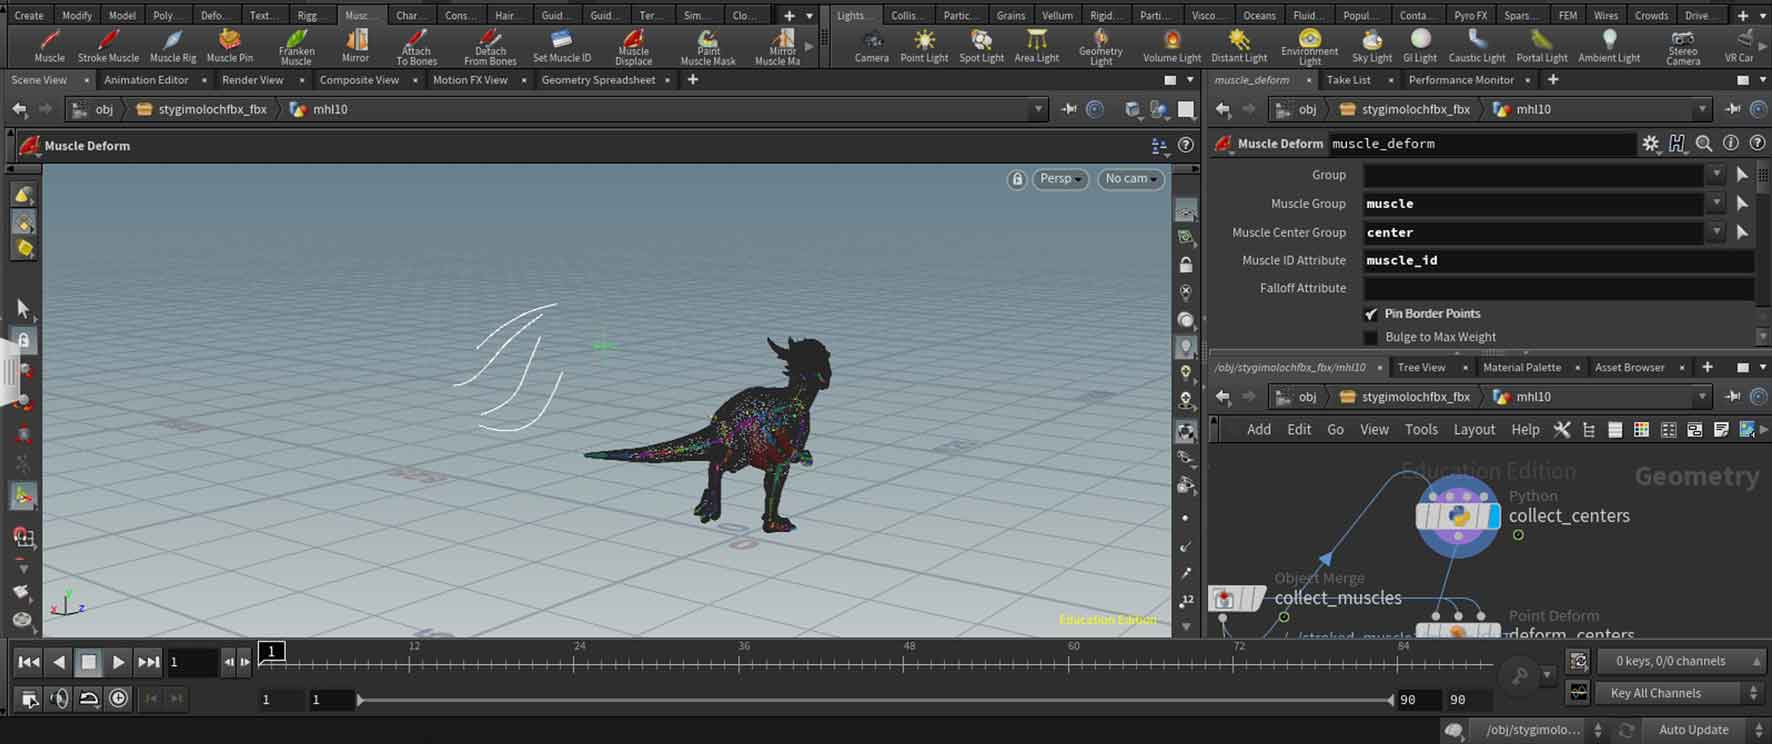
Below, the centres of muscles, certainly not being centres of muscles as they are nowhere near the centre…
At this stage I went through 3 different models each reacting completely differently to the default settings which was frustrating to say the least.
What comes after this paragraph was dome after I tried Ziva again, but instead keeping it chronological and jumping there and back I decided to keep the rest of Houdini all together, but to keep it clear I wanted to explain that the following, happened after I managed to get Ziva working again.
I was saving this model for last, as I was thinking that if I have enough time to rig and animate it, it would be awesome to work with it, but I thought that some practice beforehand would be good.
I started by rigging it in Maya, as I planned on animating it, but at this stage I was desperately running out of time, so I skipped the weight painting process, and tried to do a couple of basic poses and transition with whatever the rig would allow, but it was so bad that it wasn’t possible without painting the weights.
Then I decided to check if it was working at all, as I didn’t want to spend days trying to rig and animated a model that would simply not work, I had four of those already.
I uploaded it without the rig, as I forgot that for the muscle system the rig is essential, and I tried to quickly make one in Houdini.
I made the muscles… and I crashed without saving it, because it was meant as a five minute test.

So I started over, and since I quite enjoy making the muscles I kinda went overboard (for a five minute displacement test). This time however, I imported the model with the Maya rig, since It was done already and needed.
Not very hopeful at this point I added the displacement…and it worked like a charm this time, exactly like on the tutorials (except the final thing displaying mesh as well as muscles and rig, instead of just showing the displaced geometry but I believe that this is a visibility or display thing, which I’m still learning).
I left the other side as a reference as to how much it changed.
Since I was suspecting the issue with the other displacement may be partially the weird placement of their muscle centres, I quickly checked this model for that too, and the centres were perfect. I have no idea what could have caused the other three models muscle centres to be offset the way they were, except of maybe a glitch or bug caused by the issue the software had with the models themselves, I also dont know what that could have been, except of maybe not being watertight, because I know that two of them definitely weren’t, and I’m 70% sure the last one also wasn’t. I am also completely sure that my model – Rex – was definitely watertight.
Not watertight models quite often cause issues and since displacement literally changes the surface of the mesh, it could have possibly caused that weird behaviour we saw before. That’s the only possible explanation I see at this moment, especially that I’m sure Houdini is ok with triangles (but I can actually quickly check that, so I will do that).
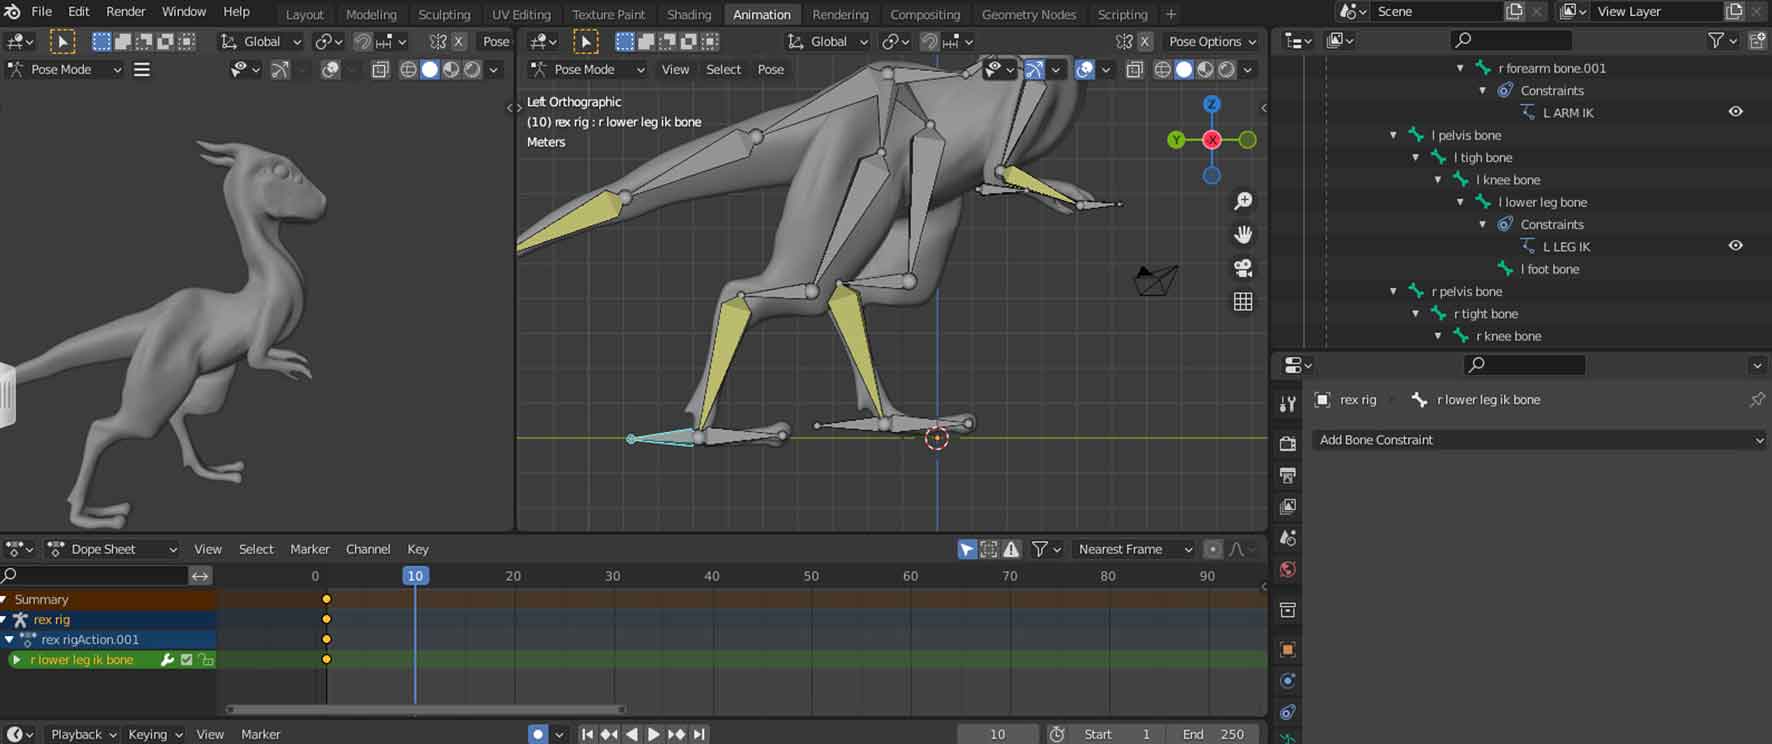
Since this was the only model that worked, I decided to finish rigging it and try to do a basic animation, to see the whole thing together (the muscles in animation).
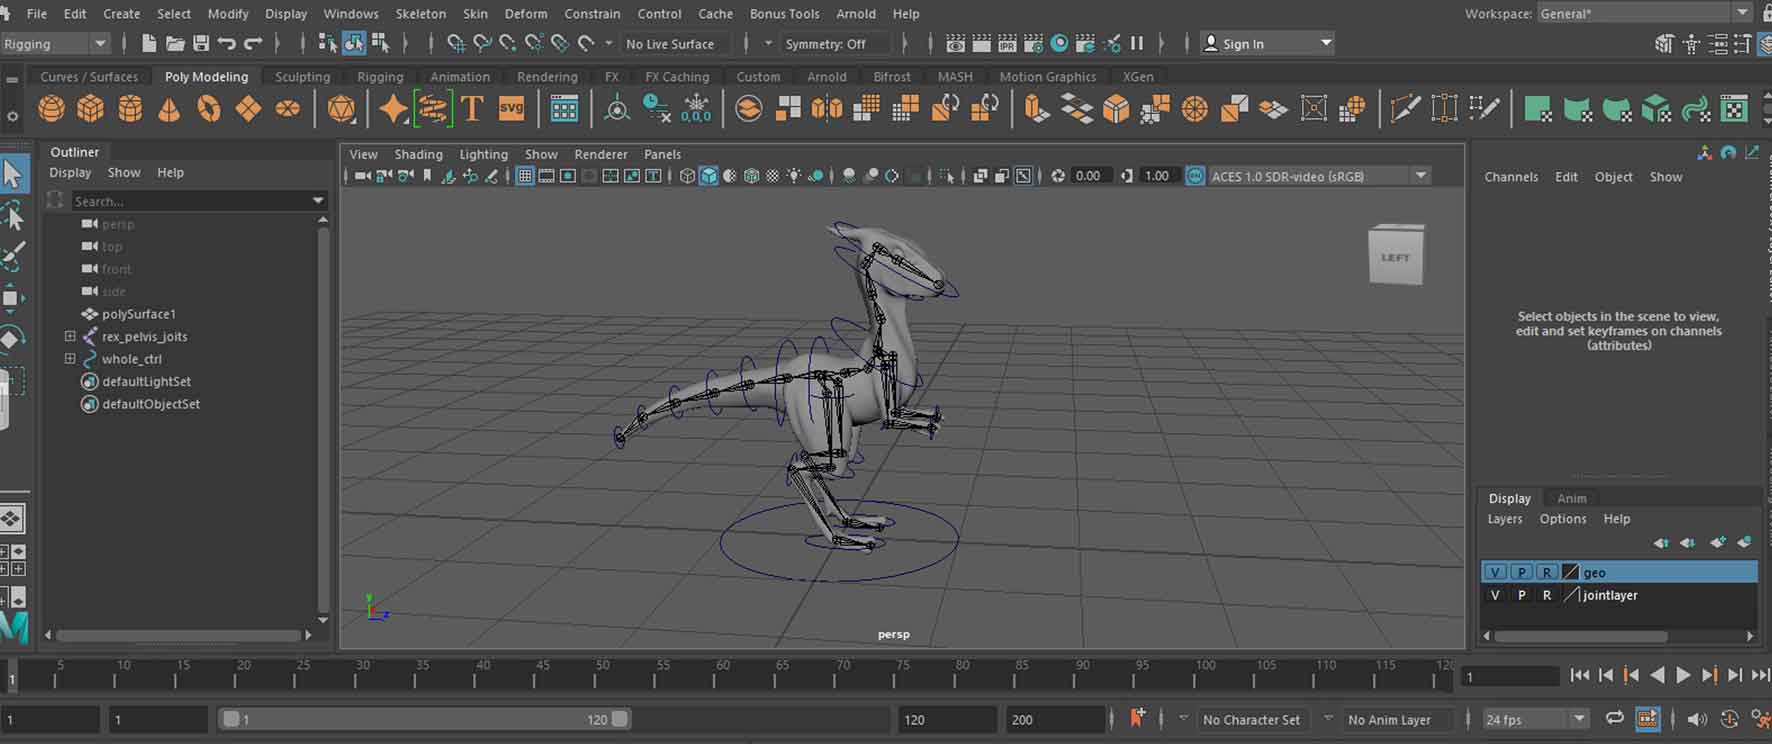
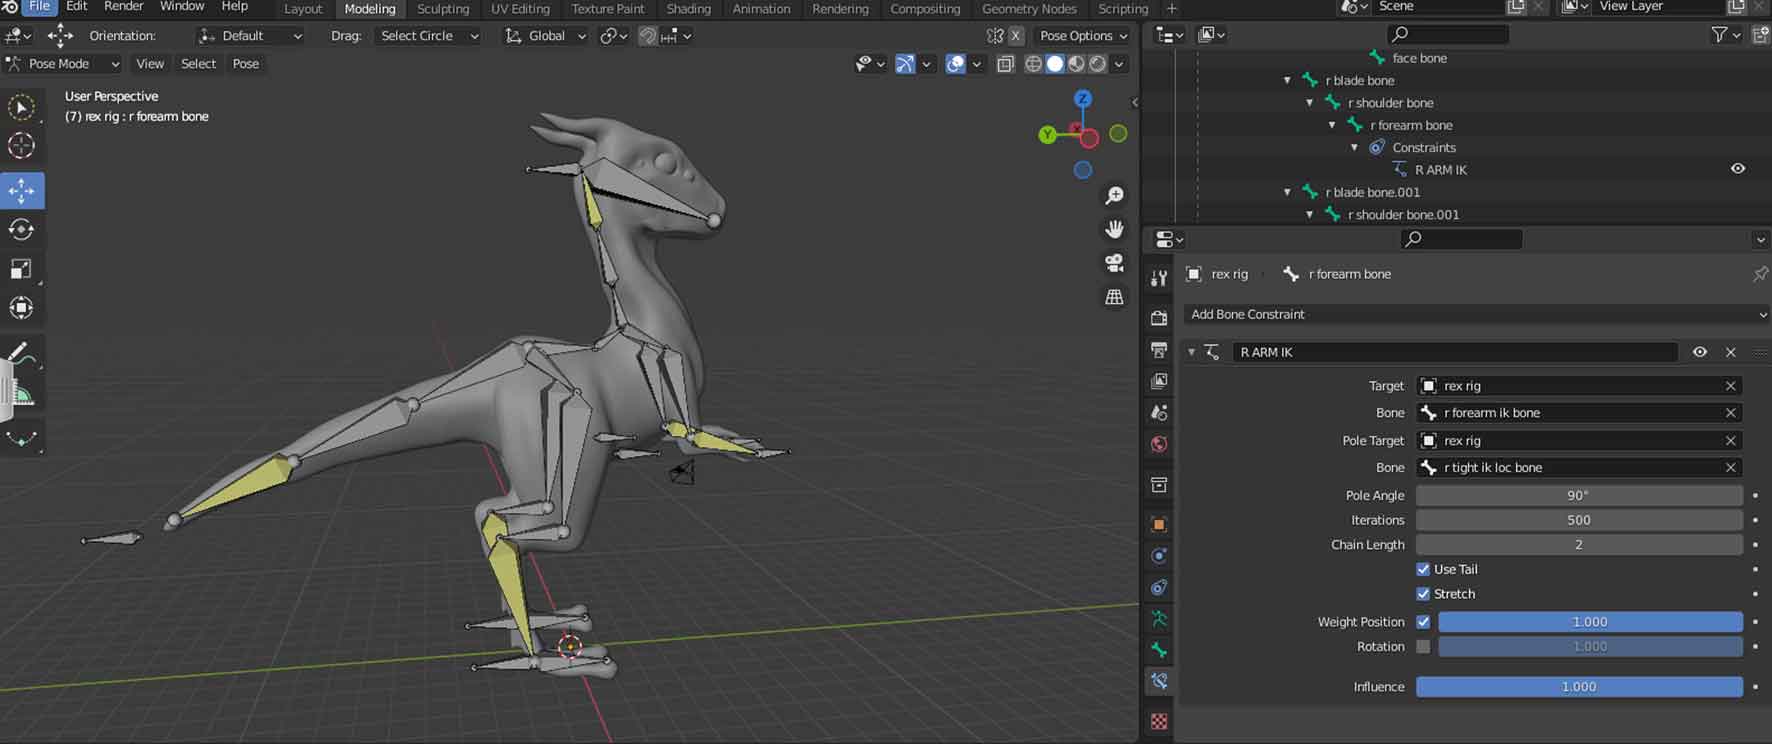
I know I am terrible in rigging and animating in Maya, and I heard that this process is a bit easier in blender, so I decided it was time to learn another software and try my hand at rigging and animation in blender.
Below a quick armature with inverse kinematics (yellow bones) and their respective handles. I skipped the step of creating controllers as it was meant for a quick trial, and if it worked I could have always came back and improved the rig and animation.
Below the animation (still quite bad and very quick but way better than I could ever achieve in Maya).
After finishing the animation (simple bouncy walk cycle), I went on to export it as a FBX and import it into Houdini, to double check the muscles work before I spend time improving the animation, aaand as you can see below, I got the usual issue with the displacement as soon as I made muscles, attached them and applied displacement.
A quick check of the centres of the muscles (as I noticed they were either missing or offset in all the other models except of my not animated original model in the previous section), and sure enough, they were missing, again.
After playing with settings I managed to get it slightly closer to what it was supposed to be, but the bottom line is that it is not working correctly, again.
Below a screenshot from above as I noticed that the displacement is affecting areas that it shouldn’t, so I decided to try to paint weights.
After trying to animate my model, I realised it is not the case of wrong topology type or the model not being watertight, as I had used the exactly same model that was working without animation (I tried that model again to make sure it wasn’t just a weird hiccup of the software, and it was working perfectly again.). The displacement works in general, as it follows the bones during the animation and the displacement changes the mesh according to its position the way it is supposed to, but as of now, I have no other ideas as to why the displacement breaks the model. One thing that I will have to double check is the normal directions of the model, but animation should not have affected those, so there if this was the case, there shouldn’t have been any difference between the animated and static model.
On a side note, I know nobody who worked with CFX before and could help me with this as well as I spent hours researching this issue, and I could find nothing.
The last thing I will be trying is rigging and animating in Houdini, in case there is something that blender changes that I don’t know about (since it was literally my first time using it), alternatively, back to Ziva Dynamics it is…
Back to Ziva
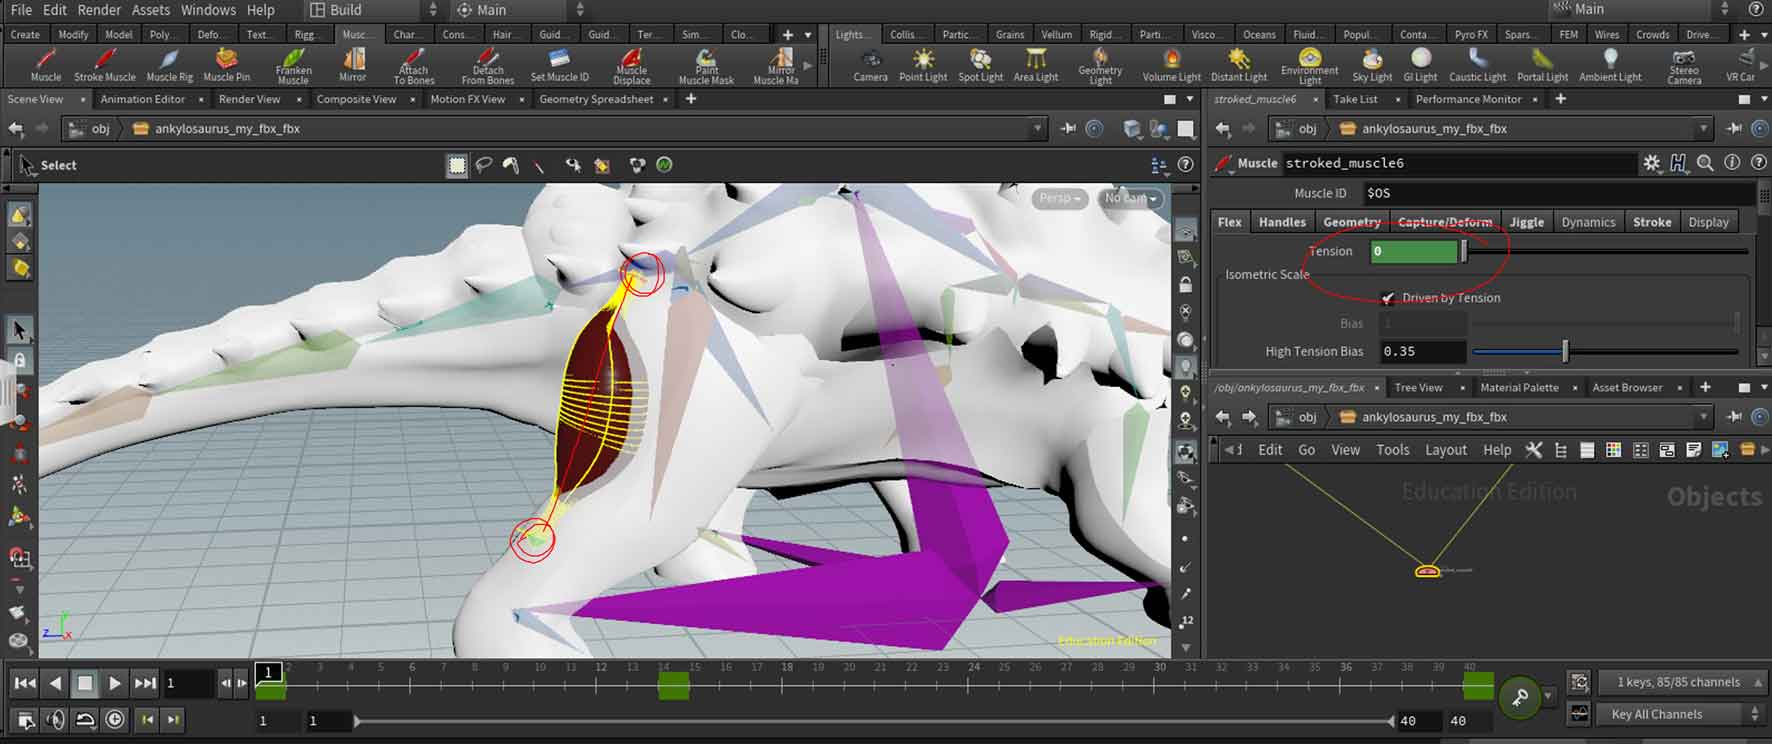
After finally giving up the fight with Houdini, I tried installing the Ziva license again, and I had no luck, until I found a student license by accident, I got that license and tried again. This time it worked, so I started exploring Ziva again, picking up from where I left off.
Model and animation credits: “Animated Skeleton Casts Spell with Hands” (https://skfb.ly/otsHS) by LasquetiSpice is licensed under Creative Commons Attribution (http://creativecommons.org/licenses/by/4.0/).
I begun by making a quick cylinder and a stretched sphere (as in my previous test) to check if there is any chance that this license will work with default settings…. and it did, not perfectly but it did automatically add the secondary motion to the tissue object I created for this test!
Here I opened the old file again, with the intent to continue the work, (the muscles sculpt took me hours on its own), but… in this file there was no change what so ever…the dynamics still didn’t work, so at this point (after adventure in Houdini with three models) I gave up on fighting with it and I got a new model and started a new scene.
After getting Ziva to work again, I decided to do a space holder quick models, instead of sculpting for hours just to find out it isn’t working again. Above is a default result shown on a space holder and a new animation.
As visible above, after doing everything exactly the same way as before, all works perfectly the way it was shown on the tutorials, and perfectly the way I have been trying to achieve over the last month or so…
Frustrating… but finally
I got kinda excited, and wanted to play around, as well as I wanted to check the way it droops and jiggles on each side of the bone, as the placement of the first one was a bit unfortunate as It doesn’t move at all after the initial step, this is mainly caused by a bad choice of animation, but it was one that I could find and afford lol, also even though is not very impressive or exciting (considering the muscle movement), in a professional environment this still would require muscles and tech animation so it was ok either way.